

May 24
In postprocessing, there are two broad types of edits: global edits and local or selective ones. The first will affect your entire image, whereas the second works on just a part, a selection of it.
One of the top features of Luminar is that some of its tools are powered by AI, which can make those complex selections – sometimes referred to as masks – automatically by analyzing the image's content. The Face Light technology in the AI Portrait Enhancer tool is an excellent example of that. It recognizes faces in a picture and selectively brightens them without any user input other than dragging an Amount slider.
Luminar creates the necessary selections 'under the hood.' But the app also has no less than four other ways to make selections: the Brush, Radial Mask, Graduated Mask, and Luminosity Mask. The first three require you to create a mask manually, but the last uses the brightness levels of the image itself as the basis for a selection. It's a very versatile selection tool that is especially handy in landscape photography. In this article, we'll give you two examples of what you can do with Luminosity masks.

A typical landscape problem: the sky is too bright and the foreground too dark.
Determining the problem
Take this canyon image that I photographed years ago while on a cycling trip through Turkey. Like many landscape images, it suffers from the problem that the sky is much brighter than the foreground. Yet when I look at the histogram, I see that there's still detail in the sky. It's not blown out. I just need to find a way to selectively reveal that detail without making the rest of the image too dark. What I want is to make a darkening adjustment and then create a mask that limits the adjustment's effect to only the sky.

The transition between sky and foreground is too irregular and precise for the Brush tool.
The right tool for the job
When I want to make a local edit like that, I think of the four masking tools I have at my disposal and decide which one could be the best tool for the job. The Graduated Mask won't work because of the V-shaped canyon. For the same reason, the Radial Mask is out, too: the transition between the sky and foreground isn't elliptical enough for this tool to make a good mask. So, we're down to two candidates: the Brush and the Luminosity mask. While the first could work, it's going to be very difficult to manually mask out the sky and only the sky. It would be great if we could have a starting point to work with. And that's precisely what the Luminosity mask gives us.
What's a Luminosity mask?
A Luminosity mask is a mask or a selection that is built from the image's brightness levels. It's often used with Adjustment Layers, and that's precisely how we're going to use it here, too. Wherever the mask is white, it will let the effect of the Adjustment Layer show. The darker the mask gets, the less of the edit will show. Now imagine a desaturated version of our image: the sky would be almost white, the trees would be almost black, and the rocks would be dark grey. Almost what we need!
 Creating a new blank Adjustment Layer
Step 1: Create a blank adjustment layer
Although many of Luminar's tools let you create a tool-specific mask (which can be a Luminosity mask),for this example, I'm going to make an Adjustment Layer as I might have to combine several tools to bring out detail in the sky. I don't want to have to mask each one. In the Layers tool, I'll click on the plus icon and choose Add New Adjustment Layer, but I won't dial in the adjustments just yet.
 To create a Luminosity Mask, click on Edit Mask and choose Luminosity from the dropdown list
Step 2: Create the Luminosity mask
It's a good idea to create the Luminosity mask before editing the Adjustment Layer to darken the image. The reason is that the Luminosity mask takes into account all your edits, including Adjustment Layers. So any attempt at darkening the sky before creating the Luminosity mask will make the mask less effective. As explained in the previous paragraph, the mask is just a greyscale version of the image, so I want the sky to be as bright as possible before I create the mask. Adding the mask to the Adjustment Layer is as simple as clicking Edit Mask and selecting Luminosity Mask from the dropdown list.
 After you've added the Luminosity Mask, you can start to tweak the Adjustment Layer to darken the sky.
Step 3: Editing the adjustment layer
Because the Adjustment Layer has no edits yet, adding the mask caused no visual change other than creating a tiny mask thumbnail next to the Adjustment Layer's icon. Now, it's time to start tweaking the Adjustment Layer. I combined a variety of tools to reveal more detail in the sky. In the Light Tool, I used a combination of negative Exposure, positive Smart Contrast, negative Highlights, and positive Shadows. I also added the AI Enhance and AI Structure tools to the mix. The exact settings are not relevant, as they will vary from image to image. Thanks to the Luminosity Mask, the global darkening effect of the Adjustment Layer is mainly targeted at the sky area and much less in the foreground.
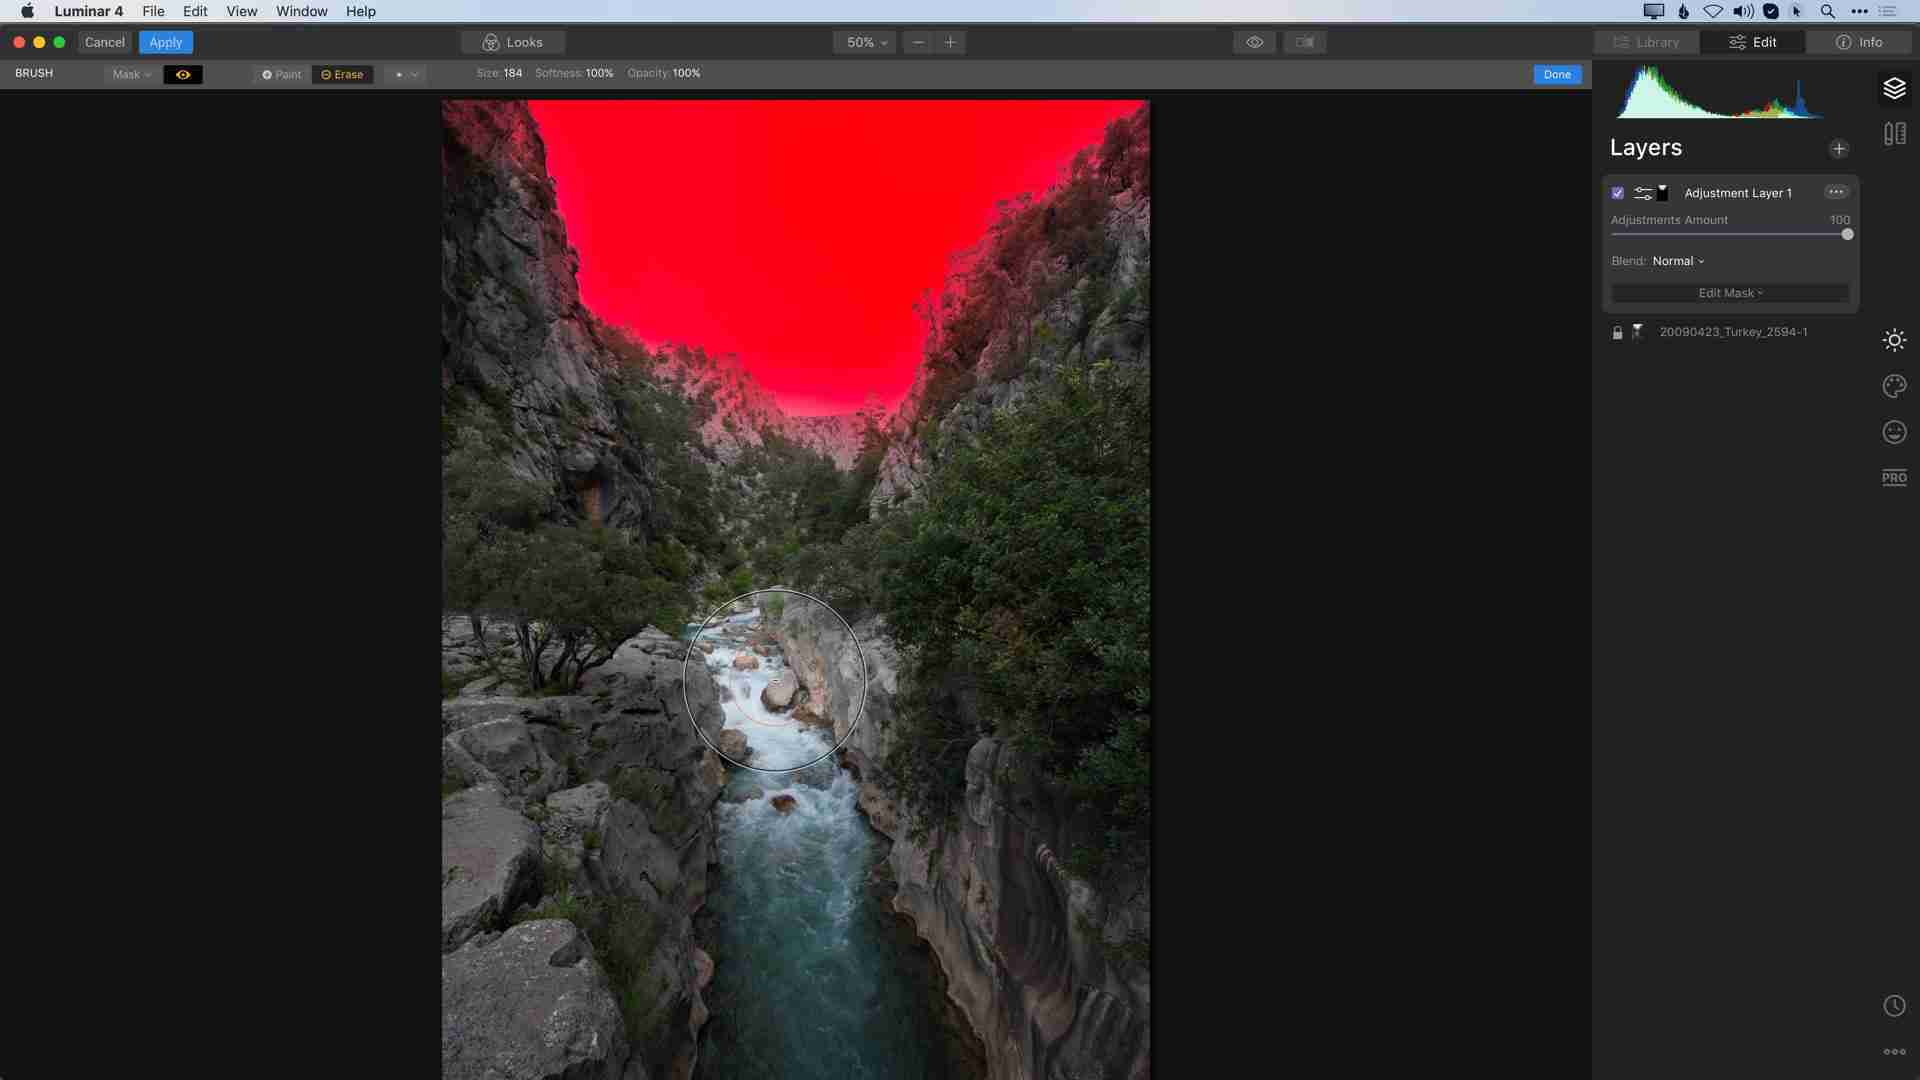
 Wherever the overlay is red, the edits of the adjustment layer will be visible—the more intense the red, the more pronounced the effect
Step 4: Optional inspecting of the Mask
Luminosity Masks don't have to be perfect. They just have to make your edit look perfect. Most of the time, you won't even have to inspect or modify the mask, but as this is a tutorial, I'll do both so that you know how to in case you ever should. In Luminar, you can display the Brush, Radial Masks, and Graduated Mask as a red overlay: the more intense the red, the more 'selected' an area is (in other words, the whiter it is in the mask). You cannot do that for the Luminosity mask, but the trick is to switch to the Brush tool after you've created the Luminosity mask and then click on the Show Mask option in the Mask dropdown in the upper left corner of the Brush toolbar.
 Painting with the Brush set to Erase over the foreground, allowed me to focus the Adjustment Layer's effect only on the sky
Step 5: Optional tweaking of the mask
The example above shows that the sky shows up as a deep, saturated red, the trees hardly have any red overlay on them, and the rocks show some red. So, that means that some of the adjustment also affects the rocks. If that's a problem, you can set the Brush to Erase, and then paint over those areas to remove them from the Mask. Just make sure to steer clear from the edge where the sky meets the top of the canyon. In the same way, you could use the Brush set to Paint and paint over areas where the sky isn't entirely red to include them entirely in the mask. The result is an almost-perfect mask that you achieved in no time compared to having to paint it from scratch manually.
 The before and after of this sky edit: we achieved a lot more detail in the sky without having to make a detailed selection and without affecting the foreground
Using a Luminance mask for exposure blending
In this example, I worked with one image. But, what if you made a bracketed series of exposures? In that case, you could use a Luminance mask to add in the sky from an underexposed image. Instead of adding an Adjustment Layer, you'd simply add an Image Layer.
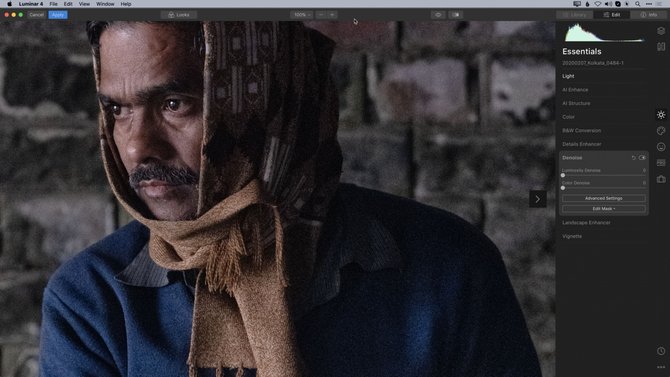
It was pitch black in this hallway, where I photographed this vendor in Kolkata. Taken at 3.200 ISO, I still had to increase the Exposure by another two stops in Luminar and bring up the Shadows slider by a value of 50. Not surprisingly, this brought out noise, especially in the shadows. By adding the Denoise tool and using an inverted Luminance mask, I could limit the slight softening of the image that the Denoise tool caused, to the darker areas.
Using an inverted Luminance mask for advanced noise reduction
Now that we understand how Luminance masks work let's consider another example: noise reduction. You may know that noise predominantly lives in the shadows and that noise reduction will always soften your image, and the brighter parts don't need so much noise reduction. So, let's think this situation through: we have an adjustment, the effect of which we want to show in the shadows but hide in the highlights. That's precisely the opposite of a standard Luminance mask. Luckily, Luminar has a command that lets you invert a mask! The procedure goes like this:

Cranking up Denoise sliders takes care of the noise in the shadows but also reduces some of the detail in the brighter areas like the face.
Adjust the Luminance and Color Denoise sliders in the Denoise tool (found in the Essentials section) to your liking. If you prefer, you can perform these adjustments on an Adjustment Layer, but as I've already demonstrated that in the previous example, I'll add a mask to the Denoise tool itself.
 In Luminar, any tool can have its own mask.
In the Edit Mask dropdown menu, choose Luminosity. Luminar will add a mask that removes the Denoise tool's effect in the brighter parts of the image. That's not what we want, so we'll fix that in the next step.
 The Luminosity mask makes the Denoise effect mostly visible in the brighter areas of the image. As we want the opposite, it suffices to click Invert in the dropdown list next to Mask in the Brush tool options.
Go into the Edit Mask dropdown menu again, but this time select the Brush. In the top left of the Brush toolbar, click on the Mask dropdown list, choose Invert, and watch how the Denoise effect now targets the shadows more than the brighter parts of the image. The result is an advanced noise reduction that's targeted more at the shadows where noise prevails, and the beauty is Luminar did the heavy lifting for you!


