Luminar User Guide
Luminar User Guide
Saving & Exporting Files
As you work with digital images, at some point you’ll reach a point where saving a file is a good idea. It might be an in-progress save to capture work to date as you edit a photo. Perhaps it’s to prepare a file for printing or sharing on the Internet. Or maybe an export to social media. Luminar offers many different options for saving and exporting images to meet your needs.
Saving a Native Luminar File for Future Edits
As you design using layers, filters, and masks… it’s a good idea to capture that work from time-to-time. To make this easy, Luminar offers a native file format, the Luminar project file (its file extension is .lmnr).
- To save your work in progress, press Ctrl+S on your keyboard or choose File > Save…. A new dialog opens.
- Choose a new location to store the saved file on your hard drive, an attached disk, or using a Cloud storage provider.
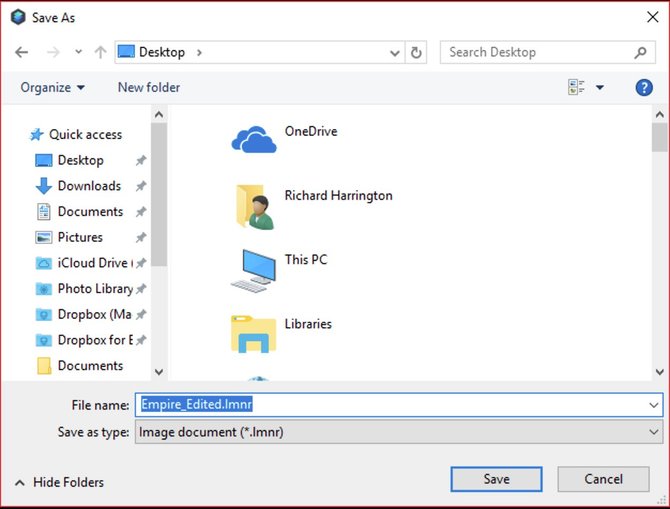
- Give the file a descriptive name and click the Save button to write to disk. Your work is saved in its current state so that you can later continue from the same point. The file is saved in the proprietary Luminar file format and cannot be opened with another application. For other software to use images created using Luminar, you’ll need to Export the file (see below)

Exporting Images
You may need to export multiple files for other tasks. Maybe its to post online, to drop into a presentation, or to collaborate with others. When you export a file, you can save in a variety of file formats including JPG, TIFF, and PNG.
Saving an Image File
You can also save image files from your Luminar project. These files are broadly compatible with many other applications. To create a new graphic file.
- It is first suggested that you save a native Luminar project first using the File > Save command.
- To create a new graphic file choose File > Export or click the Share image button in the upper right corner and choose Export to image…. A new dialog box opens.
- Choose a new location to store the saved file on your hard drive, an attached disk, or using a Cloud storage provider.
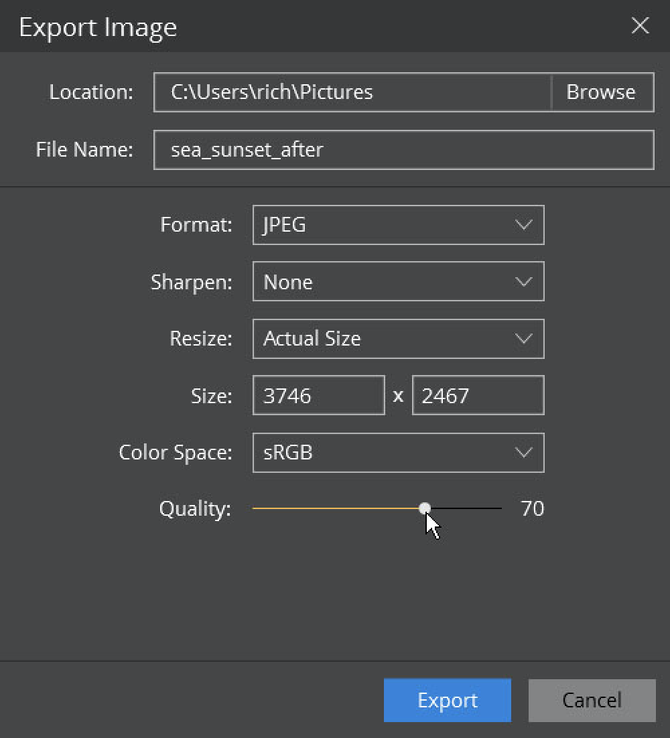
- Select from the following optional items:
- Format. Choose from eight different file formats. Some options like TIFF and JPEG may offer additional settings for control over compression and bit depth.
- Sharpen. Choose whether you want to Sharpen the exported file. This can increase details in the edges of the image and overcome some of the compression artifacts of formats like JPEG.
- Resize. You can choose to export at the original size, or to enter a new dimension for the image to fit its long side or short side.
- Quality. Some formats (like JPEG) allow you to assign a Quality setting which will affect overall compression and the final file size.
- Color Space. You can choose from 3 color spaces for output.
- sRGB is the narrowest color gamut, but most compatible with the web
- Adobe RGB is a common color space used in computer graphics and many software applications.
- ProPhoto RGB is the widest gamut and supports the broadest range of colors. ProPhoto RGB is the only color space that can contain all the colors captured in a raw format photo.
- Give the file a descriptive name and click the Save button to write to disk.

Supported File Formats
The following types of file can be created in Luminar.
- JPEG (.jpg). The Joint Photographic Experts Group (JPEG) format is most often used to display continuous-tone images (such as photos) on the Internet. Most digital cameras use JPEG because it provides excellent compression; the maximum setting provides comparable image quality to much larger file formats like TIFF. Occasionally, the print industry (especially newspapers) will use JPEGs. JPEG is a lossy compression, which means that some data is discarded during compression of the image. JPEGs should not be used as an archive or production file format. You should generally only save JPEG files once, because re-saving continues to discard data and lower image quality. If you have acquired an image as a JPEG in your camera, be sure to save the edited document as a native Luminar file.
- PNG (.png). The Portable Network Graphics format provides lossless compression. It is increasingly common on the Internet, as most web browsers support it. The PNG format was created to be a patent-free alternative to GIF. Its major advantage is the PNG-24 file, which allows for 24-bit images (8 bits per channel) and embedded transparency. It is technically superior to GIF.
- TIFF (.tif). The Tagged-Image File Format is one of the most common and flexible formats available. It is widely used to exchange files between applications and computer platforms, and has a long legacy of compatibility. Additionally, TIFF is one of the formats to work in a bit depth of 8 or 16 bits per channel.
- JPEG 2000 (.jp2). The JPEG 2000 format is an update released in the year 2000 from the Joint Photographic Experts Group committee. Its intent was to replace the original JPEG format. It uses a newer wavelet-based method of image compression which is more efficient.
- Photoshop (.psd). The Photoshop format is a common format used in the computer graphics industry. Skylum cannot write a layered file, but can export a file that can be opened by Adobe Photoshop and other software packages which support the format.
- PDF (.pdf). The Portable Document Format (PDF) is a file format invented by Adobe and was intended to be an extension of PostScript. A PDF can be viewed on virtually every operating system and portable media player or phone. The PDF is an open standard, which means that the computer industry is able to create applications that can read or write PDFs without paying Adobe additional fees. This openness led to the quick adoption of PDF, and it is utilized online extensively.
You may Also like
Have any questions?
Contact Us Help our product become better for you.
Take this survey for a chance to win an amazing prize!
Or learn more here