Luminar User Guide
Luminar User Guide
Using Filters
Filters are how you can adjust the exposure, color, contrast, and style of your image in
Luminar. The proper use of filters can significantly improve your image. Each filter
is designed to solve specific problems or enhance an image in a particular way. Be sure to click
the Info (i button) in the Filters Catalog to see helpful descriptions.
Applying a Filter
In order to adjust an image in Luminar, you’ll need to apply a filter. There are several ways to do this for an image. You can choose the workflow that fits your personal style.
- Click the Add Filter Button. At the bottom of the Filters area is the Add Filter button. You can also click the + button at the top of the Filters area. These both open a pop-up list of filters. Use the Categories at the top to sort the list or the Search box at the bottom to look for a specific effect. You can also over each name to see a description and sample image for each filter.
- Add an Adjustment Layer. In the Layers area you can click the + button at the top and choose to add an Adjustment Layer. Once added, the Effect list opens and you can apply a filter to its own layer. This makes it easy to adjust the Blending Mode and Opacity for the Adjustment Layer to refine the look of the filter. More on adjustment layers in the chapter “Working with Layers.”
- Disclosure triangle. Click this triangle to hide or show a filter’s controls.

- Filter name. Click the filters name to access a contextual menu of filter controls.

- Filter mask button. The filter mask lets you paint with a brush to control where a filter’s results are shown or hidden.

- Visibility icon. Click this icon to toggle the visibility for a filter’s results. This is a useful way to judge the effect a filter is having on your image.

At the bottom of each filter you’ll find:
- Reset filter button. This resets all of the controls of a filter to their default value. You can also double-click an individual slider to reset a single controller.

- Remove filter button. This removes the filter from the panel. You can re-add a filter by clicking the Add Filters button at the top of the side panel. If you want to temporarily disable a filter, just click its visibility icon (the eyeball).

Essential Filters
The essential filter are some of the most frequently used in Luminar. These filters perform core adjustments that are useful for most images.
Accent AI Filter
This filter automatically analyzes your image and instantly corrects it. Under the
hood, more than a dozen controls are in use. This effect tends to yield naturally
beautiful results with one simple slider. The Accent AI Filter can substitute for many
traditional controls like shadows, highlights, contrast, tone, saturation, exposure, details
and others.
Boost – Controls the overall amount of the filter effect applied to your image.
AI Sky Enhancer
The AI Sky Enhancer allows you to get beautiful skies almost instantly with artificial intelligence and a single slider. Luminar analyzes and detects the sky in an image to improve the texture, tone, and colors of the sky itself. The filter can recognize sky in most photos as well as distinguish between water and other elements in a photograph. It also detects the objects in the foreground and their edges for perfect masking.

As you move the slider, AI Sky Enhancer performs the necessary improvements, selectively adjusting brightness and contrast, saturation and vividness, alongside recovering the details and improving the textures of the sky and clouds. The AI Sky Enhancer is designed to work with most photographs of skies and works from blue hour in the morning to the blue hour in the evening. The filter is not designed to work with night skies.
Just like a professional photographer, AI Sky Enhancer treats different images differently. It applies a custom set of adjustments to a sky in a photo, depending on the look of that particular sky. This means that a blue sky will get a treatment far different from a grey sky, and a sunset sky will be enhanced differently from a mid-morning one.
- Amount – Controls the overall amount of the filter effect applied to your image.
Black & White Conversion
The B&W Conversion filter converts a color photo to black & white. It also
contains a number of controls to manipulate the monochrome look.
- Color Filter. Six Color Filters are available which act similar to glass filters that are placed in front of a camera lens. Neutral, red, orange, yellow, green and blue. Each Color Filter when applied will brighten that specific color and darken the opposite color on the color spectrum. For example: Red is often used to brighten skin tones and Blue to darken skies. Click the Edit button to redefine any default value.
- Luminance. Color sliders control the brightness of each relative color as it is converted from color to black and white.
- Saturation. Each Color slider will introduce the respective color that was present within the original color image back into the black and white image.
- Exposure. Controls the overall luminance value throughout the image. Adding exposure brightens the image while removing exposure darkens the image.
- Contrast. Controls the differences in the relationships of tonal values. Adding contrast increases the difference between the highlights, midtones, and shadows. Removing contrast decreases the difference between these tonal values, “flattening” these relationships.
- Highlights. Luminance control of the brighter values in the image, basically affecting the tones on the right side of the histogram independently from the darker values.
- Shadows. Luminance control of the darker values in the image, basically affects the tones on the left side of the histogram independently from the brighter values.
- Whites. Very specific luminance control over the brightest values within the image, really only affecting the tones that lie within the far right of the histogram.
- Blacks. Very specific luminance control over the darkest values within the image, really only affecting the tones that lie within the far left of the histogram.
- Clarity. Allows users to increase the contrast in the midtones introducing more depth between the relationships of values that lie in the middle of the histogram.
- Details. Increases image details globally or in highlights and shadows.


- Saturation. This slider adjusts the intensity of all colors in your photo.
- Vibrance. This slider adjusts only the intensity of muted colors, ignoring well-saturated colors. This is useful for finer control when adjusting color.
Structure
This tool allows adjusting of image detail and clarity. Using this tool you can get a classic HDR effect with great detail or get a smoother picture with less detail. This is the main tool to increase contrast of the image and visualize more details in the image.

- Amount. The strength of the effect. By moving the slider to the right, the amount of visible detail in the image increases. Moving the slider to the left will cause the image to lose detail and flatten. The “zero state” in the middle means that the amount is not applied by default.
- Softness. Controls the overall softness of structure and textures in the image. Moving the slider to the left will cause parts of the image to become less smooth and more unrealistic. This produces the so-called classic view of the HDR effect. Moving the slider to the right, on the contrary, the details become more global and the image is more realistic. This is very useful slider to adjust realistic details.
- Boost. Adjusts the overall display of details. When moving the slider to the left, the images will become more realistic and “calm." Moving the slider to the right will accentuate details and make the image more unrealistic.
Tone
The Tone effect is a precise way to adjust overall brightness and contrast. It helps to provide tonal balance and a unique signature style to your photos. Tone is one of the most important filters to give your photos the necessary look. This filter is similar to the Develop filter. However you may have only one instance of the Develop filter in a recipe, you can have multiple instances of Tone.

- Exposure. Adjusts the global luminance of the image. Moving this slider to the left results in a darker image (reduction of exposure value). Moving this slider to the right results in a brighter image (increase of exposure value).
- Contrast. Adjusts the contrast of the image. Contrast is the difference in luminance or color that makes an object in an image distinguishable from another. Practically speaking, contrast is determined by the difference in the color and brightness of an object in relation to other objects within the same field of view.
- Smart Tone. This slider adjusts the overall brightness of image properly. When moving to the right, the image is more vivid, but it does not work when bright areas become white, as in the ordinary exposure. And when you move the slider to the left, the image becomes darker but there are no completely black areas. This is a very powerful and balanced image brightness tool.
- Highlights. Adjusts the brightness of the brightest areas of the image. Moving the slider to the right cause very bright areas to become brighter, while moving the slider to the left, makes them darker.
- Shadows. Adjusts the brightness level of the darkest areas of the image. Moving the slider to the right will cause such areas to become brighter and additional details will appear. When moving to the left, such areas become darker, and the number of shadow areas in the image generally increases.
- Whites. Adjusts the white point of the histogram and white tones in the image. When moving to the right, the brightest tones will become brighter while the histogram stretches to the right. Moving the slider to the left will cause white tones in the image to become darker and the histogram to compress to the left.
- Blacks. Sets the black point of the histogram or black tones in the image. Moving the slider to the right, black tones become brighter and the histogram compresses to the right. Moving the slider to the left, black become darker and the histogram stretches to the left.

- Amount. Strengthens the darkening around the edges of photos. In position 0, the effect is not applied. Move the slider to the left side of the picture to give more shading to the edges, while moving the slider to right will brighten the edges.
- Size. Size of the obscured area. Moving the slider to the left will increase the area of darkening. Moving the slider to the right will reduce the area of darkening.
- Roundness. This slider changes the shape of the shaded area.
- Feather. This slider sets the smoothness of the transition between the area of shading.
- Inner Brightness. This slider increases the brightness in the central region which is not affected by shading. It allows you to create a contrast effect.
Note
This tool allows you to highlight key points in the photo, making it more interesting. A slight edges shading always provokes the viewer's eye to consider the lighter central part of the photo. For a realistic picture, don’t lower the Amount below -50. As a rule, this effect is used only with darker shading. Highlights are rarely used except for some vintage looks.

- Amount. Controls the amount of clarity added to the image.

- Amount. Move this slider to the right to help cut though fog and haze.

- Luminosity. Removes grayscale noise from an image.
- Color. Removes color noise from an image.
- Boost. Increases how aggressive the Denoise filter is.

- Small Details. Small sets sharpness of fine details. At 0, the effect is not applied. Moving the slider to the right will intensify the clarity of small details, while moving to the left, on the contrary, will somewhat wash out the fine details.
- Medium Details. This option sets medium-sized parts sharpness. At 0, the effect is not applied. Moving the slider to the right increases the sharpness, while moving the slider to the left decreases it.
- Large Details. Use this choice to set sharpness of global contours of objects in the image. At 0, the effect is not applied. Moving the slider to the right increases the sharpness, while moving to the left decreases it.
- Highlight Protection. To ensure that the brighter areas of the image aren’t over-processed use the Highlight Protection slider.
- Masking. Try the Masking slider to control the zone of detail amplification. When moving the slider to the left, the number of zones increases and the image becomes more detailed. When moving to the right, the number of granularity zones is reduced. Optimal masking comes from a setting in the range from 30 to 70.
Foliage Enhancer
Enhances the colors of foliage and greenery automatically, making them more vivid and natural. A good choice for nature and lush landscape images.

- Hue. Modifies the hue of the affected foliage. Useful to dial in the right amount of green.
- Amount. This controls how strong the adjustment is for the image.
Polarizing Filter
On a camera, a polarizing filter can provide more color depth and cuts atmospheric haze, resulting in richer, bluer skies. The same holds true with the Polarizing Filter in Luminar. The effect will produce deeper blue skies and more contrast in clouds. With a light touch of this filter, almost any landscape image can be improved.


- Method. There are three methods to choose from. Two are automatic that attempt to determine color cast. The other lets you manually adjust the Hue.
- Amount. This slider is the amount of correction.
- Color. Adds color back to the image that cab be used to correct color cast. If overdone, a new cast is added.

- Amount. Effect of the micro sharpness applied to the image.
- Radius. Distance away from contrast edges that the effect is applied.
- Masking. The dynamic masking feature allows you to reveal details only in appropriate areas and can help you define the sharpness in your image.

- Vividness. Useful for creating rich color in a photo.
- Warmth. This controls the color temperature in the image. It can be used to stylize an image or correct a color balance issue.
Сross Processing
Reproduces a color cross-processing effect once commonly used in developing film to create unnatural color and interesting contrast shifts.

- Type. Using the drop down list to choose a color palette preset inspired by various international cities.
- Amount. Drag the amount slider to affect how strong the cross processing effect is.
Dramatic
The Dramatic filter is a creative filter that lowers saturation and increases contrast, helping to achieve a gritty cinematic look in your photos, similar to the darkroom technique “Bleach Bypass.” It is often used in stylized fashion shoots, urban images, or grungy athletic portraits.

- Amount. The Amount slider controls the total intensity of the added effect.
- Contrast. Controls the differences in the relationships of tonal values. Adding contrast increases the difference between the highlights, midtones, and shadows.
- Local Contrast. Adds a more targeted contrast adjustment to the finer details of the image.
- Brightness. Darkens or lightens details in the image. Often useful for bringing out details in areas like skies.
- Saturation. Controls whether colors become washed out or more saturated.
Fog
Allows you to add a strong softening or blurring effect to part of your photo, simulating the high humidity weather phenomenon commonly known as “Fog”. You can add Light Fog or Dark Fog to an image and adjust its intensity with the Amount slider.

- Fog Type. Choose from two different style of fog.
- Amount. Controls the amount of fog added.
Golden Hour
Use the Golden Hour filter to bring warmth, softness, and golden glow to all of your photos. Simply dial in the amount of warm toning using the Amount slider and use the Saturation slider to introduce an even more overall color vibrancy. Quickly emulate the magic that happens just after sunrise or just before sunset.

- Amount. This controls the amount of warm toning.
- Saturation. This controls the overall saturation of the Golden Hour filter.
Grain
Emulates the structure of analog film stock by introducing a random, stylized grain into your image. Keep in mind that grain and photo noise are different things. Use grain to give your color and black & white photos a cool analog feel.

- Amount. This controls how present the grain is.
- Size. This adjusts the size of the grain being added.
- Roughness. This affects the visual appearance of the grain.
High Key
Emulates the look of a high key lighting set-up where the main light source slightly overexposes the subject. This produces bright high contrast images. Often used in Fashion & Beauty photography.

- Amount. How much of the effect is added to the image.
- Glow. Controls the behavior of the brighter areas of a photo.
- Standard High Key. Affects the image in a global fashion.
- Dynamic High Key. Is more limited in its effect, taking skin tones into account as it applies the filter to the image.
- Saturation. Determines if the overall colors become washed-out or stay richly-saturated.
- Black. Maintains contrast in the darkest areas.
- Contrast. Impacts the overall contrast in the image (the relative difference between the lightest and darkest areas).
Hue Shift
This filter lets you roll the hue in a photo for subtle or dramatic changes. A little is perfect to eliminate unwanted color tints while a big adjustment is perfect for dramatic style.

- Hue. This slider controls the Hue of the overall image.
Image Radiance
This filter provides for an overall “dreamy” look to your image by softening image luminescence, and increasing contrast & saturation. It can create a dreamy, fantasy look for photos by increasing contrast and adding a creative glow, prioritized to the lighter areas of the image.

- Amount. The overall effect strength. For a moderate effect and a more realistic image, keep the values in the Amount to +40. If the Amount value is 0, then the effect is not applied. Move the slider to the right to increase Amount.
- Smoothness. This controls the softness of the effect.
- Brightness. Use this slider to control the brightness of the effect.
- Shadows. Adjusts the black point for the darker areas of the image.
- Saturation. A useful way to adjust the color saturation of the effect applied to the image.
- Warmth. Adjusts the hue of the effect towards the warm end of the scale.
Note
At a low setting, this effect will give the image more contrast and can increase color in the image. Use the Smart Colorize slider for better control.
Matte Look
This filter can give your photos an aged look with flat color and high contrast. This works well for both landscape and portraits to change the emotion of your image.

- Amount. The overall strength of the matte look effect.
- Fade. Controls the loss of detail that happens in the darker areas of the image.
- Contrast. This adjusts the relationship between the brighter and darker areas of the filter.
- Vividness. This control can be used to affect how richly saturated the effect is.
- ToningRange. Affects what portion of the image has its color shifted.
- Toning Hue. This sets the color that the image takes on.
- Toning Saturation. This controls how strong the toning effect is.
Orton Effect
The Orton Effect allows enhancements to an image that includes glow and focus which produces photos that are sharp and blurry at the same time. This is a great way to add a unique look to your photos.

- Type: They Type pop-up menu offers two choices. Type 1 increases the Saturation of the image while Type 2 is a softer glow.
- Amount. Controls the overall strength of the effect.
- Softness. Choose whether you want the effect to blend gently or have more defined edges.
- Brightness. This control can raise the luminance values of the entire image.
- Contrast. Use this to maintain a crisper difference between the light and dark areas of the photo. This is a useful way to create rich blacks and bright whites.
- Saturation. Controls the intensity of colors in the affected image.
Soft Focus
This filter emulates a soft focus lens effect or diffusion material placed across your lens. It is perfect for adding a creative glow to portrait and wedding photos.

- Type. Use the pop-up menu to choose from two styles of an effect.
- Amount. The Amount slider controls the intensity of the Soft Focus filter.
- Brightness. Use this slider to increase the relative exposure of the photo.
Soft Glow
This effect us useful for creating a lighting effect in photos. It is especially useful for bright areas in your image such as streetlights or sky.

- Amount. The overall effect strength. If the Amount value is 0, then the effect is not applied. Move the slider to the right to increase Amount.
- Smoothness. This controls the softness of the effect. A Higher value creates a gentler blend between the affected and unaffected areas of the image.
- Brightness. Use this slider to control the brightness of the effect.
- Warmth. Adjusts the hue of the effect towards the warm end of the scale.
Split Toning
A powerful creative tool, Split Toning offers the ability to introduce color toning to black and white images. Toning a black and white image can transform the mood of the resulting image and also help in some printing processes.

- Amount. The overall strength of color toning applied to an image.
- Highlights Hue. Scroll through a spectrum of colors to choose the toning of the bright values in a scene.
- Highlights Saturation. This increase the intensity of the color in the light area of the image. Protection - Preserves white in the brightest highlights in an image.
- Shadow Hue. Scroll through a spectrum of colors to choose the toning of the darker values.
- Shadow Saturation. Increase the intensity of the color in the dark areas of the image.
- Balance. Shifts the balance between what is considered and affected by the Highlights adjustments and the Shadows adjustments of Split Toning. Slide to the left and the adjustments made to the Shadows will take precedent, slide to the right, the adjustments made to the Highlights will take precedent.
Sun Rays
Add a whole new light source to your photo, the sun! You can control its position, the warmth, and amount of glow for a subtle or even dramatic change in lighting. Combine the filter with blending modes for even more control to your lighting.

- Place Sun Center. Click this button to interactively nudge the sun’s position by dragging.
- X. Moves the sun’s origin point along the X-axis.
- Y. Moves the sun’s origin point along the Y-axis.
- Sunrays Amount. Controls the overall intensity of the sun rays. Sunrays Look. This changes the overall brightness of the scene;
- Sunrays Number. Use a higher number for more rays and a lower number for fewer.
- Sunrays Length. This impact the distance the sun rays will travel.
- Sunrays Warmth. Use this slider to adjust the color temperature of the rays.
- Sun Radius. This affects the size of the sun rays origin point.
- Sun Glow Radius. This slider changes the size of the glow around the sun.
- Sun Warmth. Can change the sun from bright white to a warm glow.
- Overall Penetration. This slider impacts how much the sun passes through an area. This can be useful when trying to natural composite the rays into a photo.
- Overall Randomize. Use this slider to get entirely new results that are a variation based on the current settings.
Texture Overlay
Enables custom images and textures to be blended as a layer into the current image. Textures can easily give your photos new unique looks, especially when you’re trying to achieve a vintage or grungy look.


- Red/Green/Blue. Use the tabs to switch between each color channel.
- Red. Influences the balance of Red details.
- Green. Influences the balance of Green details.
- Blue. Influences the balance of Blue details.
- Constant. Adds a global amount of influence to the entire channel.
TIP
If you press and hold the Option key and click on a slider value in the sidebar, moving the cursor to the left and right will let you set the values of the slider with high accuracy. Slider sensitivity is higher than with its normal movement. This allows you to fine-tune to small numeric values.
Сolor Balance
The Color Balance filter is useful to change the overall mixture of colors in an image for general color correction. It can also be used for creative control within different tonal regions of an image.

- Tone. Choose the region to adjust. You can select Shadows, Midtones, and
Highlights.
- Color Balance Sliders. Adjust the balance of Cyan-Red, Magenta-Green, and Yellow-Blue to emphasize certain colors in each tonal region.
Color Contrast
This filter lets you choose a color range to which to apply contrast. The color selected will cause objects of that color to become lighter, while opposite colors on color wheel will become darker. This effect can help make flat images pop based on the colors in the image.

- Amount. This controls contrast that is created between differences based on colors (vs. luminance). The strongest is the more contrast between primary and secondary colors.
- Hue. Chooses the target Hue for emphasis.
- Brightness. The overall lightness or darkness of the image is controlled with this slider.
- Contrast. This slider emphasizes the difference in brightness between areas and objects

- Tabs. You can make a curve adjustment to all channels equally or to an individual channel (such as to blue to emphasize the sky).
- Sliders. At the bottom there are sliders that let you adjust black and white points of the histogram (the leftmost and rightmost sliders),as well as the middle bend of the curve (the central slider).
- Points. You can add up to 10 control points. Drag up to add contrast to an area and down to lighten the area. Multiple points can be employed for contrast adjustments based on tonal range.
Dodge & Burn
Dodge & Burn tools are known as toning tools. They allow for finer control over lightening or darkening an image. These tools simulate traditional techniques used by photographers. In a darkroom, the photographer would regulate the amount of light on a particular area of a print.

1. To Dodge and Burn, apply the Dodge & Burn filter in the Filters list.
2. Click the Start Painting button to open up your canvas.
3. Choose either the Lighten or Darken tools in the top Toolbar to select the desired brush.
4. Use the Size slider in the Toolbar to control how large the brush is.
5. Use the Strength slider to control its impact.
6. If you get an accidental stroke, the Erase tool can be used to remove it.
7. Click Reset if you need to start over.
8. Click Done to apply the adjustment.
9. Use the Amount slider in the filter control group to further refine the global intensity of the filter and blend it back with the original image.
NOTE
This is a tool that is meant to be used creatively and by feeling. It is more about the looks and results than it is specific numbers and sliders. Feel free to experiment as you can always adjust the mask of the Dodge & Burn effect as well as its overall opacity.
HSL
Selectively adjusts Hue (color),Saturation (color purity),and Luminance (intensity) of individual colors in the image for color correction to balance tones and explore creative possibilities. Allows you to create unique looks with selective coloring.

- Hue. A set of sliders to adjust the hue or basic color shades of your image. Sliding the control further to the right results in a shift towards the next color in the list (for example from Orange to Yellow). Sliding the left shifts the hue towards the previous color in the list (for example from Orange to Red).
- Saturation. A set of sliders to adjust color saturation. Sliding the control further to the right results in a more intense color. Of course, moving to the left removes color to the point where -100 will make the image appear black and white.
- Luminance. A set of sliders to adjust the brightness of the colors. Sliding the control further to the right results in a brighter color within the image. The further to the left, the darker the image.
Note
This is a powerful tool for fine-tuning of colors in the image as well as a means for creative image processing. Examples of using this tool:
The sky is mostly blue in photos. Therefore, lowering the brightness of blue colors in the image can cause more dark and deep blue of the sky.
Reducing the tone for some colors (move the slider to the right in Saturation tab),and leaving it for the other can cause a dramatic effect on the selective color in photos.
Raising the yellow color (move of the slider to the right) can significantly improve color saturation of autumn foliage on the photos.

- Amount. This lets you reduce the intensity of the Lookup Table.
- Contrast. This impacts the overall contrast in the image and can be used to refine the LUT’s appearance.
- Saturation. This impacts the overall saturation in the image and can also be used to refine the LUT’s appearance.
Note
If you choose a custom LUT it will automatically be stored with your saved Luminar file or embedded into any custom preset that you create.
Microstructure
Improves the sharpening of your image in small areas of fine detail and texture. Advanced parameters allow you to fine tune this subtle yet dramatic effect. Use this tool to get some creative, HDR-like effects.

- Amount. Use the Amount slider to control how much structure is added.
- Smoothness. Try the Smoothness slider to better blend the increased details and avoid hard edges.
Photo Filter
This filter simulates color filters that traditionally are attached to a camera lens. Professional photographers often place glass filters in front of the camera lens to “cool” or “warm” a picture, or to add special effects. These can also be used to accentuate complementary colors, and add creative toning to your photos.

- Amount. Controls how much of the colored filter is added to the image.
- Hue. Sets the color value for the photo filter.
- Saturation. Controls the intensity of the color added to the image.
- Save Luminosity. This option prevents the overall exposure of the image from changing. It is useful for most cases and should be turned on to compare its effect.
Split Color Warmth
This filter can be used to selectively enhances cool and warm tones in your image. Allows you to get increased color contrast and vibrancy or create creative toning effects. You can separately adjust the Warm Colors and Cool Colors. Drag to the left to reduce Saturation in a target and to the right to add more in.


- Exposure – Adjusts the luminance of the image. Moving a slider to the left results in a darker image (reduction of exposure value). Moving this slider to the right results in a brighter image (increase of exposure value). You can adjust the relative exposure for both the top and bottom of the image independently to refine an image.
- Contrast – Separate contrast controls allow you to modify the amount of contrast at the top and bottom of the image. Contrast is the difference in luminance or color that makes an object in an image distinguishable from another. Practically speaking, contrast is determined by the difference in the color and brightness of an object in relation to other objects within the same field of view.
- Vibrance. This slider is a "Smart Saturation” control. In general, its effect is similar to Saturation with the difference that it increases less vibrant colors stronger and has a weaker effect on more vibrant colors. This allows you to get more realistic and less saturated colors the picture. This slider can be used in conjunction with the Saturation to enhance the secondary colors.
- Warmth. This slider affects how warm or cool an image appears. A positive value adds warmth while a negative value cools the image.
- Orientation – You can adjust the orientation of the gradient with three controls. It can be moved up or down as well as rotated. It can also be blended for a smoother transition.
Bi-Color Toning
This filter simulates a traditional glass bi-color filter. It uses two colors and a soft transition to tone the image. This is a good choice for enhancing seascapes and landscape photos.

- Amount. This controls the intensity of the filter. Overall, how strong the colors are.
- Top Color. This is the color used at the top of the frame. This will usually be a shad of blue or purple for the sky.
- Bottom Color. Use this color to control the landscape or water color.
- Blend. The blend control affects how smooth or a transition there is between the top and bottom adjustment. A higher value creates a soft transition while a lower value is more abrupt.
- Shift. The shift option moves the transition point between adjustments. By default it is centered top-to-bottom, but this can be raised or lowered in the frame.
- Rotation. If your image is angled (or your scene has strong geometric composition) you can rotate the angle of the blending. You’ll find controls to rotate + or - 90˚.
Brightness/Contrast
This is a basic filter which adjusts the overall lightness or darkness of an image (brightness) and the difference in brightness between areas and objects (contrast). This filter is easy to understand and works well for new users. For best results consider using the Tone or Develop filters.


- Highlights . Adjusts the brightness of the brightest areas of the image. Moving the slider to the right cause very bright areas to become brighter, while moving the slider to the left, makes them darker.
- Shadows. Adjusts the brightness level of the darkest areas of the image. Moving the slider to the right will cause such areas to become brighter and additional details will appear. When moving to the left, such areas become darker, and the number of shadow areas in the image generally increases.
Top & Bottom Lighting
This filter allows selective adjustment of lighting for the top and bottom parts of the image. Controls permit shifting the transition area, rotation angle and blending gradient. This effect is widely used in landscape or architecture photography with a distinct horizon. The effect flexibly and separately controls the brightness and other aspects of the top and bottom of the image. This enables you, for example, to lower the brightness of the sky and raise the brightness of the foreground. Thus, your image can be significantly improved without resorting to creating layers and masking.

- Top. Controls the brightness of the top of the image. Moving the slider to the left will make it darker and to the right brighter.
- Bottom. Controls the brightness of the bottom of the image. Moving the slider to the left will make it darker and to the right brighter.
- Orientation. Three sliders let you adjust the horizontal position, rotation of the adjustment, and feathering between top and bottom.
Whites/Blacks
This filter is a simple way to adjust the white and black point of an image. This gives you finer control over the contrast in a photo. Drag a slider to the right to brighten a zone and to the left to darken.

- Whites. This affects the brightest areas of the image.
- Blacks. This affects the darkest areas of the image.
The use of filters can be significantly extended with blending modes. Each filter supports the use of its own blending mode, which allows for very complex combinations of results. Blending modes are both a mystery and a source of great design power. Each blending mode controls how a filter’s results are blended with the image below.
Applying a Blending Mode to a FilterTo access Blending Modes for a filter
- Apply a filter to an image.
- Click the triangle next to a filter’s name.
- From the drop-down menu choose Blending Mode.
- Select a blending mode from the list.

How do blending modes work? The simple answer is, it depends. Your response is likely, depends on what? Simply put, the effect achieved by blending a filter varies with the contents of the original layer and the filters applied. A blending mode compares the content of two and enacts changes based on the content of both.
Here are the modes supported by Luminar:
- Normal. The default mode performs no additional change to how layer contents interact.
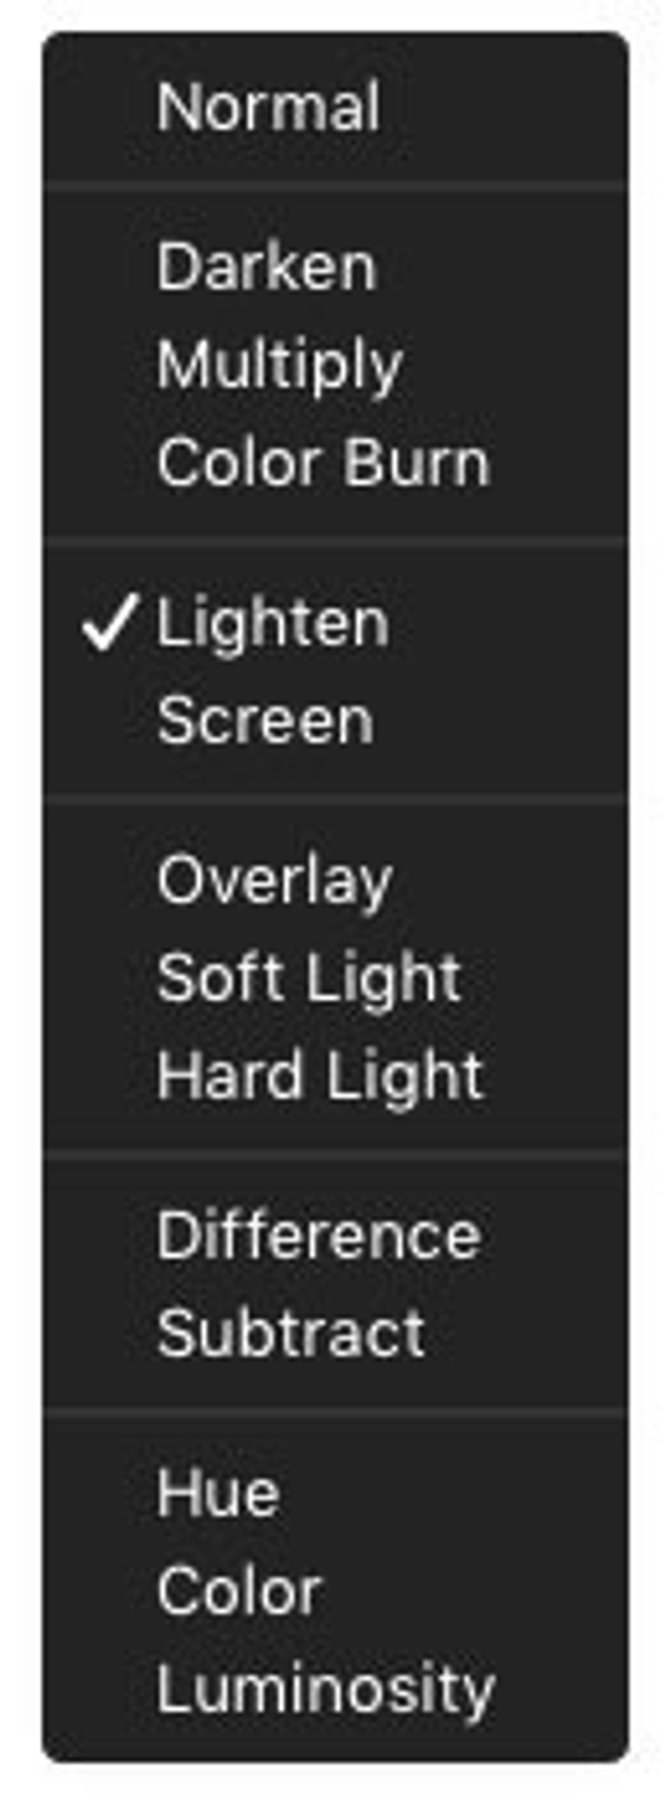
- Darken. Pixels lighter than blend are replaced; darker ones are not.
- Multiply. Is similar to drawing strokes on the image with markers. The colors of the top layer or blended with the image.
- Color Burn. Evaluates each channel; darkens base by increasing contrast.
- Lighten. Evaluates each channel; it then uses base or blend color (whichever is lighter).
- Screen. Uses a lighter color. It is useful for “knocking” black out of a layer.
- Overlay. Overlays existing pixels while preserving highlights and shadows of base.
- Soft Light. The effect is similar to shining a diffused spotlight on the image.
- Hard Light. Effect is similar to shining a harsh spotlight on the image.
- Difference. Evaluates each channel and subtracts or inverts depending on brightness.
- Subtract. Looks at the color in each channel and subtracts the blend from the base.
- Hue. Uses luminance and saturation of the base and the hue of the blend.
- Color. Preserves gray levels. It’s very useful for coloring and tinting.
- Luminosity. Is the inverse effect from the Color mode.

Note
To get the most from blending modes:
- Experiment Freely. The best way to use blending modes is to just try them out.
- Exploit Blending Modes. Do you need to tint an image? Place a Photo Filter on top of the image and change to Hue or Color mode. Need to drop out white in a layer? Just set it to Multiply mode. Blending modes are available for every filter.
- Double click a Slider. If you double-click on any slider name resets the value to the default. In most cases, double-clicking returns it to 0.
- Hold the Option Key. If you press and hold the Option key and click on a slider value in the sidebar, moving the cursor to the left and right will let you set the values of the slider with high accuracy. Slider sensitivity is higher than with its normal movement. This allows you to fine-tune to small numeric values.
- Masking. Click the mask button next to a filter’s name to control how a mask is applied. See the section “Masking Options in Luminar” to learn more.
Download the full Luminar 2018 User Guide for Windows in PDF Format
You may Also like
Have any questions?
Contact Us Help our product become better for you.
Take this survey for a chance to win an amazing prize!
Or learn more here