

What are the system requirements for Luminar Neo?
Luminar Neo should work on your computer as long as it meets the following minimum system requirements.
For Mac:
- MacBook, MacBook Air, MacBook Pro, iMac, iMac Pro, Mac Pro, Mac mini, early 2010 or newer
- CPU Intel® Core™ i5 or better, including the M1/2/3 chip.
- Memory 8 GB RAM or more (16+ GB RAM is recommended)
- macOS 11 or higher. IMPORTANT: macOS 10.13;10.14;10.15 is not supported.
- Hard disk 10 GB free space; SSD for best performance
- Display 1280x768 size or better
For Windows:
- Windows-based hardware PC with mouse or similar input device
- CPU Intel® Core™ i5 or better, AMD Ryzen™ 5 or better
- Open GL 3.3 or later compatible Graphics Cards
- Memory 8 GB RAM or more (16+ GB RAM is recommended)
- Operating System Windows 10 version 1909 or higher (only 64-bit OS).
- Hard disk 10 GB free space; SSD for best performance
- Display 1280x768 size or better
How to download and activate Luminar Neo?
Your download links will be waiting for you in your Skylum account.
Please note that your Luminar Neo purchase is automatically linked to your billing email, so make sure to create a Skylum account with that email or log in to your existing Skylum account linked to that email.
- Go to the Skylum account login page here.
- If you already have an account, sign in with your Google, Facebook, Microsoft, or Apple account, or sign in with your email and password.
- If you don’t have a Skylum account, you can create one here. Make sure to choose the same email you used when purchasing Luminar Neo.
- If you have a Skylum account but purchased Luminar Neo using an email address not tied to it, you can merge your accounts in the My Software > App isn’t showing? section of your Skylum account.
- In your account, you will see a My Software tab with all of your Skylum software, including Luminar Neo.
- Find the tab with Luminar Neo and download it by clicking the Download button.
You will be able to activate Luminar Neo by logging in to your Skylum account. No license key or activation code is required.
Luminar Neo launches in trial mode when you open it for the first time. When you start Luminar Neo, you’ll see a window that prompts you to log in to your Skylum account.
Please note that your Luminar Neo purchase is automatically linked to the billing email address you provided, so make sure to log in to your Skylum account connected to that email address or create a new Skylum account tied to your billing email address if needed.
To activate Luminar Neo:
- If you already have a Skylum account, sign in with a linked Google, Facebook, Microsoft, or Apple account, or sign in with your email and password.
- If you don’t have a Skylum account, click Register and create one. You can sign up with a Facebook, Google, Microsoft, or Apple account, or you can sign up using your email and a password.
- If you have a Skylum account but purchased Luminar Neo using an email address not tied to it, you can merge your accounts in the My Software > App isn’t showing? section of your Skylum account.
- Congratulations! You’ve activated Luminar Neo.
Still don’t see Luminar Neo in your account? Our support team will help you with that.
Which cameras are supported?
Luminar Neo RAW processing is based on our own powerful RAW engine. You can check the full list of supported cameras here. Also, we regularly update our library and make our own improvements to provide excellent support for new cameras.
Can I use Luminar Neo as a plug-in?
Luminar Neo is a universal solution that can function both as a standalone editor and a plug-in.
Luminar Neo can be used as a plug-in or extension for:
- Lightroom Classic (starting from version 6);
- Photoshop (from version CS5);
- Photos for macOS.
Will I be able to access my Luminar Neo Extensions in the plugin mode?
All Extensions that work with a single image (such as Noiseless AI) will be accessible when you use Luminar Neo as a plugin.
Also, you can use the HDR Merge, Focus Stacking, and Upscale AI Extensions from the Lightroom plugin. Achieve even more impressive results with any editing workflow.
Moreover, please keep in mind that if you invoke Luminar Neo from Photoshop or select the “Edit a Copy with Lightroom Adjustments” option in Lightroom Classic, you’ll get a TIFF file in the Luminar plugin.
Therefore, if you need to work with the RAW file in Luminar, you need to upload it in standalone mode.
Alternatively, using Lightroom Classic, you can choose ‘Export Original’ after right-clicking the photo > Export > Luminar Neo > Open Source Files.
What is going to change in January 2024?
Starting from January 2024, Luminar Neo will no longer offer separate Extensions nor the Extension Pack for sale as a one-time purchase. We will also no longer offer the 2023/24 Creative Journey Passes for lifetime customers wishing to access generative technologies.
Our goal is to simplify the process of accessing all the latest technologies in Luminar Neo for all of our customers. The most convenient way to do that will be to purchase a Pro subscription.
Instead of releasing individual Extensions throughout the year, Luminar Neo will have two major product updates per year with exciting new features and improvements, and regular minor updates addressing performance issues and bug fixes. All the Extensions you’ve already purchased will still be available to you.
Are you the owner of a Lifetime license with/without CJP or Extensions? Learn more how these changes will affect you
What’s the difference between Luminar X Membership and the Luminar Neo Pro Subscription?
Luminar Neo’s Pro Monthly and Yearly Subscription plans give you access to the Luminar Neo app, all updates or new versions, as well as all Extensions available during the subscription period.
Luminar X Membership is a paid subscription for those who already own or subscribe to Luminar and want to take their creativity to the next level. Luminar X members enjoy monthly delivery of creative assets, including Luminar Presets, LUTs, and Sky textures.
Important: Luminar X Membership doesn't include the Luminar app or its Extensions.
Where do I find my Extensions after installation?
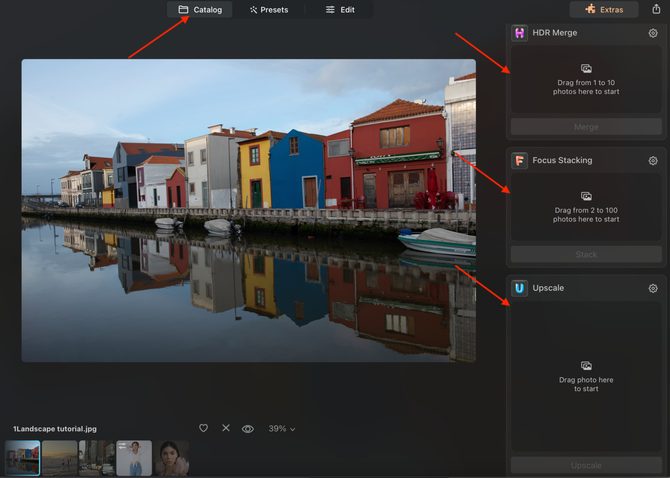
Since HDR Merge, Focus Stacking, Panorama Stitching, and Upscale AI require dragging the images to the tool from the catalog, they are available in the Catalog tab on the right-side panel.

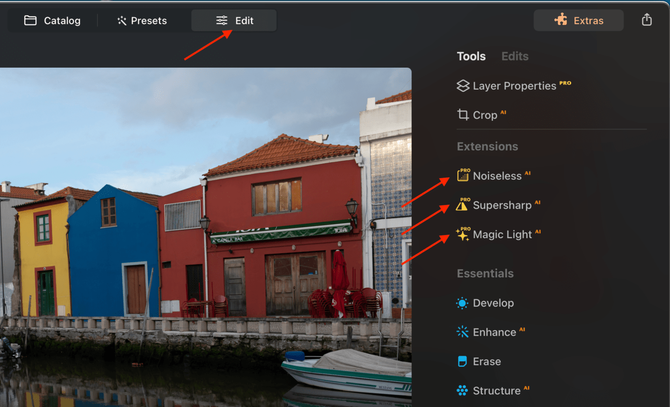
You can find Noiseless AI, Supersharp AI, Magic Light AI in the Edit tab > Tools panel:

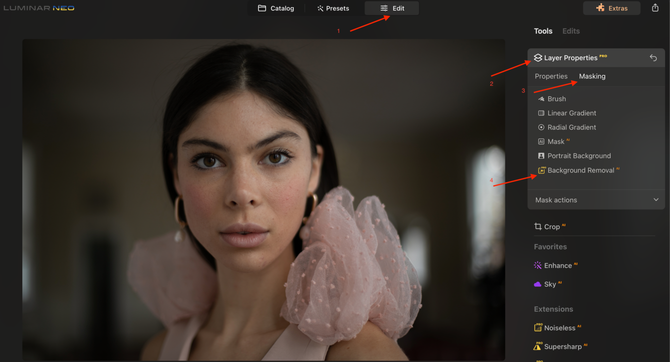
Access the Background Removal AI Extension in the Edit panel > Layer Properties > Masking > Background Removal AI.

What happens to my Luminar Neo and Extensions if I cancel the subscription?
Canceling your subscription means you won’t be charged at the beginning of the next billing cycle. You’ll be able to keep using Luminar Neo and its Extensions for the duration of the paid period.
If you owned a lifetime license to Luminar Neo and any Extensions before subscribing, you will be able to use Luminar Neo and those Extensions for which you have a lifetime license after your subscription period ends. However, you will not get access to new Extensions and will lose access to any Extensions that were available to you during the subscription period but for which you do not own a lifetime license. You will also not have access to possible future new versions of the Luminar app.
What is Luminar Share?
Luminar Share is an app that allows Luminar Neo users to transfer photos from desktop to mobile (and in the opposite direction) wirelessly.
It also makes it easy for users to share edited photos to their social media accounts.
Features of Luminar Share include:
- Wireless transfer of photos between the desktop Luminar Neo app and the Luminar Share mobile app
- Mirroring of photos from Luminar Neo on a mobile device
- Easy sharing of photos to social media
The Luminar Share app is available on both Android and iOS and is free for all Luminar Neo users.
What is Luminar Neo? Is Luminar Neo the next version of LuminarAI?
Luminar Neo is an innovative image editor powered by AI technologies of the future that simplifies complex editing routines and enables creators to bring their boldest ideas to life. And enjoy it.
- Get speed and flexibility in your editing with our brand-new core engine and layers workflow.
- The new engine we built for Luminar Neo is based on all the best solutions from our combined and evolved experience for maximum performance and creativity and is developed for achieving complex creative results.
- Adjust the light in your photo for creative control over the lighting in a scene. You can control the exposure of an image based on the distance from the lens to independently adjust the background and foreground exposure.
- Automatically remove spots on your images caused by dust and dirt on your lens and sensor.
- Clean up unwanted power lines from the skies in your cityscapes.
- Experiment with infinite creative possibilities by effortlessly combining two or more images in a shot.
...And much more.
The new technologies and innovative user experience in Luminar Neo make creative image editing simple and fun.
Luminar Neo is a quintessence of all our applications released to date. The software will retain almost all Luminar AI’s features and offer a great variety of innovations permeating the entire workflow for the best experience with the product inspired by you.
This version will have even more editing power under the hood. Channeling your inspiration into mind-blowing photos has never been easier with all-new cutting-edge AI-powered tools that will add up to the already existing go-to collection of Luminar AI. Intelligent tools such as AccentAI, SkyAI (replaces the sky automatically and adds water reflections), SkinAI, Sky EnhancerAI, StructureAI (adjusts detail and clarity), BodyAI, AtmosphereAI(adds weather effects based on image depth reconstruction), Portrait BokehAI, and Supercontrast, as well as the upcoming virtual light source emulation, automated removal of power lines and dust spots, and many more, are industry-leading and are designed to provide satisfying results effortlessly. You’ll always retain complete control over your photos thanks to the convenient interface.
To make the editing process smoother, we’ve built a powerful module-based engine that provides an overall better performance and convenience. It allows users to apply lots of different tools to an image without significant performance loss. The software will also enjoy ample opportunities for future optimization. Thanks to the new architecture, the app will be updated regularly. We’ll get more opportunities to incorporate new technologies, give you more editing possibilities, and allow Luminar Neo to advance faster in our creative journey.
Luminar Neo will be installed separately as a brand new application and will not overwrite Luminar AI or other software.
Will I be able to migrate my LuminarAI Templates to Luminar Neo? How do I use Luminar Neo Migration Tool?
We understand that you’d love to use your previously created Templates in Luminar Neo. Therefore, you can download the Luminar Neo Migration tool from the My Software tab of your account.
Moreover, starting from the official release of Luminar Neo, we have been gradually converting your favorite Luminar AI Templates from our marketplace so you can install them in Luminar Neo. You can download the compatible files from the My Add-ons section of your Skylum account. Your collection of skies, textures, and objects are compatible with Luminar Neo as well.
The Luminar Neo Migration tool converts your Luminar AI Catalog into a Luminar Neo-compatible format and transfers your custom Templates.
Before using the Migration tool, please ensure that your Luminar AI and Luminar Neo are updated to the latest version.
On Windows, click Luminar > Help > Check for updates; on Mac, click Luminar > Check for updates.
Next, proceed as follows:
- Navigate to the My Software tab of your Skylum account and click on the Download button next to the Luminar Neo Migration tool.
- Once the download is completed, install the Migration tool and launch it.
- Click on the Add Catalog button and navigate to the Luminar AI Catalog that you’d like to migrate (it is possible to add several Catalogs if needed). The default location is the Pictures folder. If you specified a custom location for your catalog, search your custom location.
- Open the Luminar AI Catalog folder and choose the .luminarai file inside it.
- Click on the Migrate button.
- Wait until ‘green checkmarks’ appear next to all the items that should be migrated. After that, the Migration Tool can be closed.
- Start Luminar Neo.
- In the top bar menu, click Luminar Neo > File > Catalog > Open (on Windows) or File > Catalog > Open (on Mac).
- Navigate to the same folder where your Luminar AI Catalog is located. The newly migrated Luminar Neo Catalog should be located next to the original Luminar AI Catalog. The name of the migrated Catalog should contain the ‘_migrated’ suffix.
- Open the _migrated catalog folder. Select .luminarneo catalog file inside the migrated Catalog, and click Open.
Note: Erase and/or Clone and/or Augmented sky Edits from Luminar AI are gathered together in one ‘Luminar AI Adjustments’ Edit. You can only delete it by clicking on the Trash Can button. The rest of the tools can be re-edited in the Edits menu if needed.
The migrated Templates can be accessed in the Presets > My Presets tab.
What languages are supported?
Luminar Neo is available in English, German, Spanish, French, Italian, Chinese Simplified and Traditional, Korean, Japanese, Portuguese, Dutch, Polish, Swedish, Norwegian, Danish, and Ukrainian


