
January 19
14 min. to read
How To Set Timer On iPhone Camera For Hands-Free Shots
Selfies, group pics, birthday chaos—the timer takes the rush out of the moment. Those few seconds let everyone get into position, straighten up, and hold still before the click. And when traveling, it makes it easier to frame the setting and the subject together, without rushing through the shot.
Why the iPhone Timer Matters for Better Photos
 Let’s settle the main question first: does the iPhone camera have a timer? Yes, the timer is part of the stock Camera app. Hit the shutter, let the seconds tick down, and the iPhone snaps the shot on its own. That small gap is what makes hands-free shots work. You get time to step into the frame without touching the phone.
Those few seconds make three practical differences:
Cleaner shots in darker rooms. When the light is low the camera uses a slower exposure. A timer helps because the phone isn’t still settling after a screen tap, so fine details don’t melt into a hazy glow. That motionlessness can save you from needing to unblur picture edits later.
More natural framing. Arm’s-length photos distort proportions, especially with wider lenses. Rest the phone on something stable at eye level, then back up until your head and shoulders sit comfortably in frame. The result looks more like someone else took the photo.
Space to adjust the details. Ten seconds is enough to tuck hair back, move closer, shift angles, and get hands out of pockets or out of awkward places before the photo happens.
Put simply, a countdown gives steadier photos, a truer viewpoint, and expressions that don’t look forced, all while you stay hands-free.
Finding the Timer and Turning It On
The Camera app keeps some settings tucked away until you pull up the extra controls, which is why the timer can blend into the interface. At the top of the Camera screen, look for an icon that reveals more options. Hit that (or swipe up) to open the hidden controls. The timer is the clock icon in that row, and it might be a swipe or two away depending on what controls are showing. Tap Timer and choose your delay.
How to turn on timer on iPhone camera:
launch the Camera and switch to Photo (or Portrait);

find the clock or open the controls panel and tap Timer;
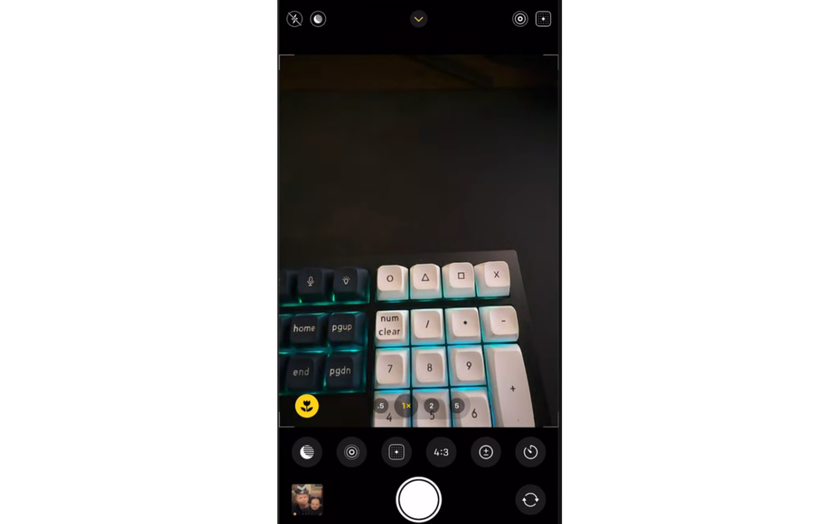
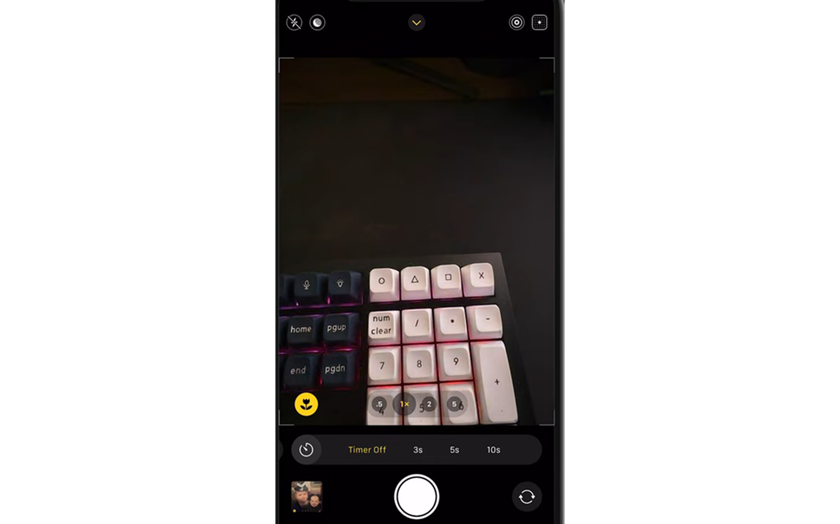
set the delay length—3s, 5s, or 10s;
rest the phone on a stable spot (tripod, shelf, table edge);
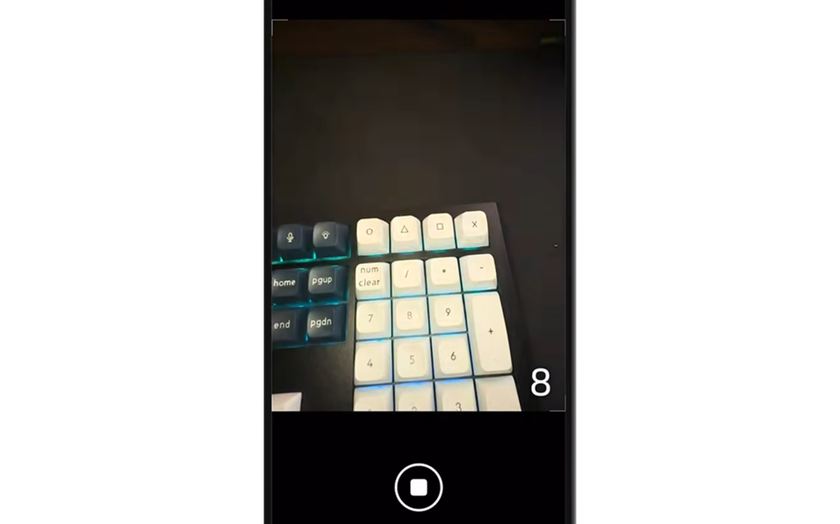
tap the shutter and get into place while it counts down.


The selected delay stays active for a few shots in a row. If the Camera app is closed, the timer may return to the default setting.
Choosing the Right Delay
 Time delay on iPhone camera means how long the phone waits after pressing the shutter before it takes the picture. Three seconds is ideal when you’re already in position and mainly want to avoid the tiny shake from tapping the screen. Five seconds is enough to get into position and relax your face before the click. Ten seconds fits situations where walking is longer, someone needs a cue, or the group needs time to line up and hold still.
Each delay works best in different situations:
Delay | Best for | Easy setup |
3 seconds | Quick selfies, single portraits. | Phone braced on a table. |
5 seconds | Solo shots with a short step-in. | Phone on a shelf or stand. |
10 seconds | Group shots, tripod scenes. | Tripod or stable ledge. |
If you’re unsure, start with 10 seconds and work down once your setup feels predictable. When outdoor light starts fading, a steady phone plus a countdown can also prevent blur. This is also a handy trick for how to take sunset photos with iPhone, since low light at dusk makes stability matter more.
Real Setups for Hands-Free Shots
Most timer photos fall into two categories: getting a clean portrait without the arm-in-frame look and capturing group shots without recruiting a stranger. With a stable setup, those extra seconds are enough to get everyone in place and relaxed.
Selfies and Portraits
 The front camera can trap photos in the same pattern—arm raised, face too close, background cropped. The rear camera delivers cleaner detail and more lens choices. Place the phone slightly above eye level, tilt it down a touch, and step back a few feet so the frame reads like a portrait, not a screen grab. Setting timer on iPhone camera also helps with the rear lens, since there’s no need to reach for the shutter while holding a pose.
Light matters more than any mode. If the room has one good window, that’s the spot. Face it, then move the lamp out of the background so it doesn’t flare or wash out the shot. Minor edits are fine, and a subtle slim face filter can be okay for a post as long as nothing looks stretched.
To keep the frame clean and faces well-lit:
phone at eye level or slightly higher;
light from the front or side, not behind;
rear camera when possible;
10 seconds to settle posture;
take several frames and pick the calmer one.
Together, these choices produce cleaner frames and calmer faces.
Group Shots
 Crowd photos fall apart in predictable ways: someone gets cropped or starts moving, and the phone-holder ends up behind the camera instead of in the shot. Can you set timer on iPhone camera in a way that keeps everyone in frame? Yes, with the right setup.
Prop the phone securely, use it wide when the scene is tight, and turn on the grid so the frame doesn’t cut into anyone’s head. Placing the phone slightly above eye level and tipping it down helps the back row fit without weird angles. Ask everyone to stay still until the click.
Two-timed shots in a row help a lot. The first frame catches people settling; the second lands when faces relax, and eyes are open. If the background looks busy, step the group forward a bit so faces pop, and the background distracts less.
After the shot, a bit of cleanup works to make it look finished without rewriting the moment. Luminar Neo can clear small distractions, fix odd indoor lighting, and even out tones across the image. As for edits done on a phone, a photo enhancer app for iPhone can help it look finished without rewriting the moment.
Fixing Common Timer Problems
 Most timer issues stem from the same trio: the phone isn’t stable, the focus isn’t on the face, or the lighting forces a slower shot. That’s when the thought hits: "How do I take a timed photo on my iPhone without rolling the dice?" The answer is stability first, then focus, then light.
Timer shots fail for three reasons, each with a straightforward fix:
Blur. Put the phone down securely, begin the countdown, and let it fire without any last-second screen touches.
Focus Misses. Tap the face (or place an object where the face will be), and use focus lock if the camera keeps hunting.
Low Light. Move toward a window or bring a lamp forward, keep bright light out of the background, and let the phone sit still for a few seconds before it takes the shot.
With everything in place, take a second shot right away as a backup. As mentioned earlier, the first frame catches movement settling; the second has a better chance of crisp detail and relaxed expressions, especially indoors.
Making Timer Shots Feel Effortless
 Most people learn how to use timer on iPhone camera by messing up a few frames, and the fix is consistent. Set the iPhone down before anything else, get the frame where it needs to be, and keep fingers off the screen until it takes the shot. If the phone has a habit of drifting, brace it with whatever’s nearby—a wallet, a mug, a book spine.
Extra settings rarely fix what the basic setup handles. Frame it with a bit of slack around the edges so editing doesn’t feel cramped. When the phone is farther away, start the timer, step in, and stay put right before the shutter fires.
Next comes an edit pass to tidy. Light editing finishes the job without changing what happened. When learning how to retouch photos on iPhone, start by fixing what people notice first—a crooked horizon, a dim face, or color that feels too cold. After that, clean up the background only if it keeps stealing the eye.
Your AI-Powered Photo Editor for MacOS and Windows
Discover Now!Getting Consistent Results Every Time
 Timer shots work best when the phone is stable, and the plan is set before the countdown starts. Rest the iPhone on a steady surface, leave a bit of breathing room in the frame, then tap to focus on the spot where the face will be. Pick the timer by how much ground needs covering: 3 seconds when standing ready, 5 seconds for a quick walk in, 10 seconds for group shots and wide framing. Trigger the timer in multiple takes and pick the frame with crisp focus and fewer blinks.
Indoors, light comes first. Face the window, or pull a lamp forward so it lights faces instead of the wall behind. Let the countdown run without extra taps, as stability is half the battle. For finishing touches, keep it practical: straighten, brighten slightly, and fix color temperature if skin looks too yellow or too blue. The result speaks for itself—full group in frame, calmer expressions, and a photo worth saving.
 >
>
