How To Edit Sky in Photoshop: A Beginners Guide
April 16, 2023

Have you ever seen a beautiful photograph of a landscape and wondered how the photographer managed to capture such an amazing sky? Tired of the sky not appearing rich and colorful enough in all your photos? A basic knowledge of layers and a few more effects can help you create dramatic images with expressive skies.
We've all been in similar situations where we've wanted to capture a beautiful location against an equally beautiful sky, but in the end, that same didn't come out as expressive as our eyes saw it. However, it is possible to get the perfect sky even after you have taken a photo with your camera. In such cases, Photoshop comes to the rescue. Someone will say that this is cheating (of course, he will be partly right, it is better to improve your skills and not resort to the help of editors). But if you simply can't go back to that place and make another attempt, this is the only way out. Especially since the result will be pleasing to the eye. In our tutorial, we'll tell you a few ways how to change the sky in Photoshop.
Why does Adobe introduce a sky replacement tool?

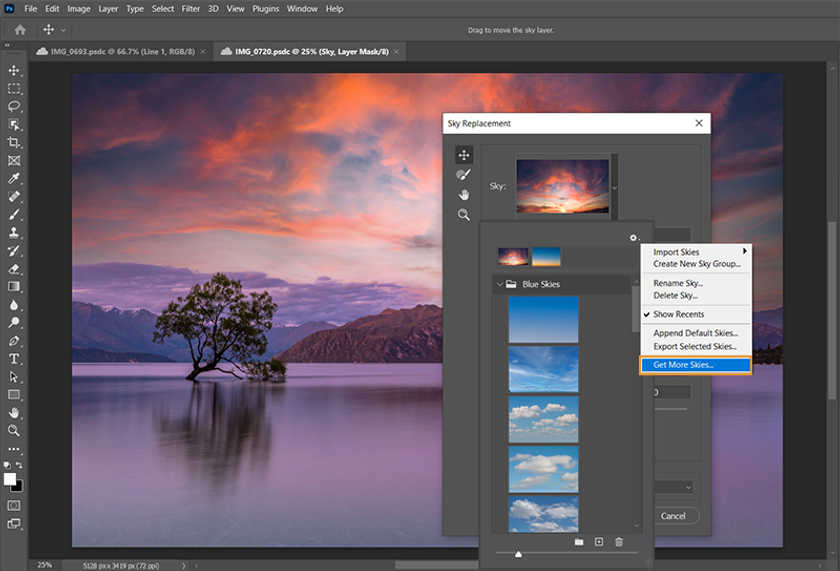
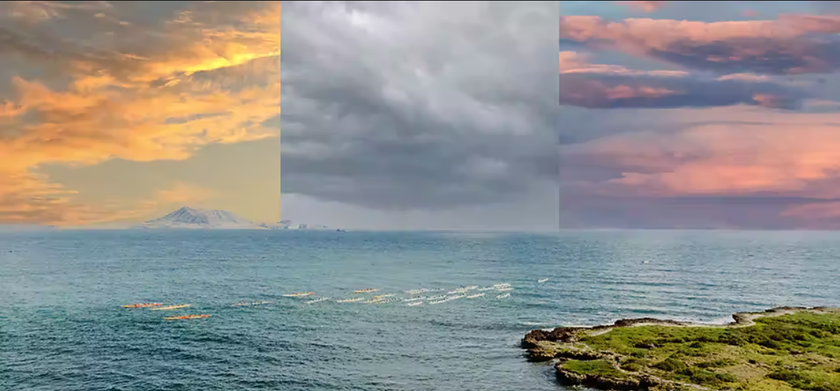
With this tool, the user can quickly and easily improve the sky in pictures. It is powered with artificial intelligence to analyze the desired image, determine where the foreground is and where the sky is, perform complex masking, and then realistically replace it with another:
1. Click on Select and choose Sky from the drop-down menu;
2. Choose Edit > Sky Replacement;
3. Select a wanted new sky from the database of the presets.
The tool allows you to adjust the scale of the image, use only some of it, as well as all sorts of moving the picture in the image, select only part of it, and move the sky on the scene. At that, the coloring and illumination of the foreground will automatically change, adjusting to the new sky.
How to change a sky in Photoshop?

In previous versions when changing the sky in Photoshop, you had to manually select the image and cut and paste the sky you want, and the selection did not always work correctly. Now this problem is solved once and for all!
Choose the tool
Go to the tab "Edit" and look for the button "Replacing the sky" then wait for a little and your image is already another. Just note that there is a set of different skies, and you can choose one of them, as well as upload your own. Also, there is a cool feature "Lighting Correction", set for example to 100% and we see that not the sky, and the rest of the photo color is similar to the sky, which helps increase the realism of the photo.
Select the foreground in Photoshop

Now we move to another step to remove the sky in Photoshop. To make the contents of a layer appear in the foreground, you must move the selected layer to the topmost level within the "Layers" list. After moving the layer to the top of the list, the content will be visually closer to the user and it will cover all the remaining layers behind.
Highlight and select the sky
Next, we'll talk about how to take the next step in how to edit sky in Photoshop. In the settings, switch to the brush with "+" and click to select the sky in your photos. If there are extra objects in the selection (buildings or the model itself), take the brush with "-" and click to exclude them from the selection. Now you know how to add a sky in Photoshop, and here are some extra tips:
- To make the selection more accurate, reduce the brush size. This way the tool will capture the right parts of the image more accurately. Without removing the selection, go to the menu: Select → Select and mask.;
- Click on View to choose the display option that makes more sense to you.
So in that way, Photoshop changes the sky. For example, if you take Overlay and adjust the Opacity, you will clearly see the quality of the selection.
Edit the sky in Photoshop and change lightning

The hardest part of this step is finding the right photo. For example, a cloudy overcast sky with no sun "looking" into the lens would work for you. Also, ideally, the picture should not be too bright. All this is to make sure that the sky to be replaced is in the colors of the original and not out of whack in terms of brightness. The picture with the sky will "lie" on top of all the layers, overlapping them. To put it down, go to the Layers palette. There, pick up the layer with the sky by holding down the left mouse button and moving it down. Blur the sky to make it smoother and blend in more with the rest of the background. Now we are ready for to next step of sky replacement in Photoshop.
Replace the Sky and Its Reflection in One Step
Try SkyAI NowGo to Filter → Blur → Gaussian Blur. The radius is 5 pixels. In general, you should focus on making the sky as blurry as the background. The sky probably still doesn't fit into the background. To fix this, click on the picture of the sky and add a Hue/Saturation adjustment layer in the Layers palette. Lower the Saturation and raise the Brightness. It remains to refine the borders between the sky and the rest of the background. To do this, stand on the mask that you created for the model layer, take the Brush tool, and draw the borders.
In the question of how to do a sky replacement in Photoshop you should consider these settings:
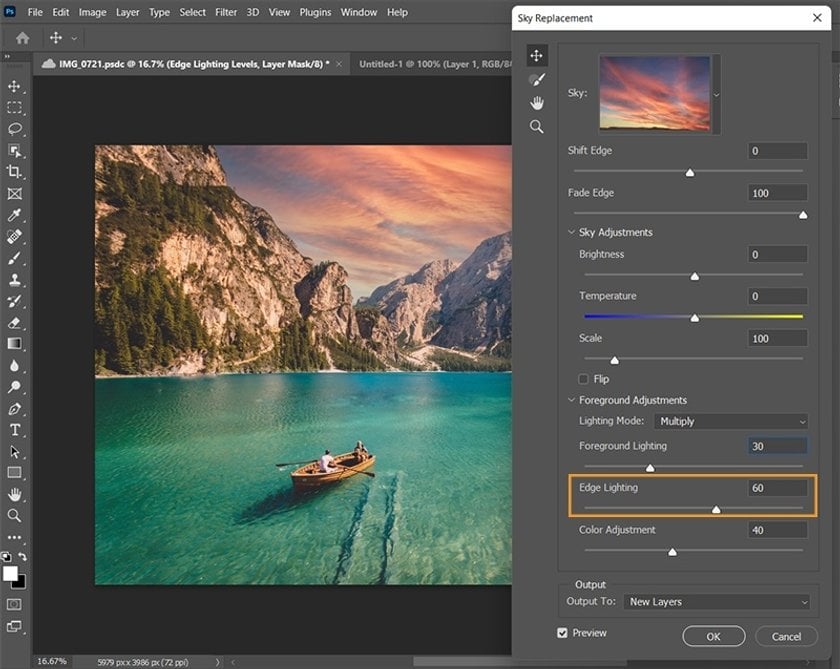
- Edge Shift. Selects the starting point of the border between the sky and the original image using a gradient;
- Fade Edge. Adjusts the degree of smoothness or gradient from the sky to the original image edge;
- Sky Adjustments. A drop-down menu with three options to consider: brightness, temperature, and scale;
- Brightness. Adjusts the brightness of the image;
- Temperature. Adjusts the temperature of the picture to make it look warmer or cooler.
- Scale. Resizes the sky;
- Flip. Allows flipping the image horizontally to give you a different look;
- Adjust Foreground. Another drop-down menu contains the "Light Mode," "Adjust Lighting," and "Adjust Colors" options. These controls will improve the transition area between your main image and the new sky;
- Lighting Mode. Specifies the blending mode used for the adjustment;
- Adjust Lighting. An opacity slider that brightens or darkens the sky blending area with the main image, knowing that setting the value to zero will not result in any adjustment;
- Color Adjustment. An opacity slider that determines how closely the foreground colors match the sky colors, knowing that setting the value to zero will not result in any adjustments;
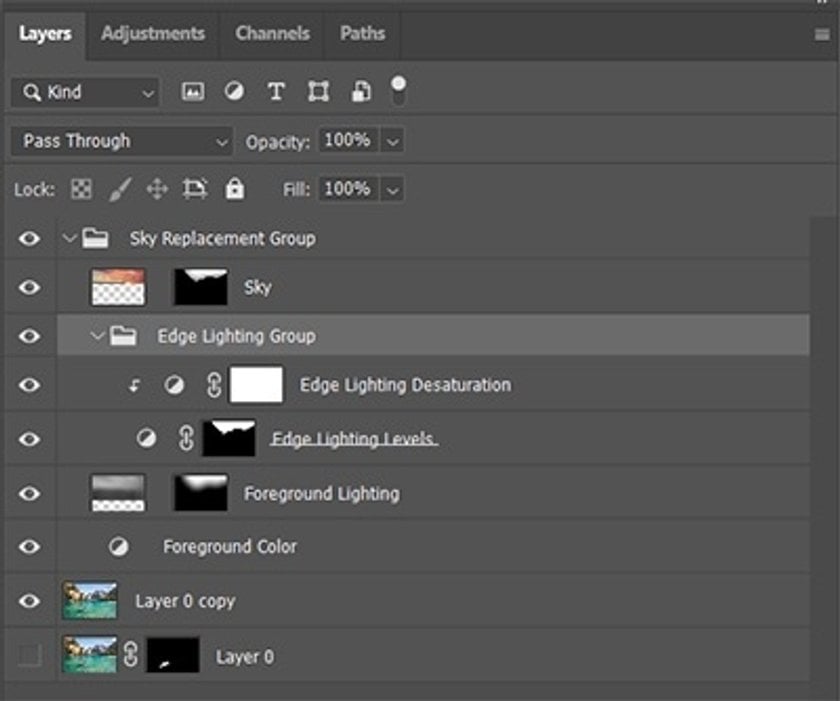
- Photoshop output. Allows you to specify whether the changes you make to the image will be applied to new layers (called a group of masked layers) or to a duplicate layer (one flat layer). The default setting is "New Layers," which is usually the best way to improve the image later.
In order to use the Photoshop sky replacement tool correctly, you have to take into account the maximum of these parameters, otherwise, the image will look unrealistic. While Photoshop usually does a great job of creating a new image, the result at this point may not be exactly what you expected depending on how different the colors are in each image. So, now you know how to replace the sky in Photoshop.

Additional changes are required. How far you decide to go to creatively improve your image is up to you. You can spend up to an hour or more trying to achieve a very artistic look. But for achieving the desired result, we recommend creating two more layers to successfully change the sky in Photoshop before moving on to more advanced methods.
Replace sky in Photoshop: import your own picture
Well, you can work with your own images. To add them to your workspace, just find the little "+" icon in the replace panel.
FAQ
Why is the sky replacement tool in Photoshop is unavailable?
This is possible if you are not using the latest version of Photoshop. What to do? It's simple: just update the application to the latest version.
Which option allows users to change the sky background in a project?
Typically, a tool that allows you to edit the sky is called the Sky Replacement Tool in many photo editing programs, such as Luminar Neo or Adobe Photoshop. This tool automatically detects the sky in an image and allows you to replace it with a new one. All you have to do is select the sky that fits.
Can you add skies to Photoshop sky replacement?
To replace the sky in Photoshop you can use the database or use your own images. The most important thing is that the pictures more or less match in brightness.
Does Photoshop have sky overlays?
Yes, and below we will describe how to work with it. And we already told you how the sky replacement feature works in Photoshop.
How to change the sky in Photoshop?
- You need to import the image;
- Then choose Edit -> Replace Sky;
- The Sky Replacement properties window will appear. In the "Sky" field, where the thumbnail at the top is displayed, click the down arrow;
- Another dialog box opens. Click the gear and select New Sky. Photoshop will open the default file viewer window;
- Select the image of the sky you want to use and click on it;
- When the image is loaded in the preview window, all the controls for replacing will be available to help stitch the two images together;
- Adjust each slider to your liking;
- Then click “Ok" when you're done.
This is how you add a sky in Photoshop.
Most images will require their own unique settings. We recommend that you experiment with each slider to see how Photoshop displays each setting.
Luminar Neo: Photoshop replacing sky alternative
With Luminar Neo you can take advantage of the sky replacement tool Sky AI. Thanks to artificial intelligence, you can quickly and easily improve your picture. It automatically analyzes the photo, finds the sky, replaces it, and adds reflection to the water, if it is in the photo.


