
How to Rotate a Layer in Photoshop + Shortcut Keys
October 25
19 min. to read
 Have you ever wondered how to rotate a layer in Photoshop? This guide is perfect for beginners and those looking to hone their Photoshop skills.
We'll cover everything from the basics of layers and their importance in design to a step-by-step guide on rotating layers effectively. Along the way, you'll pick up some handy tricks and learn about the automatic editing photo platform Luminar Neo, which takes you to a new level.
Let's dive in!
Understanding Photoshop Layers and Rotation
What is a Layer in Photoshop?
 In Photoshop, think of layers as transparent sheets over your picture. Each layer can hold different elements like photos, text, or drawings. You can edit one layer without affecting others, adding effects like shadows or making parts transparent. This way, you can change your image while keeping the original safe.
There are two main kinds of layers in Photoshop:
Content Layers are where you do most of your work, such as adding photos, text, or shapes.
Adjustment Layers are used to change the appearance of content layers, such as making them brighter or changing their colors. They're great because they don't permanently change the original picture.
You can also turn layers on and off by clicking the eye icon next to each layer to see how they change your picture.
The Importance of Rotation in Design
Knowing how to rotate a layer in Photoshop is important. It's about making your picture look its best. Turning a layer can make parts of your image stand out more or look better!
Pro Tip: Use Automatic Horizon Alignment and perspective correction to achieve quick, AI-driven adjustments that streamline the process far better than Photoshop's multi-step approach.
Exclusive Tools of Endless Possibilities in One AI Editor
Explore Now!Core Steps: Rotating a Layer in Photoshop
If you want to change how a layer in your Photoshop image is turned, follow these easy steps. It's a simple way to make your picture look exactly how you want it.
1. Selecting the Desired Layer
 In the Layers panel, click on the layer you want to swivel. Hover over the layers to see which part of the image they correspond to.
2. Accessing the Rotate Options
 Go to Edit > Transform > Rotate, or press Ctrl+T (Cmd+T on Mac). Then, drag the corners of the layer to turn it.
3. Adjusting the Rotation Angle and Finalizing
 Drag the corners to your desired angle. Hold Shift for precise steps. For specific angles, type it in at the top of the screen. Finalize by pressing Enter or clicking the checkmark.
How To Rotate Selection In Photoshop
This process allows you to adjust the orientation of selected image parts. It is useful for aligning, creating dynamic compositions, or adjusting subject angles. Only a few steps are needed to achieve the effect.
Step 1. Make a choice
 First, select the part of the image you want to restore. You can use any of the selection tools, for example:
Rectangle Tool (M) for rectangular selections.
Elliptical Marquee Tool (hold Shift to get perfect circles).
Lasso Tool (L) to select a free shape.
Quick Selection Tool (W) for automatic selection based on similar pixels.
Step 2: Enter Free Transform Mode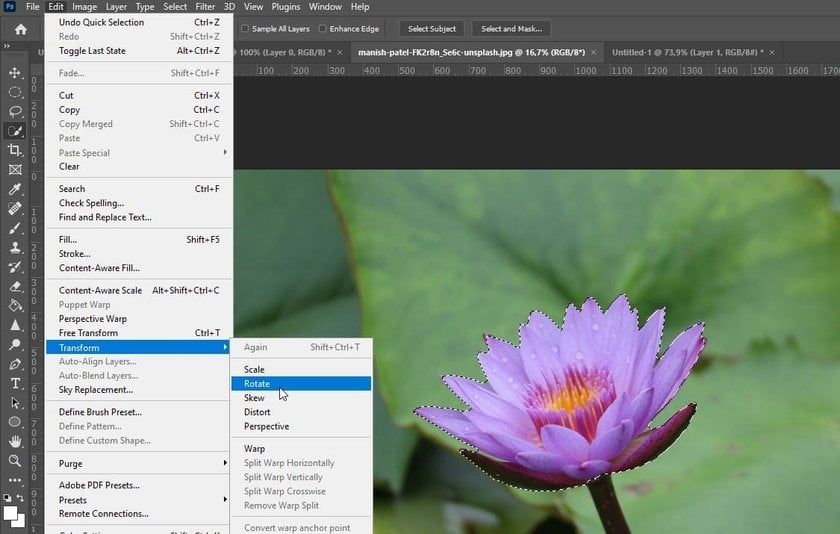

Go to the menu and click Edit on its top bar.
From the drop-down menu, select Transform and then Rotate.
Alternatively, you can directly use the keyboard shortcut Ctrl + T (Command + T on Mac) to enter Free Transform mode.
Step 3: Return the selection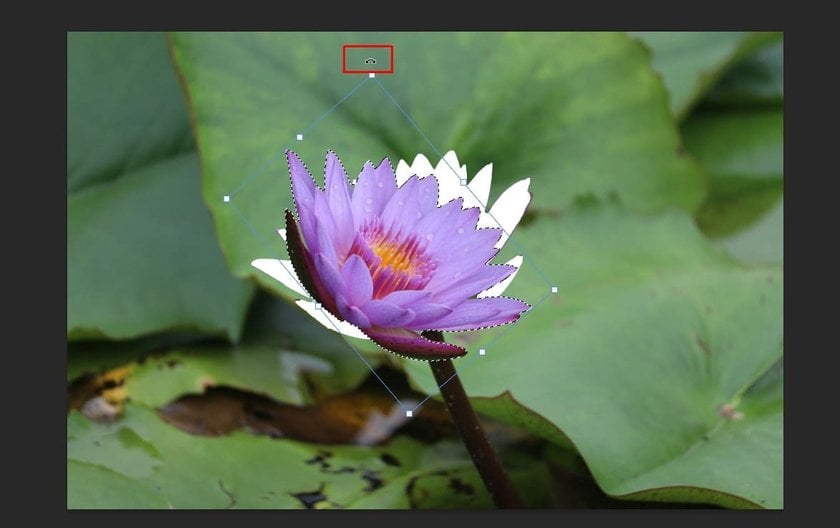

Move the cursor near one of the corner markers of the bounding box. The cursor will change to a curved arrow.
Click and drag the corner handle to freely turn the selection. You'll see it rotate in real time as you pull.
Step 4: Set a Specific Angle (Optional)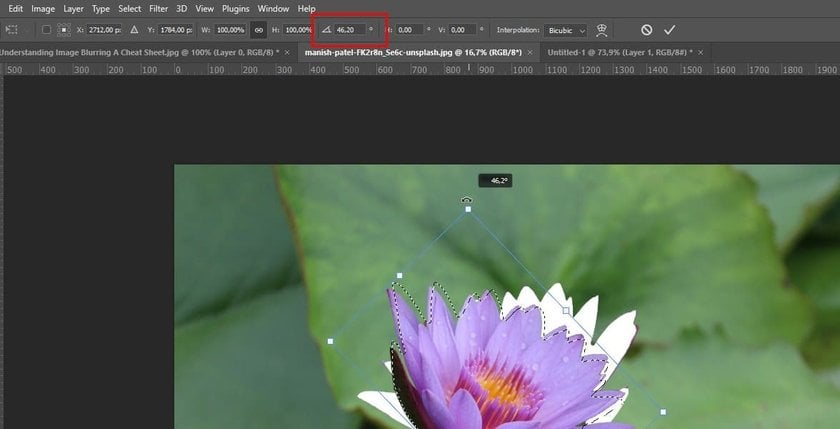

If you want to turn to an exact angle, look at the options bar in free transform mode at the top of the screen.
Enter a specific degree (e.g., 45°, -90°, etc.) in the Rotation field on the right of the toolbar.
Step 5: Apply the transformation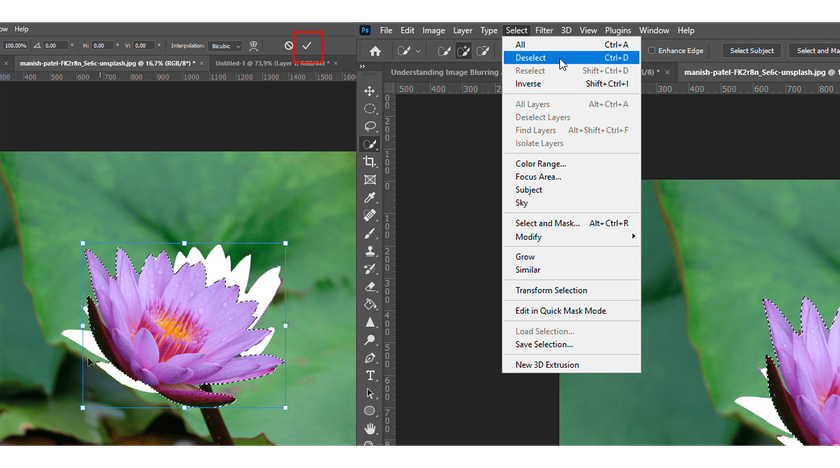

Press Enter (Return on Mac) to apply the conversion.
Deselect if needed by going to Select > Deselect (Ctrl + D / Command + D).
Additional tips
Hold Shift while dragging to rotate the selection in 15-degree increments, making it easier to achieve straight turns (e.g., 90°, 180°).
If unsatisfied with the rotation, press Ctrl + Z (Command + Z on Mac) to undo the last action.
How to Rotate an Object in Photoshop
1. Select the Layer: Choose the layer with the object you want to turn. If it's the whole layer, no need to select the object. Find the Layers menu under Windows if it's not visible.
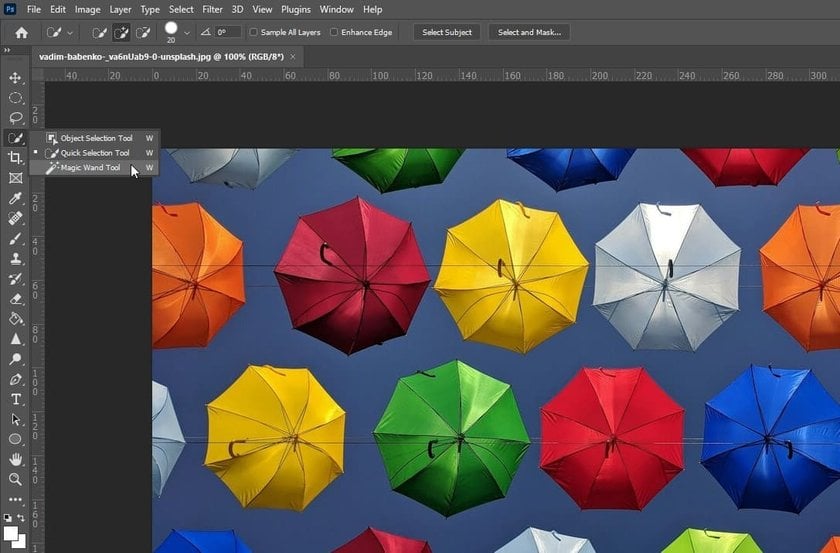
2. Select the Object (If Needed): To select specific objects, use the Quick Select Tool (a paintbrush icon with a dotted outline) from the toolbar. Right-click the Magic Wand Tool to find it if needed.
3. Start Transforming: Go to Edit > Transform or press Ctrl+T (Cmd+T on Mac) for Free Transform, allowing you to swivel freely.
4. Choose Rotation: For quick turning, Use options like Rotate 180°, Rotate 90° Clockwise, or Counter Clockwise. You can also flip the object.
5. Rotate Manually: Drag the small squares around your selection to turn. The degree will be displayed above the pointer.
6. Finalize: Press Enter (or Return on Mac) when satisfied with the results.
Pro Tip: Unlike Photoshop's manual adjustments, the AI-powered Composition Tool from Luminar Neo automatically turns images for perfect alignment. Try it to see the difference!
Techniques for Rotating Selections in Photoshop
This can be done in two main ways, each suitable for different needs in your project.
Option 1: Move Tool & Transform
1. Make Your Selection: Use any selection tool like the Lasso or Object Selection Tool to select the part you want to turn.
2. Use Move Tool: Press 'V' for the Move Tool.
3. Enable Transform: Press Ctrl+T (Cmd+T for Mac) for the Transform function, putting a box around your selection.
4. Turn and Deselect: Drag outside the box to turn. Once done, press Ctrl+D (Cmd+D for Mac) to deselect. Remember, this method cuts the selection from its original spot.
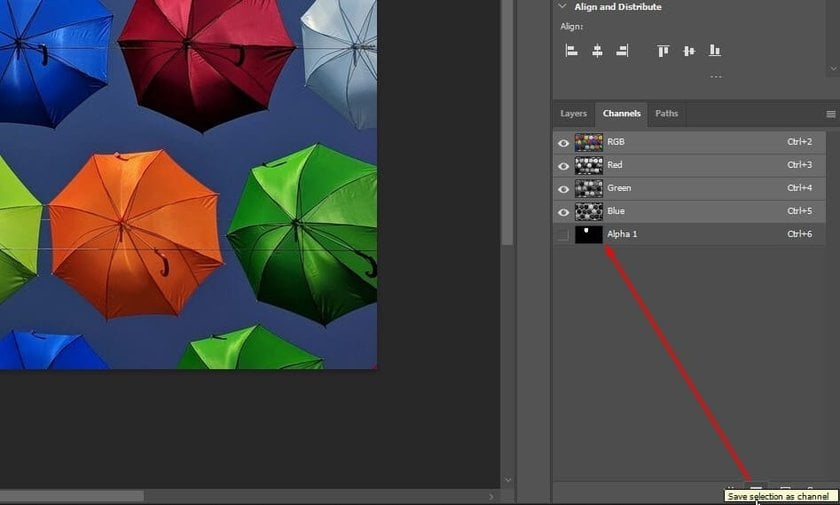
Option 2: Alpha Channel
1. Select and Save to Alpha Channel: After selecting, go to Channels and click the Masking Icon to save your selection as an Alpha channel.
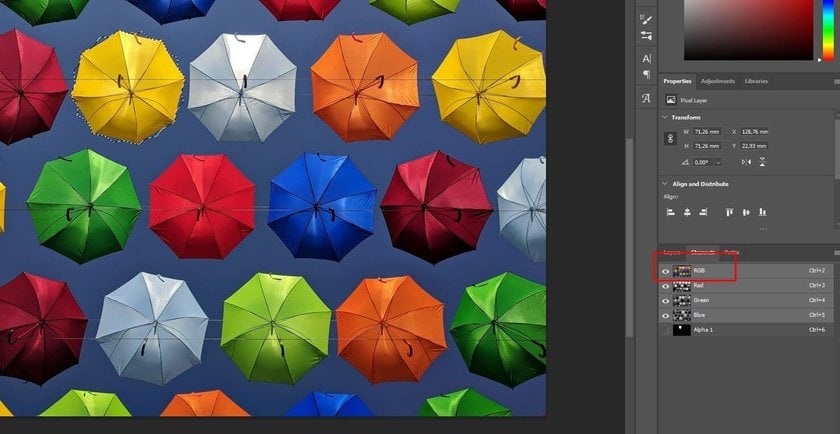
2. Deselect and Transform: Clear your selection (Ctrl+D or Cmd+D), then click on Alpha 1 channel and use Transform (Ctrl+T or Cmd+T) to swivel.
3. Reselect and Return to Color: Use the Move Tool and Ctrl (Cmd for Mac) to click on the Alpha channel thumbnail to reselect the rotated area. Switch back to RGB Channel to see your image with the rotated selection.
Adjusting Shapes: How to Rotate Shapes in Photoshop
 This process is straightforward. Use the Shape Tool (U) to create and customize a shape. Then, click and drag outside the shape's corner to turn it, with the angle shown next to the shape. Press Enter when done. Use the Angle setting in the Properties Panel, found under Window > Properties, for precise angles. Select the angle from the drop-down for exact control!
The Art of Rotating Images: Turning and Tilting
 Knowing how to rotate an image in Photoshop can really change its appearance. You can turn a picture on its side, make it upside down, or even create a mirror image. So, how to tilt a photo in Photoshop? Here is the answer:
Go to Image > Image Rotation. You can turn it 90 degrees left or right or flip it 180 degrees. Select 'Arbitrary...' for a custom angle and enter the degrees. Tools like the Perspective Crop Tool can tilt your image, while Transform and Free Transform allow detailed adjustments. Use the Rotate View tool to swivel the entire image or the Image Rotate command to create a mirror image.
Find out more: How to Flip an Image in Photoshop
Advanced Rotation Techniques in Photoshop
When working with multiple images or layers in Photoshop, there are advanced techniques to handle rotation, saving time and effort efficiently!
Using Transform Shortcuts for Efficient Rotation
Instead of navigating through menus, shortcuts like Ctrl+T (Cmd+T on Mac) can quickly access the Free Transform mode. This mode allows easy rotation, scaling, and transformations of your selected layer or object.
Batch Rotation: Adjusting Multiple Layers at Once
If you have many images or layers to turn, doing them one by one can be time-consuming. Photoshop's batch processing feature is a solution:
1. Prepare Your Images: Place all images you want to swivel in a folder.
2. Record an Action: Go to Window > Actions. Create a new action, record the rotating steps, and save an image.
3. Batch Process: Go to File > Automate > Batch, select your recorded action, and apply it to the image folder. Photoshop will then transform all the images in the folder according to your recorded action.


Setting and Changing Your Pivot Point
The pivot point in Photoshop is the center around which your object turns. By default, it’s set to the center of your selection, but you can click and drag the pivot point to a different location. This is useful for turning objects around a specific point in your image.
Smart Objects and Their Rotation Advantages
Smart Objects in Photoshop offer nondestructive editing, allowing you to turn, scale, or transform layers without losing quality. Key benefits include preserving the original data during transformations, updating all instances if the source changes, and flexibility in experimenting with designs. However, they have limitations with direct pixel editing unless rasterized or edited in the source application. Smart Objects thus enable efficient and creative image manipulation!
Helpful Tips and Tricks for Photoshop Rotation
Here are some simple ways to turn pictures and shapes in Photoshop, making your designs look right!
How to Rotate a Single Layer Distinctly
You may also have a dilemma: how to rotate one layer in Photoshop? If you want to turn just one layer of your picture without changing anything else, here's what to do:
1. Pick the Layer: Find the layer you want to change in the list on the side and click on it.
2. Start Rotating: Press Ctrl+T (or Cmd+T on a Mac) to change the layer. Move your mouse to the edge until you see a curved arrow, then drag it to turn around the layer.
3. Finish Up: Press Enter when it looks good to you.
Pro Tip: Sky Replacement and Augmented Sky tools automatically adjust the orientation of skies and objects with intelligent 3D rotation, which Photoshop requires manual steps for.
Leveraging the Power of Photoshop CS6 for Rotation
Photoshop CS6 has some cool features for turning:
1. Easy Process: Click and drag to turn any layer.
2. Change the Center Point: You can choose a spot for your layer to turn around.
3. Exact Angles: Type in the same number of degrees you want your layer to turn for really precise rotations.
Tricks for Rotating Rectangles, Items, and Other Elements

Keep Shapes Even: Hold the Shift key while you turn to keep the shape looking right.
Snap to Straight Lines: Holding Shift also helps snap the rotation to straight angles, like 90 degrees, which is great for lining things up.
Use Lines to Help: In Photoshop, you can turn on guidelines to ensure everything is right.
A Glimpse into the Future: Luminar Neo
 Rotating an object in Luminar Neo, an image editing software powered by next-generation AI technology, is more intuitive and efficient than Photoshop.
For instance, with its Transform Tool, you can easily turn, skew, and adjust perspective in a more streamlined way, providing faster control over object manipulation. The software automatically aligns objects or skies during rotations, ensuring perfect perspective without manual tweaking.
Photoshop, while powerful, often requires more manual steps to achieve the same result, such as using multiple tools and fine-tuning angles. Luminar Neo simplifies the process, making it ideal for photographers and designers who want quicker, smarter adjustments with less effort. In addition, you can use Luminar Neo as a plugin with Photoshop and Lightroom.
Find out more: How to use layer masks in Luminar Neo
Advanced yet easy-to-use photo editor
Get Luminar Neo NowWrapping It Up: Mastering Rotation in Photoshop
This guide has covered everything from basic layer rotation to advanced tricks for transforming shapes and images in Photoshop. We've explored essential features in Photoshop CS6 and introduced Luminar Neo for easy AI-powered photo editing. These techniques allow you to creatively transform elements in your photos and designs!
Moreover, Luminar Neo's mentioned advanced rotation techniques offer significant improvements over Photoshop in simplicity, speed, and AI-assisted precision. These features can be especially beneficial for photographers looking for a faster, more streamlined workflow without sacrificing control or creativity.
FAQ: Rotating in Photoshop
Can I Rotate Only One Layer in Photoshop?
Yes, select the layer and use Free Transform (Ctrl+T or Cmd+T) to turn around without affecting others.
How to Rotate Layers in Photoshop CC?
Select the layer, then Edit > Transform > Rotate or use Free Transform (Ctrl+T or Cmd+T).
Differences in Rotating Objects vs. Layers?
Rotating an object affects only that item, while rotating a layer turns everything on it.
How to Rotate a Text Layer in Photoshop?
Select the text layer, then use Free Transform (Ctrl+T or Cmd+T) and drag outside the box to turn.
How Do You Rotate 90 Degrees in Photoshop?
Select the layer, go to Image > Image Rotation, choose '90° Clockwise' or '90° Counterclockwise', or use Free Transform with Shift for precise 90-degree rotation.
