We'll teach you how to make up great high dynamic range photos on your Mac.
Lightroom 3 is a pretty cool photo editor, and there’s a lot more you can achieve with the app in spite of its perceived limitations. This article focuses on how one can achieve stunning HDR results in Lightroom 3. But first, let’s refresh our minds on a few facts about HDR.
Understanding Dynamic Range in Photography
Every photography process, at one stage or the other, revolves around three major players – the capture device (camera, smartphone or any camera enabled device), a storage medium (film, Memory card or cloud), and an output or display device (Monitor screen, Mobile device screen, or print).
These three have continued to play a principal role in photography from the very beginning.
It goes without saying that the camera requires a storage space if it’s to function optimally. And, of course, a display unit or device since the captured image would be of little or no use if it cannot be viewed or used elsewhere. This brings us to the quality of captured image with specific emphasis on the Dynamic Range.
The Dynamic Range of a captured image plays a vital role in the quality of photo that is eventually produced. Put differently, a higher dynamic range would produce more realistic images. But, you see, the entire field of photography, however interesting, could sometimes feel somewhat complicated especially when you don’t know where you should be looking.
If the Dynamic Range of a scene is too high or low for any one of the ‘players’, particularly the camera and output device, some details (highlights or shadows) would need to be sacrificed. In an attempt to fix this limitation, the High Dynamic Range (HDR) technique was created.
It’s important to note that the operational principle of the HDR technique is pretty simple and straightforward, particularly if you know where to look.
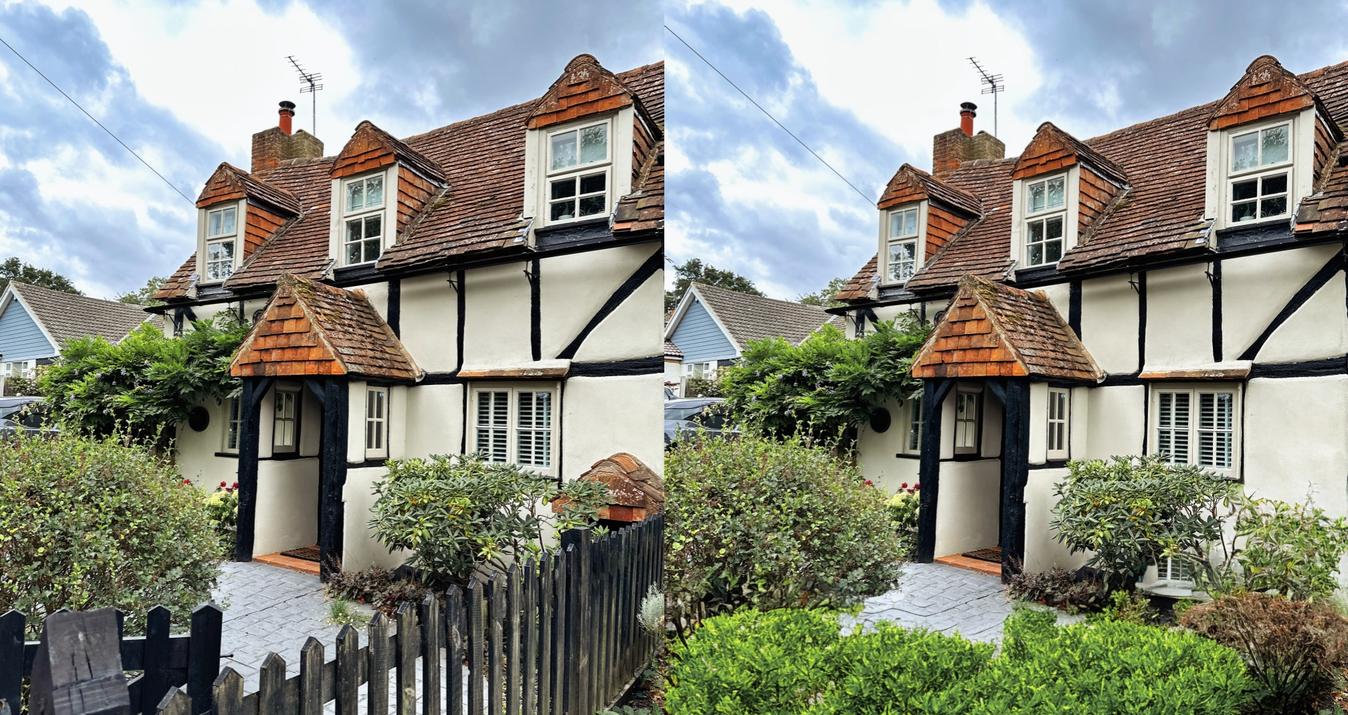
Bracket images with exposures are taken from the same scene. These images are then processed or merged together, by means of an HDR app, into a single photo, the HDR image. Photographers, who really know what is HDR photography, can now easily capture the complete dynamic range of scenes that are within their camera’s reach, many thanks to the HDR technique.
High Dynamic Range Software
High-Dynamic-Range programs can be used to accomplish stunning results in virtually every photography task as long as you play by the rules – same-composition photos having varied light exposures. The HDR technique is an incredible imaging technology that’s applicable both within and outside the photography domain.
Since the development of HDR apps which has gone through series of improvement phases, it is becoming a lot easier to process bracket photos into HDR images of better quality. The era when HDR apps grossly produced unrealistic results in the shadow-contrast effects is gradually fading away.
Unlike the way it once was, years ago, when great photo-shoots were only achievable with pro photographers and their powerful cameras, the advent of the HDR imaging technology (HDR app) has to a very large extent, improved the quality of realistic natural-looking photos in circulation today.
There are now several dozens of HDR apps that can be incorporated into your workflow for realistic Dynamic Range results. Besides Photoshop, Photomatix and Aurora HDR, are you aware that you can achieve stunning HDR results in the Lightroom 3? Yeah, you sure can!
High Dynamic Range in Lightroom 3
Adobe has made a good number of significant improvements with Lightroom since its third (3rd) iteration. You’d be amazed to find out that your LR3 isn’t as dumb or technologically lacking as you may have thought. If you are a Canon user, Lightroom may be a great alternative for Canon DPP.
Generally speaking, Lightroom is Adobe’s simplified version of Photoshop. The app is great for executing basic photo editing tasks while avoiding the technical or overwhelming look of the Photoshop editing environment.
But if you would be processing your multiple-exposures for High Dynamic Range, there’s no hiding place in Lightroom 3. Unlike the newer versions of Lightroom that supports HDR processing and the likes, you’d, at some point, need to take a short trip out of LR3 if you must get your HDR tasks properly done.
Lightroom enthusiasts would agree that one of LR 3’s characteristic features is its simplified interface when compared to Photoshop’s. In other words, Lightroom 3 is clear-cut and fast. LR 3 is designed to enable you to easily carry out swift and satisfactory photo editing tasks.
Aurora HDR Plugin: Upgrading your Lightroom 3 Features
This is probably not the first time you’d be hearing about incorporating a plugin into your favorite editing app or some other software program. Plugins, also known as add-ons or extensions, are software components that can be installed on an existing program.
They usually contain additional features and functionalities that make it possible for individual users to be able to customize their existing program to suit a specific purpose or use. This makes programs that support plugin installation generally more versatile than those that don’t.
Adobe Lightroom 3, despite its age, is an amazing program. Its compatibility with third-party applications like Plugin and Presets is noteworthy. LR 3 is remarkably extensible, supporting a host of plugins, little wonder it has remained relevant even with the presence of newer versions.
Among all the free HDR plugin for Lightroom 3, as well as the paid ones, Aurora HDR software is king! With Aurora you can conveniently carry out your HDR in Lightroom 3
Why Photographers choose Aurora?
Aurora HDR is an exceptional HDR tool created by Macphun, and the world’s famous HDR professional photographer, Trey Ratcliff. Aurora is great at handling all HDR tasks in a very intuitive way. The app is fun to use which makes it a user-friendly app that gives you tremendous control over your images.
Using Aurora’s Plugin for your Lightroom 3 HDR workflow is a guaranteed way of getting stunning results in a fascinating way. Even more interesting is the fact that Aurora plugin options are slider controlled, which means they can be easily tweaked to achieve your desired HDR effect.
Aurora HDR is also available as a standalone app. Irrespective of the version you decide to use, you’d love Aurora’s simplified setup process as well as its highly intuitive HDR functionalities, and all.
Conclusion
It’s no longer a myth that HDR techniques offer a more reliable shot at achieving a better picture quality; using Aurora HDR (as a Plugin or standalone app in LR 3) is the smartest and most efficient way to creating your most outstanding HDR images.
A Special Perk for Our Blog Readers
Get a 10% discount on Luminar Neo and dive into professional photo editing today!
Thank you for subscribing.
Your gift is waiting in your inbox!