Take your photography to the next level — win the Loupedeck+ console!
April 17, 2019

We love our community and we always do our best to make the editing workflow faster and more creative.
That’s why we’ve partnered with Loupedeck to give you total focus on your images with full-screen editing. Want to become the owner of a new Loupedeck+ console?
What is Loupedeck+?
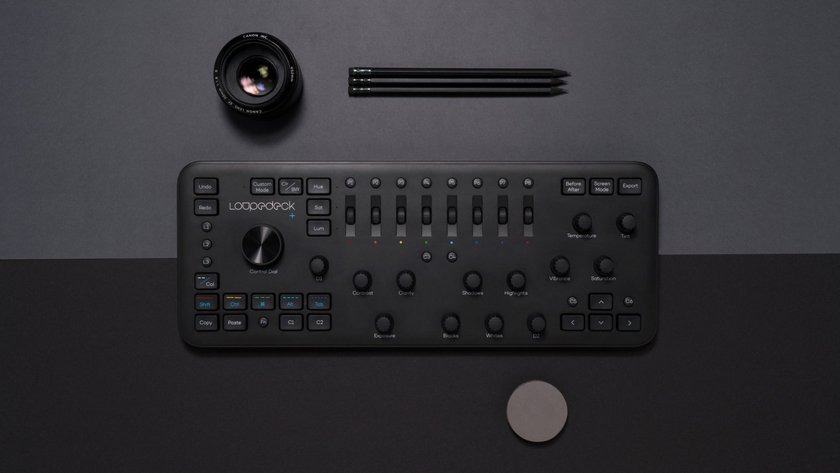
Loupedeck+ is a photo and video editing console. It lets you be more creative, edit faster, and focus on what’s important — your craft.
Loupedeck+ is compatible with Skylum Aurora HDR, Adobe Lightroom Classic CC, Adobe Photoshop CC, Premiere Pro CC, Final Cut ProX, and Adobe Audition.
Thanks to Loupedeck+, Aurora HDR users can now edit photos faster and more efficiently. The console offers not just a tactile editing experience but also a more ergonomic alternative to changing basic settings, making HSL adjustments, cropping, and a whole lot more.
The best part? It’s easy to use and straightforward enough for new users to figure it out quickly. Each button and the dial is labeled according to the Aurora HDR slider it controls.
Read about five ways Loupedeck+ gives you an even more seamless workflow with Aurora HDR.
How to participate in the giveaway
Simply head over to Instagram to enter the giveaway! Your chance at winning the Loupedeck+ console is just three steps away:
- Follow @skylum_global and @loupedeck on Instagram
- Like the giveaway post
- Tag two friends in comments to the giveaway post
Increase your chances of winning by tagging extra friends (every 2 friends tagged = 1 full entry). The Grand Prize winner will be announced on May 3 on Instagram!
Giveaway terms: This giveaway is in no way sponsored by, administered by, or associated with Instagram or Facebook. By entering the giveaway, you confirm that you are 18+ years of age. The giveaway runs April 17 through May 3, 2019, at 12:00 pm ET.
We couldn’t be more excited. So hurry up, head over to Instagram, and enter the giveaway!
Follow Skylum Software: YouTube, Instagram, Facebook, Skylum Photography Community
Image credits: Loupedeck Official Website.