AURORA HDR 2019 REVIEW
February 25, 2019

This post was originally published on a Shotkit.com. We loved it and thought Skylum Blog visitors should read it too. So with the permission from Shotkit.com, we are reposting this great overview of Aurora HDR 2019 by adventure, travel, and wilderness photographer Teryani Riggs.
For landscape and cityscape photographers, HDR photography can be a wondrous thing. It allows you to expand an image’s tonal range far beyond that of a single exposure.
When done right, it gives you the entire palette that the human eye can see – something most single exposures simply can’t do.
To make HDR work well, you need very specific software. Traditionally, one would take 3–5 different exposures of the same scene and then put them into a program that would combine them together to get the best tonal range.
Good software can also take a single RAW image and expand an image’s tonal range through tone mapping.
Most HDR photographers choose to go elsewhere for the actual exposure-combining and initial editing, and for many, that software is called Aurora HDR.
Now Aurora HDR 2019 is out and the improvements keep rolling in. Here’s a bit about it and why I think it’s the best all-around HDR editor.
What is Aurora HDR 2019?
Aurora HDR 2019 is Mac and Windows compatible software inspired by the workflow of Trey Ratcliff, a famous HDR photographer who’s really set the bar high for HDR photography.
Trey’s involvement is no doubt one of the main reasons why the interface and style is so different from other programs.
Like other HDR programs, Aurora can either combine bracketed photos taken at different exposures or create a tonal map of a single image shot in RAW.
The results are a higher tonal dynamic range than your camera could normally produce in a single exposure, with far more information in the shadows and highlights.
It can be used both as a standalone program and as a plugin for Lightroom, Photoshop, Elements, and Apple Aperture.
(I personally think it’s best used as a plugin, but more on that later.)
 The superb ghost reduction in Aurora HDR 2019 made the edge of this wave look realistic | 1/6 f/8 ISO 100 | Sony a7III + Sony FE 16-35mm f/4 ZA. Photo by Teryani Riggs
All HDR programs have their unique way of merging photos. Aurora HDR 2019 uses AI in their new Quantum HDR engine, and the results are excellent.
I’ve run a number of my old sets of bracketed exposures through it, and the opening image is often (though not always) far superior to what I was working within the 2018 version or in Nik’s HDR Pro. (It was certainly better than anything I’ve ever done in Photomatrix Pro).
There’s far less noise in the final image and considerably better tonal blending. In addition, the ghost reduction is impressive and the color denoise and chromatic aberration reduction really works.
Not once have I ended up with halos or fringing. Literally not once!
On top of that, Aurora is also far more powerful and pleasant to use than any other HDR software I’ve ever worked with.
The UI is sleek and intuitive and the controls handle a bit like a race car – just the slightest adjustment creates substantial results.
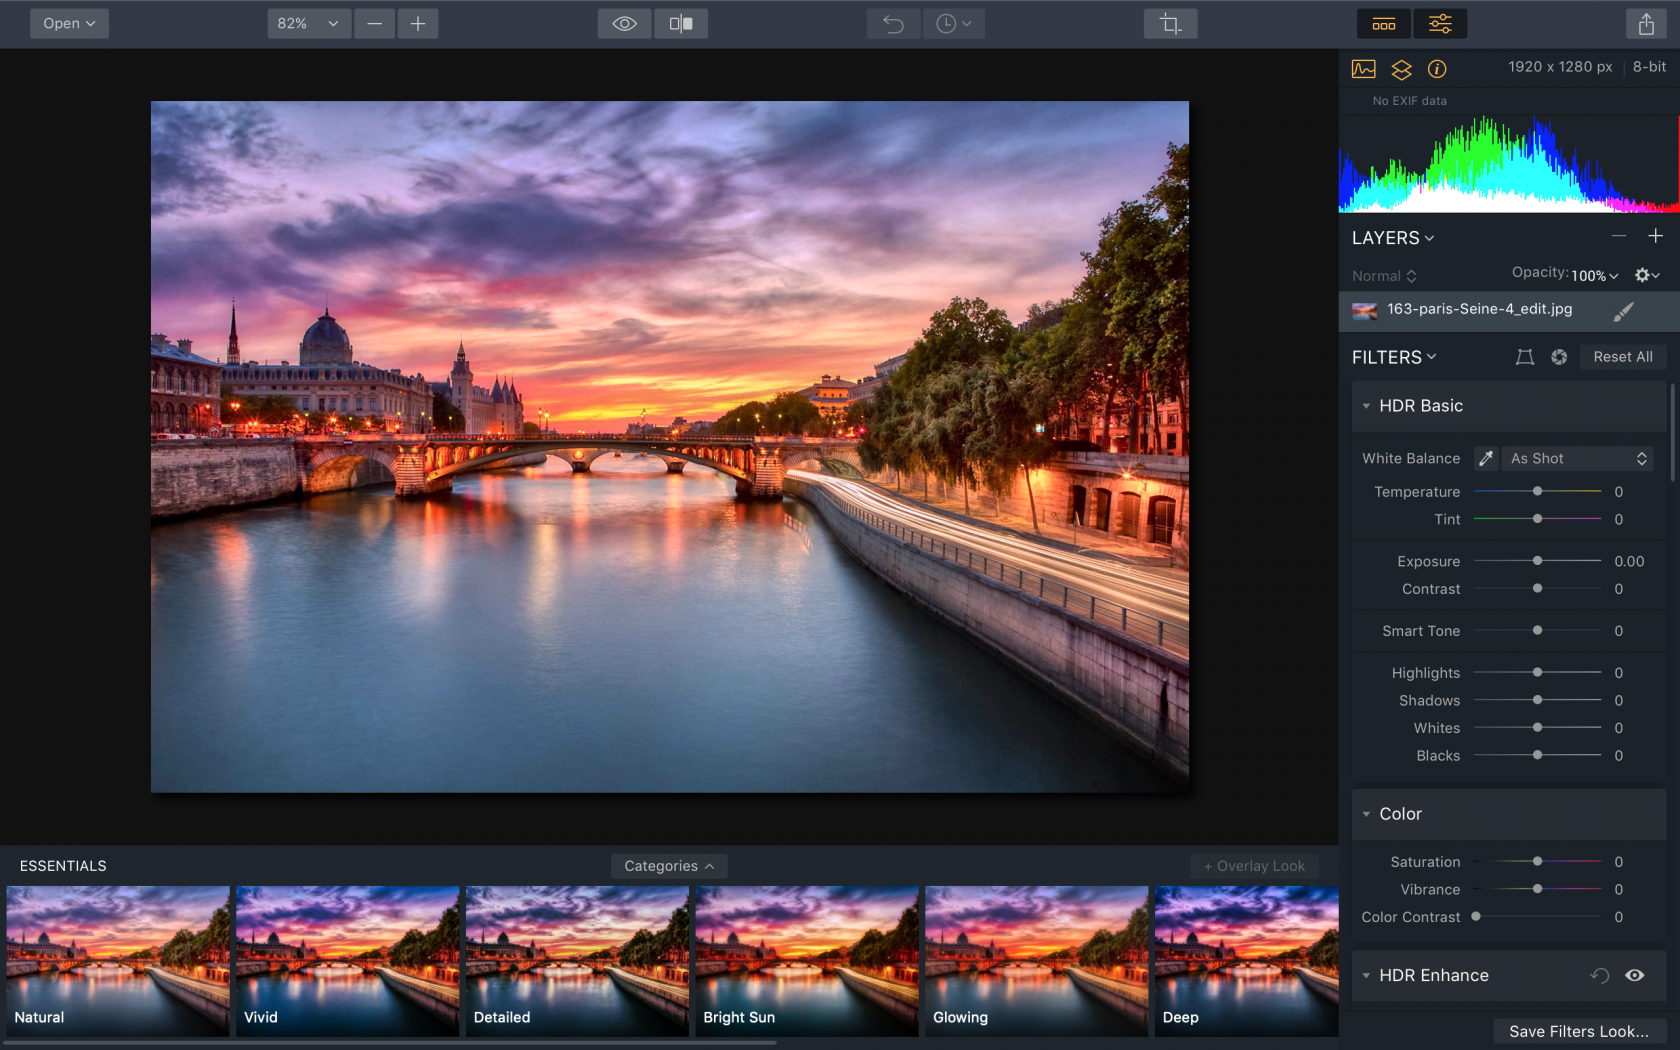
Aurora HDR 2019 | The UI
The first thing that both novices and experienced photo editors who work in Lightroom will notice is that the interface seems quite similar to Lightroom, though much sleeker.
The adjustment panels run down the left-hand side and many of the initial sliders are exactly as you’d see them in Lightroom. There’s even a histogram at the top (which I find very useful).
That’s where the similarities end. Unlike Lightroom, Aurora HDR also allows you to work with layers, masks and blending modes à la Photoshop.
If you’re a beginner, this probably won’t make much difference to you, but if you’re used to having serious control over exactly how you adjust your images, this will be a serious plus.
Like some aspects of Lightroom, all of the changes you make to an image in Aurora are non-destructive. The program saves to its own file format where it preserves all of your editing history and adjustments. You can go back at any time and tweak things.
Of course, you can also export as a .jpeg or .tiff, but then you get the image only – no editing history.
One aspect that Aurora HDR 2019 has that both Photoshop and Lightroom don’t have, is intuitive ease of use. There’s very little learning curve.
Whether you’re someone who’s never shot in HDR or you’ve been doing it for years, the UI is sleek and easy. Everything is laid out in front of you and it only takes a little experimentation to figure out your workflow.
You can even use other Photoshop plugins with Aurora. So if you already have an established workflow with say, Nik and Topaz filters, you can use them directly through Aurora.
(Honestly, I haven’t found any filter that really comes close to what the Tonal Contrast in Nik’s Color Efex can do. It works amazingly well with HDR, too.)
The last thing that I just absolutely love about both Aurora and Luminar, is that each filter has a simple, obvious on/off toggle button. I can easily see what the changes will do to the image without having to turn off an entire layer.
While this isn’t necessarily unique, it’s definitely one of the things I use the most.
[Related: Luminar Discount Code]
 Installing Aurora HDR 2019 as a plugin is simple
What your workflow will look like will depend on whether you intend to use Aurora as standalone software or as a plugin.
If you’re not already used to Photoshop and Lightroom (or you stopped using them when they changed over to subscriptions), Aurora HDR will probably work fine as standalone software.
It allows you to crop, transform, manually correct for lens distortions, and use any other Photoshop plugins in tandem with it. It also has a curves adjustment panel, HSL, split toning, and vignette, as well as excellent noise control. If you’re used to Adobe products, however, you’ll probably appreciate it more as a plugin.
Manually adjusting for lens corrections is challenging for most people, there’s no healing brush, and I don’t always want to have to manually paint my selections in (an issue I have with Luminar as well).
Also, if you’re already using Lightroom’s catalog system, then it will make more sense to stay with that.
Aurora HDR 2019 | Features and Filters
 Just like with Lightroom, you can use the histogram in Aurora HDR to reveal areas of clipped highlights and shadows.
As far as the different filters and features are concerned, don’t be fooled by the simplicity of the interface – they’re quite powerful and in some cases, very unique.
Many use artificial intelligence (e.g. Smart Tone, HDR Clarity, and HDR Smart Structure) and some are downright novel (e.g. Dodge and Burn, Adjustable Gradient, and LUT mapping). Skylum’s sister program, Luminar, also has these.
On this most recent version of Aurora HDR 2019, the sliders are incredibly sensitive.
Since I’m looking for a natural-looking image, I rarely need to make any adjustments far beyond 10-20, especially when working with filters like HDR Clarity, Smart Structure, and so on.
For me they’re like salt: little really improves the image; too much and it can become, well, inedible.
 The adjustable gradient filter in Aurora HDR is especially useful for working on landscapes. It allows you to set the orientation and then adjust the top of the image separately from the bottom.
Of the more unique filters, one of the more useful ones for me in my landscape work is the Adjustable Gradient. (Luminar has this as well.) It allows you to adjust the top of the image separately from the bottom.
In landscapes, the sky is often much brighter than the foreground – even when using HDR. Being able to quickly and easily change the sky without affecting the foreground (and vice versa) saves me loads of time.
There’s no need to create another layer and a layer mask. Simply set the orientation and adjust. This feature is especially useful when editing photos of sunsets.
Other more proprietary filters that make a huge difference in my images’ final look include the color contrast slider, the HDR Enhance panel, and the Image Radiance filter. All of these, used judiciously, can really enhance an image.
And remember the race car analogy I used above? The AI filters (Smart Tone, HDR Clarity, and Smart Structure) are particularly powerful, with only the slightest of adjustments making powerful changes.
You don’t need to yank the wheel – just a slight nudge is often all an image needs, at least when doing realistic photography.
Aurora HDR 2019 | Presets and LUTs
 Like most other HDR editing programs, Aurora HDR 2019 comes with a number of presets that they’ve now renamed as Looks.
They’re incredibly easy to adjust, both in terms of the single slider each preset has and via the adjustment panels on the left. Just about all of these pack quite a punch, though, so you’ll probably want to dial them back significantly.
While the preset collection that comes with 2019 is a bit slim, there are more Looks available on Skylum’s site and you can easily create and share your own as well.
Along the same lines, both Aurora HDR and Luminar come with the ability to use LUTs. Look Up Tables are usually used in movie making, but can offer some great looks to still images too.
Aurora HDR 2019 comes with a number of LUTs that you can use just like presets, or you can use other LUTs that you might come across elsewhere. I may be wrong, but I’m pretty sure no other strictly HDR software has this available. Also, while you are able to load LUTs into Photoshop, it’s much easier to do it with Aurora HDR.
 Taking advantage of LUTs and presets in Aurora HDR is a piece of cake
For me personally, though, I don’t find the presets or LUTs all that useful in Aurora. I’m more likely to get the look I’m going for simply going down the left-hand column and adjusting the sliders.
Mostly I just use the presets for inspiration when I can’t quite get an image looking as good as I’d like it to. Or for when I’m looking for something different, but I don’t know exactly what it is.
As I rarely find a preset I want to use, I’m grateful for the history pull-down menu that makes it super easy to go back however many steps I need to.
I do occasionally use the LUTs in Luminar, though. But they come at the end of my workflow, not at the beginning when I’m using Aurora. They have some particularly nice ones that are downloaded from the Skylum site.
Aurora HDR 2019 | What Could be Improved
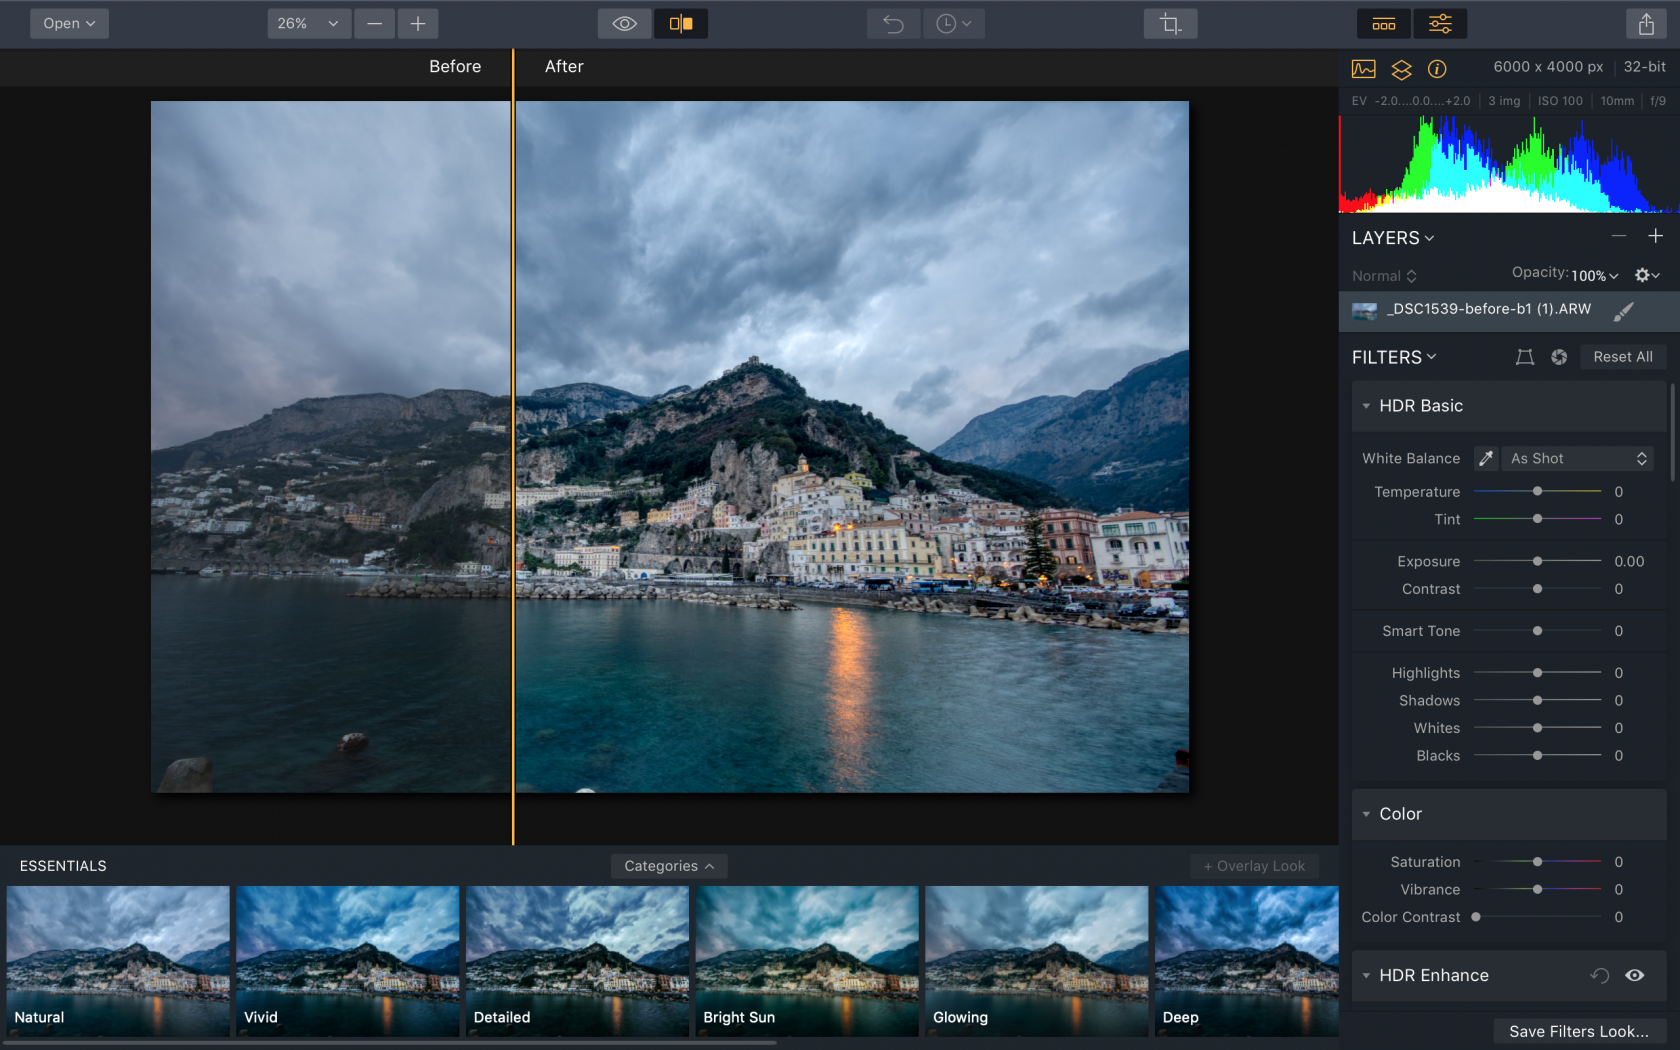
 The Aurora before and after slider seems a little redundant to me
One thing I find particularly useless (although it looks cool) is the before/after slider bar. I may be wrong in this, but the “before” slider image seems to be taken from the middle exposure image before they were combined, not the baseline combination of all three images.
I’d also really appreciate it if both Aurora and Luminar would offer some more advanced selection tools. Not everyone wants to draw their masks in by hand or use a gradient.
In the same vein, offering some kind of healing brush would go a long way towards making this a standalone program. As it is, you need to use it in tandem with another editing program if you need to erase anything (like lens dust or water droplets) from the image.
Also, the presets/looks would be easier to use if they had a simple on/off toggle button like the filters do so we could see their effects without having to change the slider. It’s just a little thing, but would be oh-so-helpful.
Lastly, Aurora HDR 2019 needs a lot of processing power to run. Even on a brand new 2018 iMac, it was taking a long time to get the initial image. On my little 2010 MacBook Air, it’s agonizingly slow.
Aurora HDR Coupon Code
Considering its current bargain basement price (see here), Aurora HDR 2019 really is a phenomenal deal – just as a plug-in, let alone as a standalone program.
As with all the Skylum products, updates come quick and fast and usually deliver plenty of useful features that you can take advantage of right away.
You can take advantage of a 10% discount using the Aurora HDR coupon code SHOTKIT – just look out for the small ‘Coupon Code’ field when making your purchase here.
Skylum is doing a great job at disrupting the pay-as-you-go subscription-based industry (oh hey there, Adobe!), offering affordable, high-quality imaging solutions, or for a one-off price.
Anyone who believes that a software company needs constant funding from a subscription pricing model to keep delivering frequent, valuable, updates, only need look toward Skylum, and what they’re doing with Aurora HDR 2019.
Aurora HDR 2019 Review | Final Thoughts
 Bixby Bridge 3-exposure HDR shot merged and edited using Aurora HDR 2019 | 1/200 f/8 ISO 100 | Sony a7III + Sony FE 16-35mm f/4 ZA. Photo by Teryani Riggse
The new Quantum HDR Engine really does make a huge difference in the quality of the initial image imported into Aurora HDR 2019 (whether bracketed or tone-mapped).
In fact, I was honestly able to rescue a number of older images that just didn’t come out well in Nik’s HDR Efex Pro 2 or even in the 2018 version of Aurora HDR.
No other HDR editing program offers layers, the ability to use Lightroom or Photoshop plugins, and a super-intuitive user interface all packaged into one.
Added to this, Aurora HDR 2019 makes the most realistic photos I’ve ever seen in an HDR program.
It’s supremely easy to use and works well as a plug-in for Photoshop and Lightroom. You really can’t go wrong with this amazing piece of software.
If you can recommend a better HDR program, I’d love to hear about it… but it’s hard to imagine anything beating Aurora HDR 2019 any time soon.
Disclaimer: All recommendations are impartial and based on user experience, with no bias to the products or the brand. The products in this post contain affiliate links which help support Shotkit.