This week on Creating the Shot, landscape photographer Sherwin Magsino tells us how he edited his dreamy Yosemite Valley shot on Luminar.
Creating the Shot is a new Skylum blog series that showcases how exactly photographers created and edited their famous shots. This week, landscape and real estate photographer Sherwin Magsino tells you how he edited his dreamy Yosemite Valley shot on Luminar.
One of the challenges of doing night photography is trying to capture and bring out the details at the same time in a pitch-black environment. You can do a super long exposure, but that wouldn’t always guarantee a properly exposed shot, especially when there are no artificial lights to help you illuminate the scene.
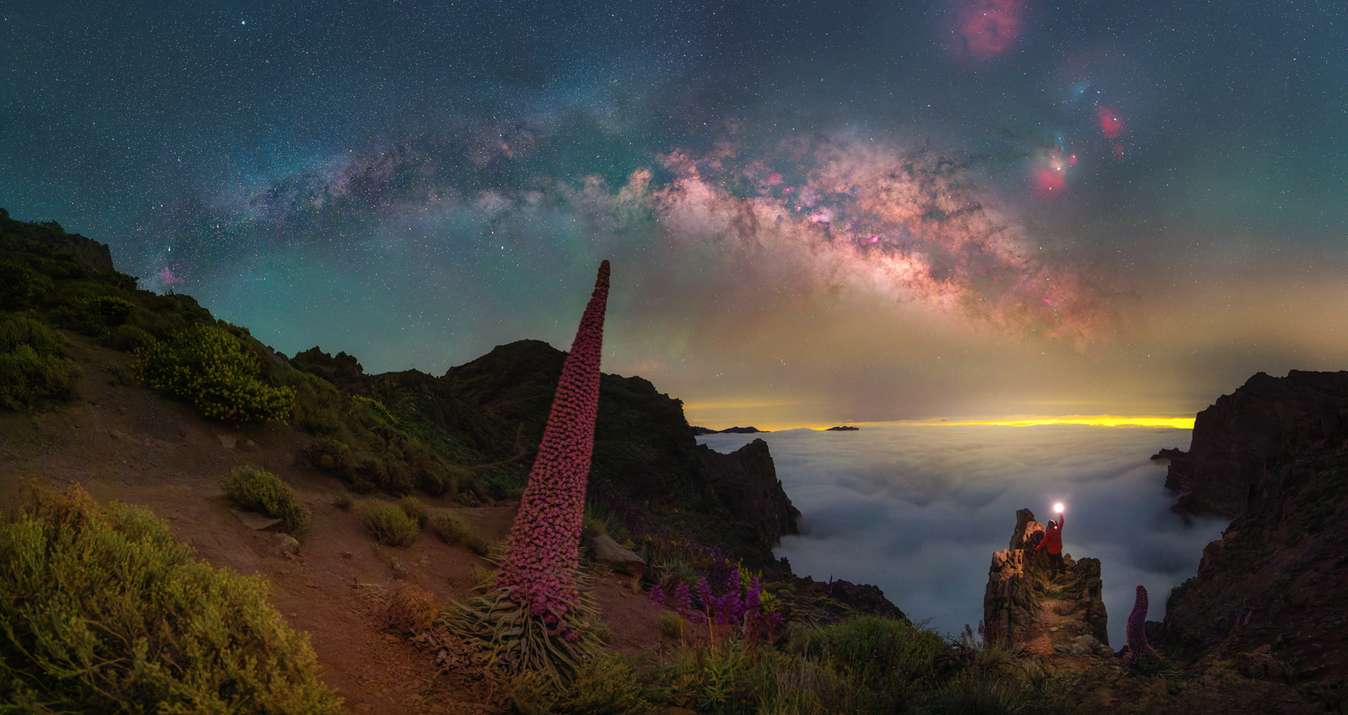
This is one of the shots I took in Yosemite Valley. I noticed there was a thick fog slowly drifting down into the valley, and I thought it could make for a really interesting scene if this fog just settled halfway in the frame, just over the treetops. As soon as the scene was ready for the shot, however, all the lights were gone and I couldn't see a thing. I was hoping for the moon to help light up it up, but it was totally covered by a blanket of clouds.
Still, this didn't stop me from shooting the spectacle. I set my camera to ISO 200—so there’s less noise in the image—at F/8.0 and in bulb mode for a two-minute exposure. When I got home, loaded the memory card to my computer and saw the result… an underexposed shot. But because I always shoot RAW and I knew that Luminar is powerful enough to help me expose the image properly, I knew I would easily be able to recover details in the sky, mountains, and foreground.
READ MORE: How to Take Night Photos
 240-second exposure at F8.0, ISO 200
So how did I utilize Luminar to go from this image above to this nicely exposed nighttime scene? I’ll tell you!


Step 1: Utilize the Accent AI Filter

The first thing I did was to add the Accent AI Filter, which is a one-slider-edits-all function. Basically, this filter automatically analyzes every image and makes the necessary corrections for shadows, highlights, contrast, tone, saturation, exposure, details, and more. I set the boost to 100, and I was amazed how it brought back all the details in the scene.
Step 2: Adjust White Balance and Exposure

My next step was to use the Raw Develop Filter to adjust temperature and tint as well as to make the scene a little brighter by lifting the exposure and shadows a bit.
By bringing the details back out, I noticed that the foreground and the sky became brighter than my subject, and I wanted to tweak those a little to make them darker. This way, anyone who looks at the photo wouldn’t get distracted from the mountains and the fog in the middle, as they are my intended subjects.
READ MORE: How to Develop Raw Photos in Luminar
Step 3: Make Local Adjustments with the Adjustable Gradient Filter

To bring focus back to my subjects, I needed to do local adjustments on the immediate foreground and the sky by making them darker than my subject. I added the Adjustable Gradient Filter, which allows you to selectively adjust exposure, contrast, vibrancy, and warmth for two different parts of the image. I played around with the mask orientation, until I got the result that I wanted.
Last Step: Use the Radial Mask for Final Touch-Ups


After I addressed that, all I needed to do was boost the middle of the frame and make the details pop out.
What I love about Luminar 2018 is the sheer number of filters and layer support, making the editing process a whole lot easier. Adding a new adjustment layer, I was able to make selective adjustments in that area by using a Radial Mask at the center of the image. I clicked on the invert button because I wanted the adjustments to take effect inside the Radial Mask.
With the Radial Mask selected and placed, I then added the Clarity Filter to increase mid-tones and contrast as well as the Accent AI Filter to increase brightness and finish it off.
 Sherwin Magsino is a landscape, real estate, and lifestyle photographer and Luminar user based in Manila, Philippines. Check out his work and follow him on Instagram.
A Special Perk for Our Blog Readers
Get a 10% discount on Luminar Neo and dive into professional photo editing today!
Thank you for subscribing.
Your gift is waiting in your inbox!