November 05
17 min. to read
How to Create a Transparent Gradient in Photoshop: 2 Simple Ways
There are two main ways to make a transparent gradient in Photoshop: by using the tool or layer styles. Here's a quick tutorial on creating a transparent gradient in Photoshop in easy ways using both methods.
Transparent Gradient Editing in Photoshop
You could always change the background color, and Photoshop will build a new transparent gradient, or you can use the Editor to tweak your gradient further.
The Opacity Stop determines the transparency of the matching Color Stop. You may modify the clarity of the matching Color Stop by selecting an Opacity Stop and then dragging the Opacity slider. To change the color, do double-click a Color Stop. When you're satisfied with your new gradient, you can use the Tool to add it.
Once applied, you may experiment with the Blending Modes to make your blend more seamlessly with your designs.
Method 1: Gradient Tool (how to gradient fade an image in Photoshop)
Creating a transparent gradient using a tool can apply a translucent gradient to any layer on your project. By setting it on its layer, you may complete the operation without causing damage. That way, you can always return and easily change or relocate your gradient.
To make Photoshop gradient to transparent, do the following:
- Choose a Tool.
- Select the "Foreground To Transparent" from the Builder.
- Choose Your Favorite Foreground Theme.
- Click and drag over your project to make a new Photoshop transparent gradient.
With these fundamental stages completed, we'll examine each in further detail to better understand the entire technique. Similarly, we'll review a few simple methods to debug your tool if you encounter issues.
Step 1. Make A New Layer
To start, add a new layer to the Layers workspace by choosing the new layer option. To start a new layer, use the Command Option + Shift + N (Mac) or Control + Alt + Shift + N (PC).
Step 2. Choose Your Gradient Tool
To launch the tool, tap on the toolbar button or enter G.
Step 3. Choose A Foreground To Transparent In The Editor
Open the top menu and click on the editor while your tool is chosen. A new menu box contains all of your opened tool options. Here you may select from a variety of presets and customize the sort of gradient you wish to generate.
Open the "Basic" section inside the presets selection to display the many options. The white and grey checkerboard color represents the foreground to transparent gradient. This checkerboard means transparency.
Once you've chosen your gradient, click apply to leave the builder.
Step 4. Select a Transparent Gradient Color
Because it is based on your current background shade, this gradient is dubbed "foreground" to transparent. By checking at the end of your toolbar, you can determine which color is chosen as your foreground color. The color in the top colored box is your current background color. To modify the tone of your background, click the foreground color box to show the color picker.
Apply after selecting a color from the color palette.
Step 5. Adding To A New Layer
Now that you've picked your new layer, it's time to put on the gradient!
Ensure you use the correct type for your photo before you start. A list of variations is next to the editor on the top side of the toolbar. To change the appearance of your gradient on your new layer, select the linear, radial, angle, reflected, or diamond options. If you're unsure, We'd recommend keeping with the linear gradient. In almost any situation, this form of gradient will suffice. After selecting your type, set and put the transparent gradient into your canvas.
Step 6: Changing the Color of an Existing Transparent Gradient
You may want to modify the transparent gradient color once it has been created. Step by step, it appears there is no way to achieve this without starting from scratch. Fortunately, there is a simple fix using the Layer Styles dialogue box.
Double-click on your foreground layer to open your Layer Styles. A new box will emerge with many choices for changing the appearance of that specific layer.
Select "Color Overlay" in the styles menu.
Remember that your opacity gradient in Photoshop should be 100%, and your blending style is standard. Then, click the colored box to select the new overlay color.
When selecting the foreground color, apply the color selector to choose a new color overlay, just like you did. Regardless of your desired color, it will be used for the colored parts of your transparent gradient. Then apply the outcome.
Method 2: Layer Mask
We'll show you how to alter layer masks using transparent gradients. You don't need to create a new layer section since you'll add a layer mask to a current picture layer! Using this approach, you may want to make effortlessly gradient fade in Photoshop areas of your picture with only a few clicks. Here's how it might look.
Step 1: Build a Layer Mask for Your Layer.
Now, you should apply a layer mask. You've previously picked a foreground to transparent gradient following the methods outlined in the first variant. Layer masks may be applied to any layer or group. To make a new layer mask, choose the layer you want and click the layer mask button at the end of the Layers setting options.
Step 2: Make the foreground color black.
Choose black as your foreground color if you wish to fade to transparent in Photoshop half of your image. To do so, apply black from the color selection by clicking on the foreground color box.
Step 3: Create A Transparent Gradient For Your Layer Mask
Then, choose your layer mask by clicking the toolbar. Please take notice of the white boxes around the borders of the layer mask image to ensure it's decided.
It is a simple method for fading away the boundaries of the layer masks.
How to Customize a Transparent Gradient in Photoshop: Extra Tips
Since we added the transparent gradient with a layer mask, we can modify it whenever possible.
- For instance, with the Paint Brush tool.
- Remember, you should choose the layer mask thumbnail.
- Then pick the Paint Brush tool and make the color black.
- Begin coloring the photograph.
- Try to draw a whole screen to see the entire picture.
- If you want to create areas of the photo solid color, you should set up the white color.
Typical Problem with the Transparent Gradient
Now you know how to create a transparent gradient in Photoshop. If you do everything right, you will get a good result. But sometimes there are some mistakes due to which you will be unable to get the desired result.
Top mistakes:
1. Examine the Blending Mode.
This mode determines how a gradient is blended into a layer when formed. In rare situations, you may have mistakenly altered this option without knowing it.
2. Make sure that your layer or layer mask is chosen.
If nothing is chosen, Photoshop will not know where you wish to add your gradient. Ensure that your layer thumbnails or mask are selected based on what you want to change.
3. Double-check your background color when adding a gradient to layer masks.
Ensure you're using the correct color for your layer mask before you alter it. For example, applying a white gradient on a white layer mask has no results.
4. Confirm your chose
Sometimes, your gradient may be drastically different from what you intended. It is frequently due to the incorrect type being selected. Aside from the editor, you can discover a variety of kinds while the gradient tool is activated. Check to verify which is picked and whether or not it corresponds to the one you're attempting to make.
5. Make sure that your layer is visible.
Anyone won't be able to notice any of your gradient tweaks if your layer isn't displayed or if the opacity is set to zero. Make sure the icon is displayed beside your selected layer and that the opacity of your layer is set to 100%. It is a simple remedy that I've come upon on multiple occasions by mistake.
Spotlight: Luminar Neo
You might also consider using Luminar Neo, a robust and versatile software renowned for its effective Mask tool, ideal for detailed and creative photo editing.
Using the Linear Gradient Mask in Luminar Neo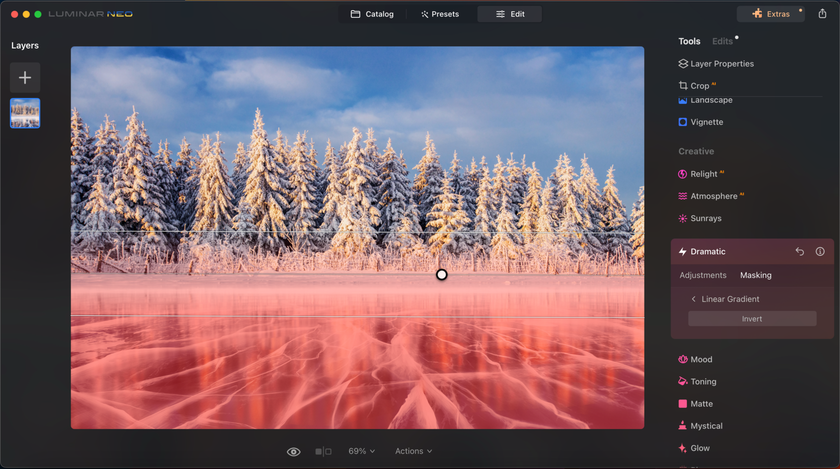

The Linear Gradient Mask in Luminar Neo is a powerful tool for creating a smooth transition between two effects, especially favored by landscape photographers for its ability to apply effects along a gradient seamlessly.
Steps to Use a Linear Gradient Mask:
Open Your Image: Launch Luminar Neo and open the image you wish to edit.
Access Editing Tools: Go to the 'Edit' tab on the top toolbar to see the tools pane. Scroll to 'Creative tools'.
Apply Dramatic Effect: Select the 'Dramatic' tool. Increase the effect's intensity with the sliders for a noticeable change.
Initiate Masking: Click on the 'Masking' tab within the tool.
Create a Gradient: Select 'Linear Gradient' in the mask tool. Click and drag on your image to create the gradient. A red overlay will appear, showing affected areas.
Refine the Mask: Use the 'Additional Mask Controls' for adjustments. Options to Invert or Clear the gradient are also available.
Adjust the Gradient: Use the Hand tool to move or rotate the gradient lines, modifying their position and extent.
Tip: Enhance your gradient mask by selecting the 'Paint Mask' tool from the drop-down and using the Brush mode for additional adjustments.
Using a Radial Mask in Luminar Neo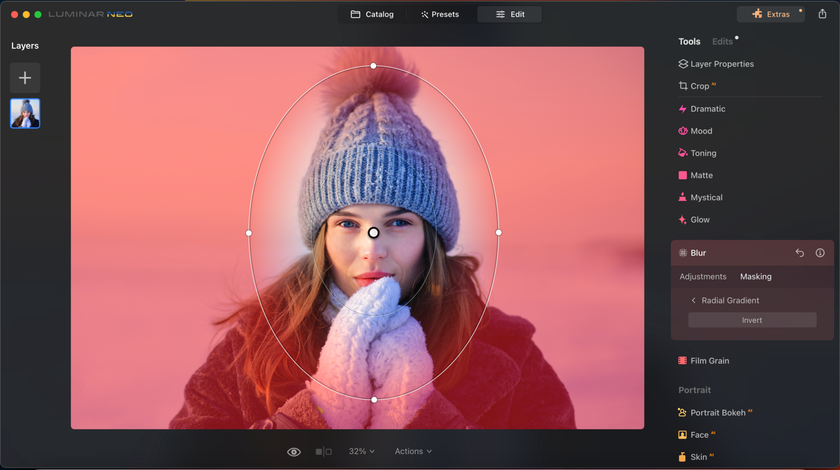

A Radial Mask in Luminar Neo highlights focal points like the sun or a face. This tool is perfect for creating a circular or elliptical blend.
Steps to Use a Radial Mask:
Open Your Image: Launch Luminar Neo and open the picture you want to edit.
Apply Initial Edits: Use any tool in the 'Edit' panel to adjust your image.
Open Mask Options: Click the 'Edit Mask' icon to set up a tool mask.
Choose Radial Mask: From the menu, select 'Radial Mask'. Pick between Standard or Inverted options.
Create the Mask: Drag to form a circular mask. A red overlay shows the affected area.
Mask Visibility: Use the mask controls (three-dot icon) to toggle 'Show Mask' for visibility.
Manipulate the Mask: Adjust the center, radius, feathering, and aspect ratio of the mask using the Hand tool. Rotation is also possible by clicking on the outer circle.
Tip: For further customization, switch to the 'Paint Mask' tool and use the Brush mode to add or remove parts of the Radial Mask, fine-tuning your selection.
FAQ
What is the difference between a linear gradient and a radial gradient?
A linear gradient creates a straight-line transition between colors, while a radial gradient creates a circular transition, spreading outward from a central point.
How many types of gradient are there in Photoshop?
Photoshop offers five main types of gradients: linear, radial, angle, reflected, and diamond.
How to make a linear gradient in Photoshop?
To create a linear gradient, select the Gradient Tool, choose the Linear Gradient option from the options bar, and drag your mouse across the area where the gradient appears.
How do you select a linear gradient in Photoshop?
Activate the Gradient Tool, then select the Linear Gradient icon from the gradient options at the top of the Photoshop window.
How do I make a shape fill transparent in Photoshop?
To make a shape fill transparent, create or select the shape layer, then adjust the opacity slider in the Layers panel or apply a transparent gradient to the shape.
Conclusion
How to make a transparent gradient in Photoshop? The answer is quick and easy. Creating it in Photoshop does not take much time, and even a beginner in Photoshop can make it. It's not scary to make mistakes because we work primarily on the layer mask, then it's always easy for us to make any changes and improve the mask. It is straightforward to start creating a transparent gradient. Thanks to our guide, you can quickly learn our creation methods and start working on your project. In addition, even other editing programs should have the same settings. Therefore, if you try to do these same actions, not through Photoshop, you also have a chance that you will be able to correct your photo.
 >
>
