March 28
15 min. to read
How to use and edit clipping masks in Illustrator: a quick guide
Masking in Illustrator is a handy skill for anyone in design. However, even though it is not difficult to master, many beginners have difficulty. In this tutorial, I'll detail how to create a clipping mask in Illustrator, what it's for, and how to use it to make perfect pics.
Don’t feel like reading the whole breakdown? We’ve pulled together a quick summary below.
Key Takeaways
Clipping masks in Illustrator let you display artwork only within the shape of another object, perfect for creative cutouts, text effects, and layered designs.
You can create a clipping mask via Object → Clipping Mask → Make, a right-click, or the Ctrl/Command + 7 shortcut.
Always keep the masking shape on top of the objects you want to clip. Illustrator will hide everything outside that boundary.
To edit a clipping mask, double-click inside to move, resize, or recolor the elements, then double-click outside to exit.
Combine masks with blend modes or outlines to create dynamic posters, ads, and brand visuals.
In Luminar Neo, you can use AI-powered masking (Brush, Linear, Radial, or Mask AI) for quick and precise photo editing.
What is a clipping mask, and why it's used for?
From the name of this tool (derived from clipper), it is clear that its purpose is to cut off objects. That is, this mask is a kind of window that makes it possible for us to see objects inside the clipping path. You can prepare two or more objects on the artboard, but only those inside the clipping mask boundary will be visible in the final image.
Do not confuse it with a layer one. We use both tools to mask something on the artboard, but they work differently. The main dissimilarity between them is that the second tool uses one layer to hide things. The first tool uses several layers called the clipping mask's group. In this case, the mask is placed at the top of the objects, and all the layers below are clipped to its shape.
How do PRO designers use clipping masks?
The guys at Adobe originally conceived it as a tool to put a pattern inside any shape. For example, you can draw a pinstriped tie using the shape of the tie as a mask. You can also make the text on your illustration stand out by adding a colorful pattern to it. This is what a tool does at a basic level. In addition, there are a couple of cool ideas to make designing more eye-catching.
- Create unique posters and covers for magazines/books/music albums, etc. The Illustrator's clipping mask tool is constantly used when creating images for printing.
- Take your collages to the next level by creating extraordinary transitions from one image to another. For example, you can create the effect of a torn poster showing another picture underneath.
- Play with surrealism and illusions if you are a photographer. Even the most ordinary portrait can be turned into a work worthy of a Salvador Dali brush if you know how to clip in AI.
- Create social media ad creatives that surprise your customers and attract hundreds of new followers to your profile.
- By creatively applying a clipping mask, you can come up with a brand identity that will make it recognizable in all countries of the world.
How to make a clipping mask in Illustrator?
First of all, let’s figure out how to create a clipping mask in Adobe Illustrator. There are several ways:
Drop Down Menu: Navigate to Object > Clipping Mask > Make. This menu option is straightforward and guides you through the steps.
Shortcut Key: Press Command + 7 on a Mac or Ctrl + 7 on Windows to quickly create a clipping mask using the keyboard.
Layer Panel: Look for the 'Make/Release Clipping Mask' icon at the bottom of the Layers panel. Clicking this icon toggles the clipping mask on or off for selected objects.
Right-Click Method: First, select all the objects you want to include in the clipping mask by clicking and dragging over them or holding Shift and clicking each object. Then, right-click and select 'Make Clipping Mask' from the contextual menu.
A clipping mask can only be a vector object. But inside, you can place both another vector object and a raster one or even a group of different things. Let's create a shape in Illustrator to practice. Let it be an ellipse (hotkey L):

Now we need to prepare the contents. I chose a random bitmap on my PC and also created a vector flare, also random:

Tip: You can add a bitmap in any way. I click and drag it to the artboard from explorer.
The first and most important rule: the Adobe Illustrator clipping mask must be placed on top of the objects that you will place inside! So I go to the layers panel and drag the ellipse up (since I created it in the first place, I had it on the bottom). I also removed the fill for clarity and placed my photo and flare below the figure:

Now we are going to clip. Select all the objects, right-click on them and choose “Make Clipping Mask” or press Ctrl+7.

Please note that you can't see the outline now. The same thing would have happened to the fill if I hadn't removed it earlier. That is, a clipping mask is an object without an outline and a filling.
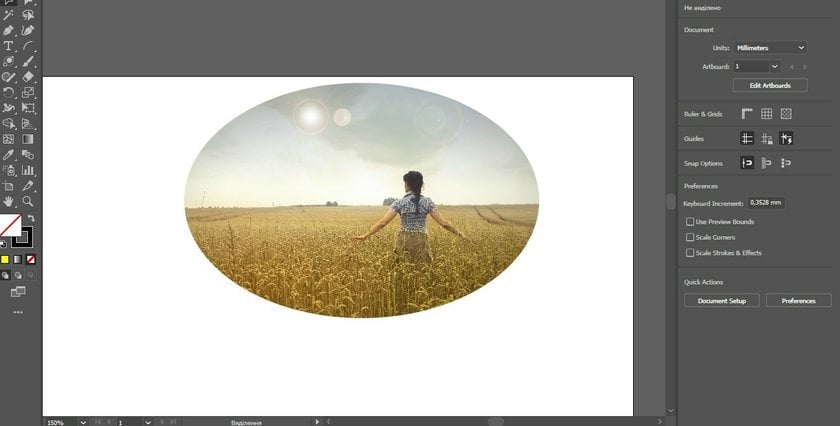 To create outlines, first press Ctrl+Z to deselect. We need to copy our ellipse to the clipboard, so select the desired shape and press Ctrl+C. Now select all the objects again and create a clipping mask as you did before. To place the copied ellipse with the clipping path exactly on top of the mask, press Ctrl+Shift+V. Here is your result:

Well, friends, now you know how to mask in Illustrator, but what if you already created a clipping mask and later wanted to edit the object inside? To do so double left-click on any object (all of them are highlighted when you hover over them.) You can drag and recolor objects, change their size and angle, and do everything you normally do when working in Illustrator. When you're happy with the result, just double-left-click on an empty space to finish editing.
I also want to draw your attention to the fact that it is not in vain that Illustrator initially provides for the use of a clipping tool without an outline and a fill. This will allow you to create unusual shapes and line breaks that will look great in your design.
For example, I created two shapes: a star and a circle. By placing the circle on top of the star, I can apply a clipping mask to create some fancy lines:


This is the simplest example, but it perfectly shows how you can create unusual art with clipping masks in Illustrator if you have a cool idea. So get creative! Now, that you know all secrets, I hope, you'll impress with your work!
Get some extras: masking in Luminar Neo
This is something really special that I also want to share with you. Luminar Neo allows you to mask your photos to make them look their best! You can also touch up the masked area with a brush to achieve an impressive result. The program has the following types of masks:
- Brush mask
- Linear Gradient Mask
- Radial Gradient Mask
- Mask AI
The first is a perfect tool for meticulous editing. With careful strokes, you can fully control any changes in the masked area.
Gradient masks allow you to create smooth transitions and work with elliptical areas and objects.
Mask AI is the coolest feature of Luminar Neo when it comes to photo masking. Artificial intelligence independently determines objects such as the sky, people, animals, houses, water bodies, etc.
Conclusion
I have heard from beginners more than once that masks and layers are the most incomprehensible and complex functions in any graphic or photo editor. However, in fact, these functions are easier to understand than it seems at first glance. You see this with Illustrator masking, so why should it be harder in other cases? Do not be afraid to explore the possibilities of your programs, as this will certainly affect the quality of your work. Once you get the hang of the clipping mask in Illustrator, I'm sure you'll feel it for yourself! That's all for now. See you (write you) in future articles. Good luck!
FAQ about clipping masks in Illustrator
Are clipping masks and blend modes compatible?
No need to worry, it is possible and really easy! To do this, first, create a layer or object, and then create the mask you want to apply it to. Then you will need to select both layers and create a mask. And after that, you can apply the blending mode by selecting the option you want in the "Transparency" panel.
Can I add or remove items from a clipping mask in Illustrator?
Yes, of course. To add a new object, you need to place it on top of the mask object and make sure that the position of the direct selection tool is in its place. After that, create a new mask. The new object will be there. To delete, select the desired object, then click Object > Clipping Mask > Release.
What do I need for making a Transparency Mask?
It's very easy! Just six steps and you'll get what you want:
- To begin you must first create the mask and the object that will be masked. If you need several of them, group them together ("Group" from the "Object" menu) and give the name of the group.
- Select the objects you wish to use.
- Open the transparency panel.
- In the Transparency panel, you will find the Create Mask button. Click it, making sure that you selected Crop.
- You can easily change the opacity of the object. To do this, simply enter the desired values in the Opacity field.
- There is a mask thumbnail in the Transparency panel. By clicking on it, you can apply changes to it.
The object can be anything you want, such as a gradient, an oval, or a pattern.
FAQ
How to make a clipping mask in Illustrator with multiple shapes?
To make a clipping mask in Illustrator with multiple shapes, first combine the shapes into a single compound path or group them together. Then place the object you want to mask underneath, select everything, and choose Object → Clipping Mask → Make.
Where is clipping mask in Illustrator?
You can find the clipping mask option in the top menu under Object → Clipping Mask. You can also create it quickly by right-clicking selected objects and choosing Make Clipping Mask.
How to make a clipping mask with a group of objects in Illustrator?
To create a clipping mask with a group of objects in Illustrator, place the masking shape on top of the grouped objects, select both, and apply Make Clipping Mask from the Object menu. The top object will define the visible area. What is a clipping mask in Illustrator, and when to use it? A clipping mask in Illustrator is a feature that hides parts of an object outside a selected shape. Designers use clipping masks to crop images, place photos inside text or shapes, create collages, and build clean, non-destructive layouts without permanently deleting parts of the artwork.
What is a clipping mask in Illustrator, and when to use it?
A clipping mask in Illustrator is a feature that hides parts of an object outside a selected shape. Designers use clipping masks to crop images, place photos inside text or shapes, create collages, and build clean, non-destructive layouts without permanently deleting parts of the artwork.
 >
>
