How to Plan and Photograph Amazing Star Trails (the PhotoPills Way)
April 19, 2023
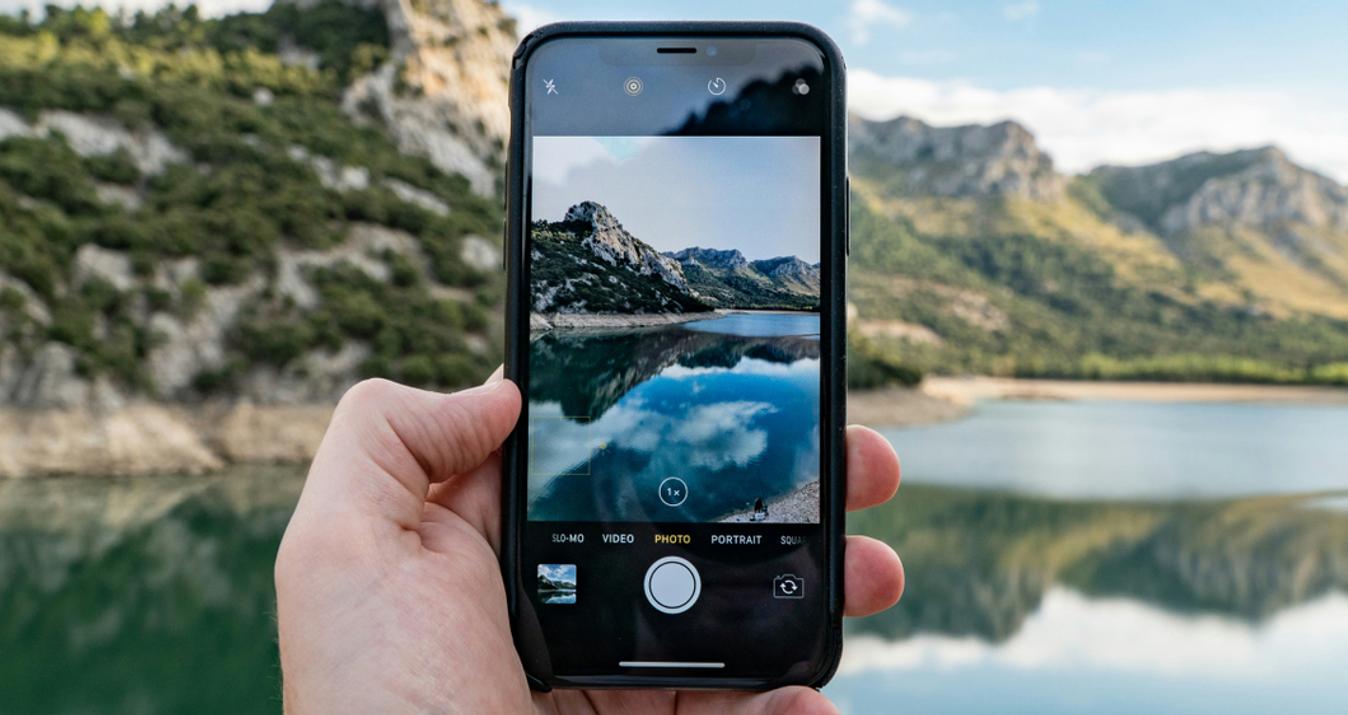
In this article you have everything you need to plan and shoot any Star Trails photo you imagine: from inspiration, planning and the best gear to the camera settings and the right software you should use.
Star Trails pictures are hypnotic.
That’s the magic of photography: your camera allows you to capture something your naked eye can’t see… the stars trailing due to the rotation of Earth!
But, the question is…
How can you get a unique Star Trails image?
Quick answer:
You need (i) a cool location (with no light pollution and an interesting subject), (ii) thoughtfully plan your photo idea (with PhotoPills) and (iii) master the shooting technique to nail the photo.
Finally, you need to use, for example, StarStax (to create the Star Trails) and Luminar Neo (to work out the foreground).
But don’t worry!
It’s not as complicated as it looks.
Plus, I’m here to help you get the picture you have in mind!
But let me introduce myself first...
My name is Antoni Cladera, I’m the photographer of the PhotoPills team… And I’m here to help you imagine, plan and shoot legendary Star Trails photos.
Why don’t you join me?
Let’s dive in!
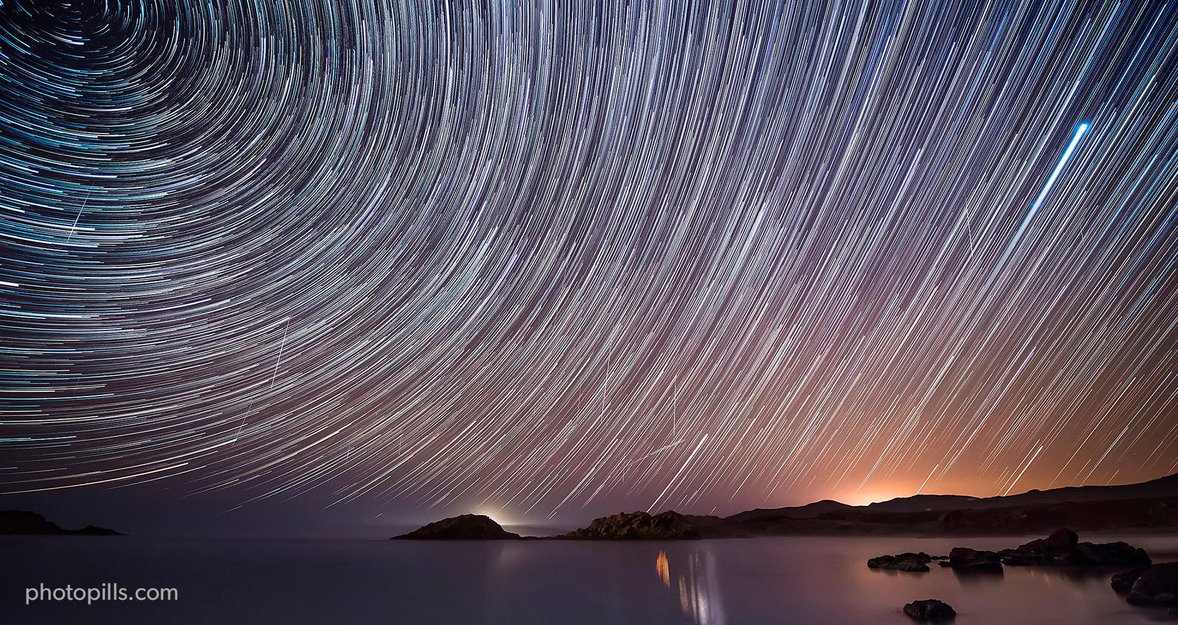
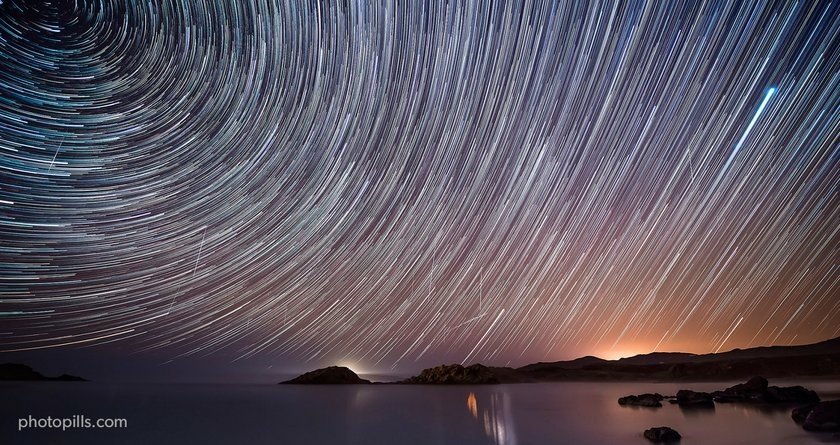
1. When to photograph Star Trails
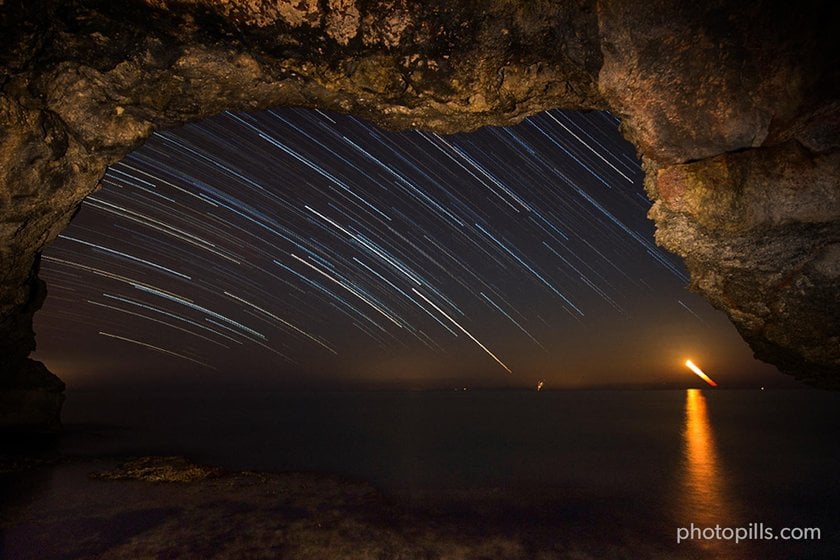
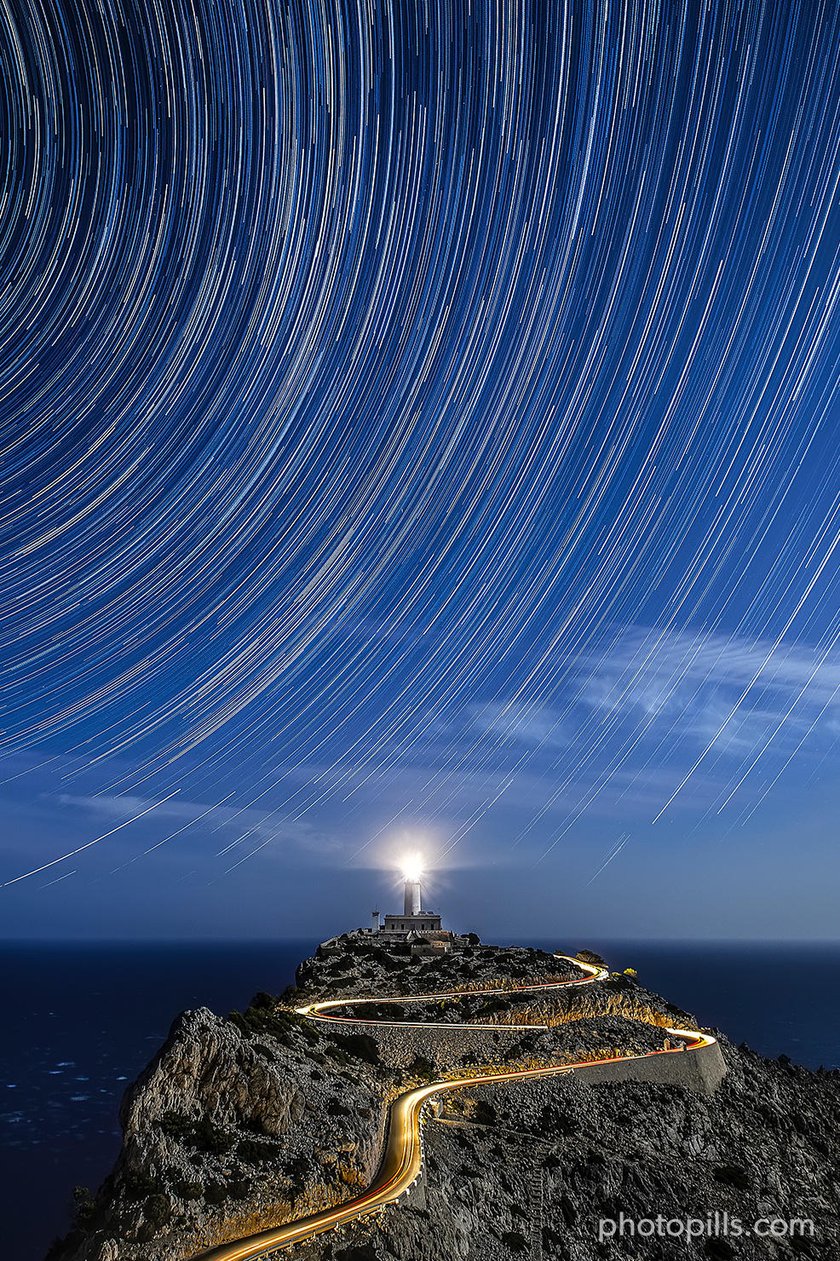
 Nikon D4s | 14mm | f/2.8 | 21s (total exposure time: 1h 40min 48s) | ISO 3200 | 4700K | 288 photos stacked with StarStaX
If you're a beginner, you should definitely start planning your Star Trail shots with no Moonlight and no light pollution. So I suggest you shoot Star Trails around New Moon.
There are dozens of websites and apps where you can find this information.
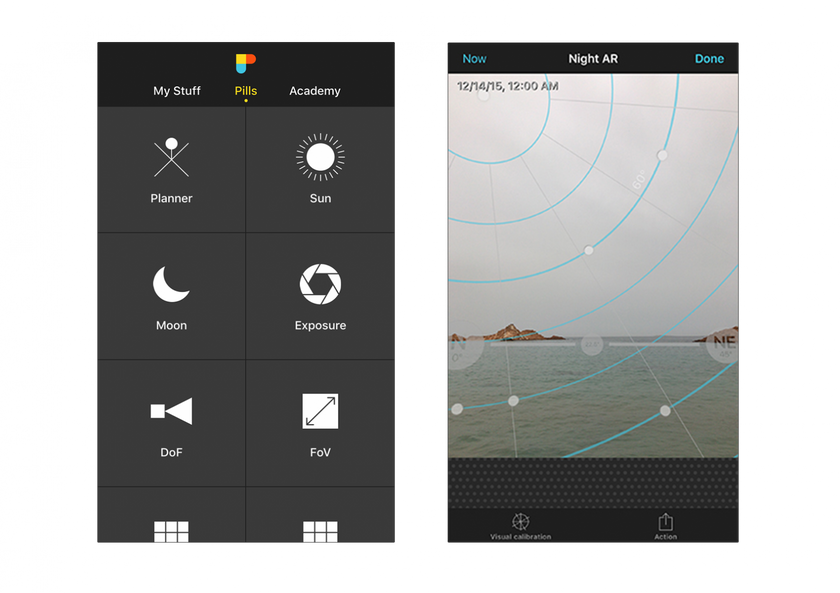
But, if you’re a PhotoPiller like me (a photography nerd and a PhotoPills app lover), take advantage of the Moon pill – it includes a very helpful Moon calendar.
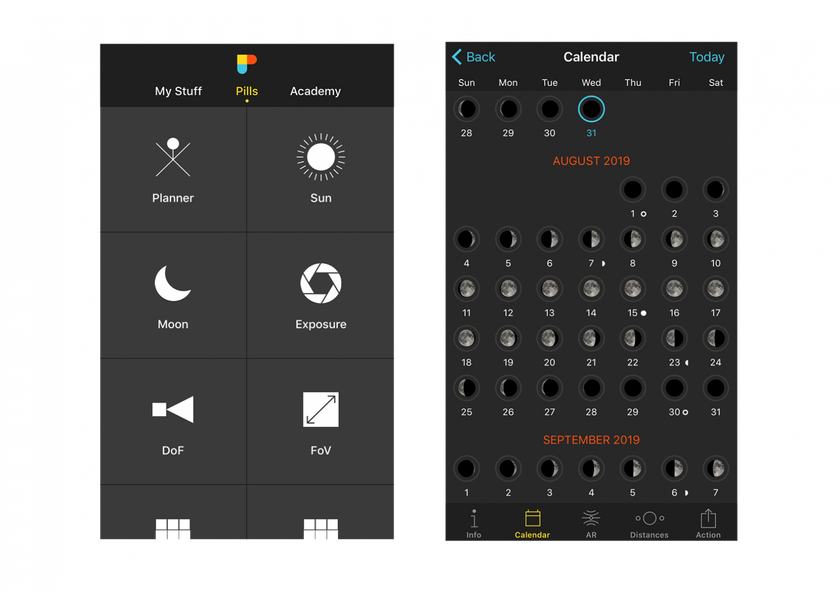 Go to PhotoPills. In the Pills menu, tap on Moon, and then tap on Calendar to see a complete Moon phase calendar.
Haven’t heard of PhotoPills yet?
It’s the one photo tool to rule them all! ;)
It basically lets you plan any picture that you can imagine (with the Sun, the Moon, the Milky Way, Star Trails, Meteor Showers…), regardless of how crazy you think your idea is.
But before any planning…
Let’s find some inspiration!
2. Where to frame the camera (and for how long)
 Nikon D4s | 16mm | f/4 | 30s (total exposure time: 51min 30s) | ISO 800 | 3450K | 103 photos stacked with StarStaX
For a given location, when shooting Star Trails you basically need to establish 2 things:
- The Star Trails pattern you want to play with your subject (or where to frame the camera).
- The Star Trails length (or how long you are going to be shooting).
The Star Trails pattern
Being able to locate the north celestial pole (Northern Hemisphere), the south celestial pole (Southern Hemisphere) and the celestial equator is key in Star Trails photography.
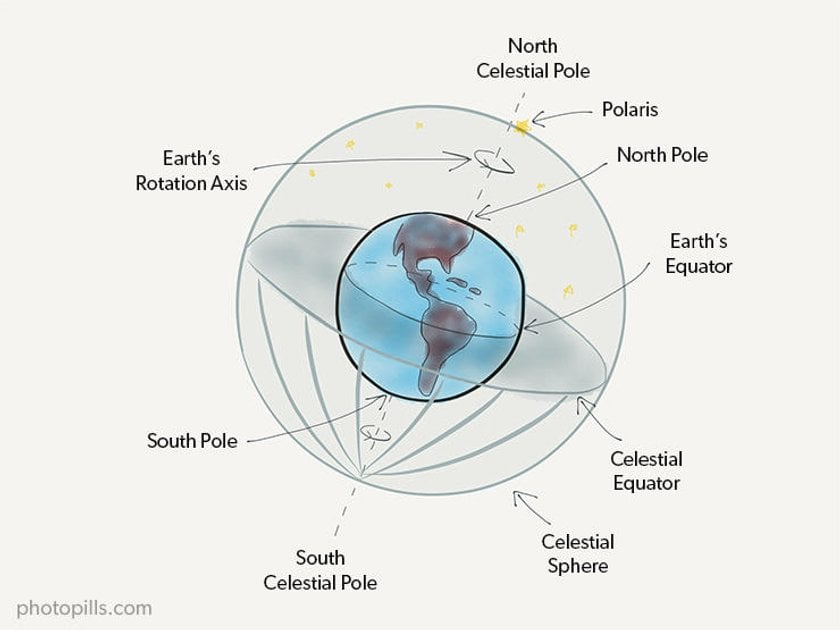
This information gives you the power to decide where to aim your camera to get the Star Trails pattern you want in your photos.
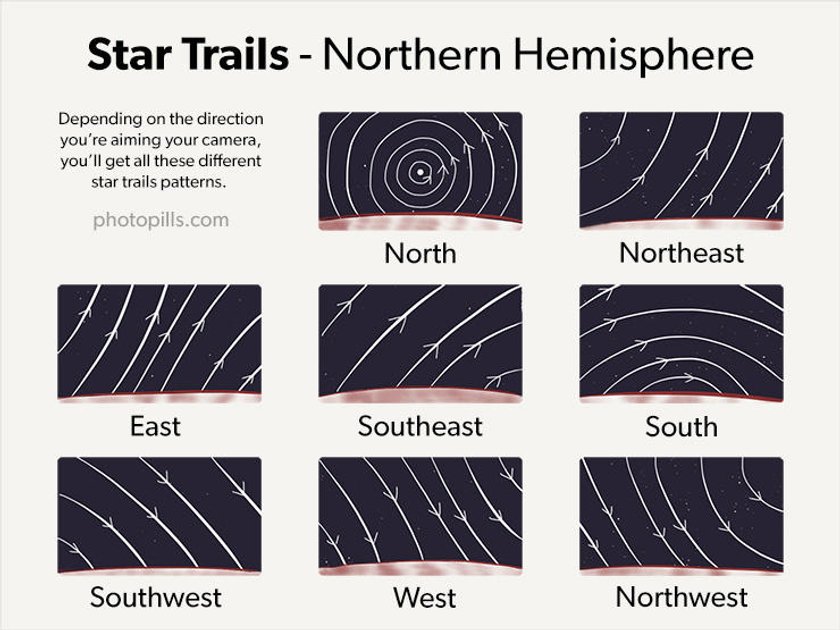
Northern Hemisphere
In the Northern Hemisphere, you’ll have the impression that the stars move counter-clockwise. Depending on the direction you’re aiming your camera, you’ll get all these different Star Trails patterns.
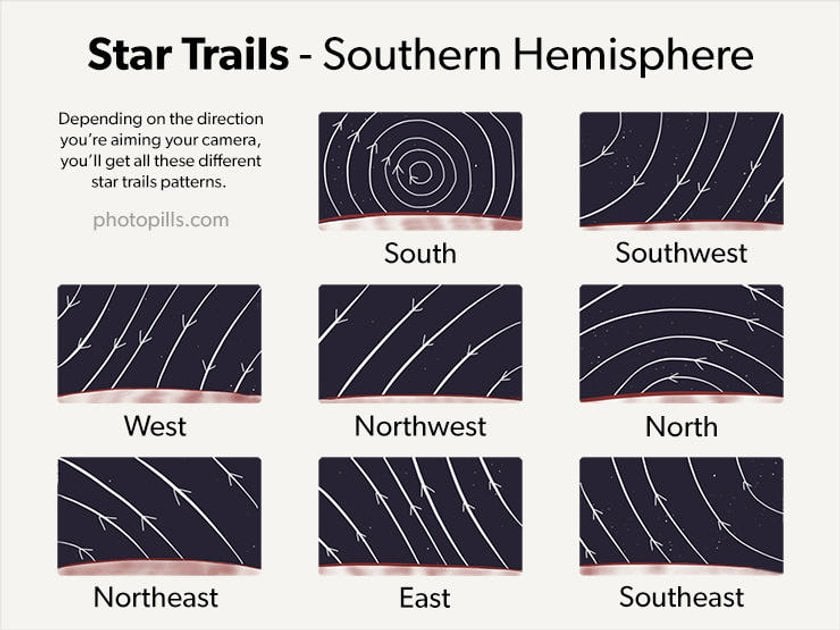
Southern Hemisphere
On the contrary, in the Southern Hemisphere, you’ll have the impression that the stars move clockwise. So you’ll have the following patterns.
Equator
If you live on the Earth’s equator, the north and south celestial poles seem to be very close to the horizon.
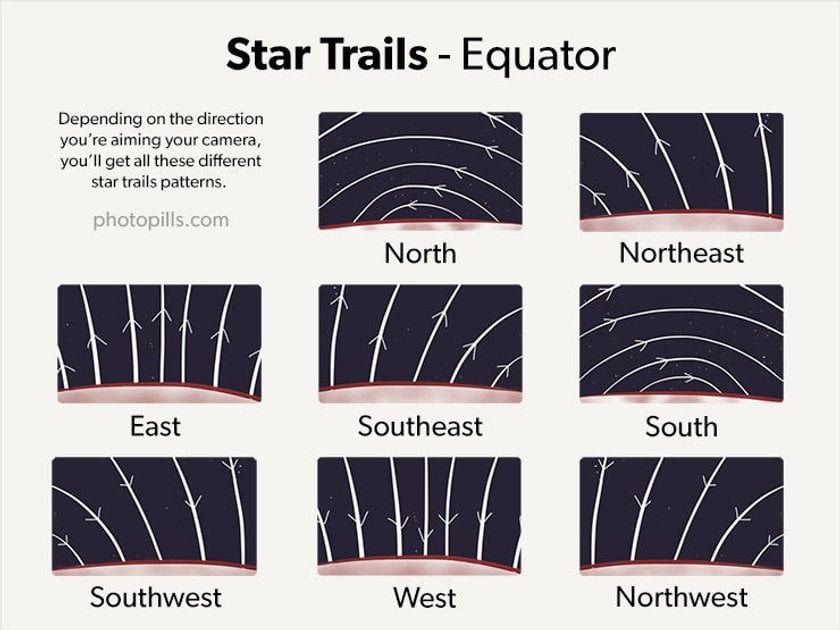
In section 4, I’ll show you how you can use the PhotoPills Night Augmented Reality (AR) view to easily visualize the Star Trails pattern you’ll get depending on the direction you want to point your camera to.
The Star Trails length
Always go for the longest possible Star Trails :)
And as you may have guessed, the longer the total exposure time the longer the trails.
But I would say that a total exposure time between 1h and 3h will result in a nice and smooth Star Trails image.
If you want to have an idea of how a circumpolar image will look like, you can take advantage of the PhotoPills Star Trails calculator.
Open PhotoPills and tap on the Star Trails pill. Drag your finger from left to right to increase the exposure time and see how the Star Trails length grow.
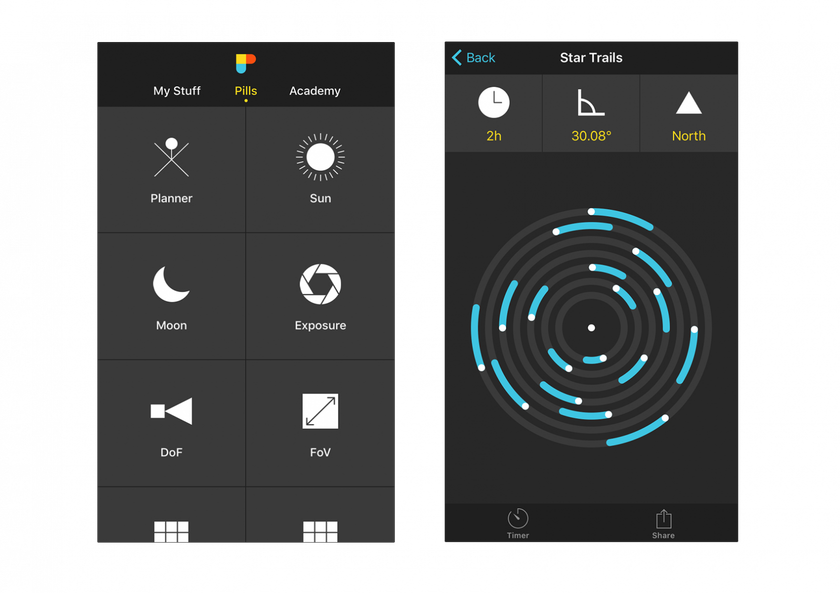 Go to PhotoPills. In the Pills menu, scroll down and tap on Star Trails, and then drag your finger from left to right to see the Star Trails length grow.
This way you’ll know for how long you need to be shooting to get the Star Trails length you want. I’ll tell you more in section 6.
Oh, one more thing.
For more inspiration…
Follow the PhotoPills Instagram account. There you’ll find a lot of Sun, Moon, Milky Way and Star Trails pictures that PhotoPillers from across the world have imagined, planned and shot. And to get featured (and inspire others), submit your photos to the PhotoPills Awards.
Let’s move on…
It’s time to look for a gorgeous location!
3. The winning combo (a dark sky + a powerful subject)
 Nikon D4s | 24mm | f/4 | 30s (total exposure time: 1h 20min) | ISO 800 | 3850K | 166 photos stacked with StarStaX
The title sums it up. Those are the two ingredients that you should combine in the shooting location:
- A dark sky (you can find them using NASA's Blue Marble map).
- A powerful subject (rock, lighthouse, tree…).
If you find a location that has both, you have a winning location.
So go and find it :)
And please, when shooting outdoors, take care of our planet...
It’s very important that you leave no trace when capturing your Star Trails images!
4. How to plan a Star Trails image
Imagination comes first, shooting goes last and planning is what makes everything possible.
The planning is crucial, without it chances are you won’t capture a really cool photo…
Do you want to know how to use PhotoPills to plan your own Star Trails shots?
It’s super easy :)
Watch this video:
And here’s a summary of how you should use the PhotoPills Night AR to plan your Star Trails pictures:
Step 1. Go to the location, choose your shooting spot and tap on Night AR.
Step 2. Use the Night Augmented Reality (AR) view to visualize exactly what Star Trails pattern you'll get depending on the shooting spot and shooting direction.
Notice that the thin blue curved lines you see on the Night AR view are showing you the Star Trails pattern.
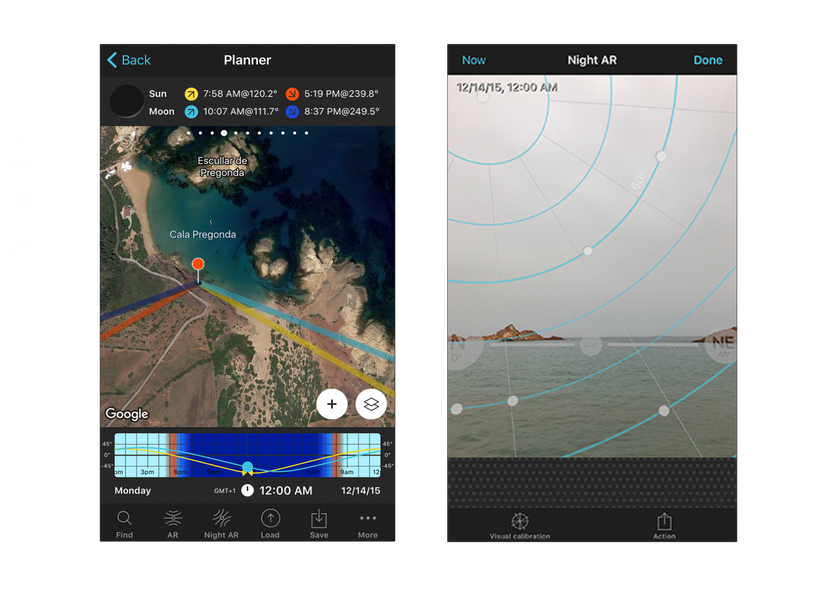 PhotoPills Planner – The Red Pin is located in the shooting spot where your are. PhotoPills Night AR view – Polaris and the circumpolar pattern.
That’s it!
If the Star Trails pattern you get is not the one you want, simply change the shooting spot and repeat the process ;)
5. All the gear you need to photograph Star Trails
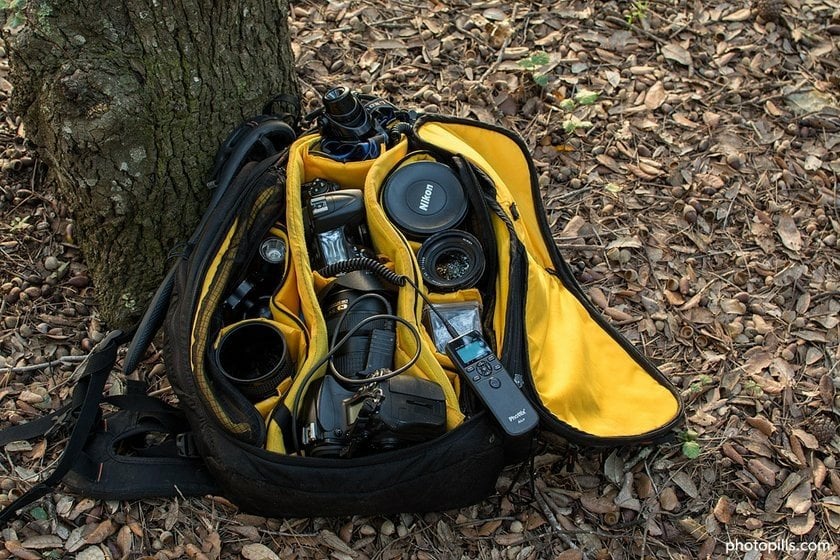
When photographing Star Trails, the gear is not as critical as when photographing the Milky Way. But if you’re into Star Trails photography, I’m assuming that you’re also into Milky Way photography.
So invest in the best equipment you can afford (even second hand) to avoid limiting the quality of your images.
In night photography the quality of the gear has a deep impact on the quality of the final image.
Camera
It’s not mandatory but I like to recommend a full-frame camera if you can afford it. A full-frame sensor produces less noise than the APS-C or Micro 4/3 ones. Remember that you’ll be shooting several straight hours.
For a mid-range budget, the Nikon D610, Nikon D750, Sony a7 II, and Sony a7R II are great cameras.
If you’re looking for a high-end camera. Right now, my go-to camera is a Nikon Z6. But you should also have a look at the Canon 5D Mark IV and the Sony a7R III.
Lens
If you're seriously getting into night photography, you should look for a sharp and fast (large aperture, small f-number) wide-angle lens:
- You want the sky with the stars and the foreground to be crystal clear in the picture.
- You want your camera to capture as much light as possible and a big portion of the sky.
My favorite lens to capture the night sky is the Nikon 14-24mm f/2.8.
But some good alternatives are the Canon 16-35mm f/2.8L III, the Sony 16-35mm f/2.8 GM and the Rokinon/Samyang 14mm f/2.8.
Tripod and head
To capture some nice Star Trails you need to shoot long exposures. So get a stable and sturdy tripod (and good head) to get tack sharp shots!
I use a Benro carbon fiber tripod with the Really Right Stuff BH-55 ballhead.
Other pieces of gear
Apart from a camera, a lens and a tripod, you also need:
- An intervalometer to avoid any vibrations.
- Memory cards (I like the SanDisk and Lexar ones).
- A headlamp, such as the Led Lenser H7R.2, to work at night.
And now that you’ve got all the equipment set…
It’s time to go for it!
6. How to shoot a Star Trails image step by step
Nikon D4s | 14mm | f/2.8 | 30s (total exposure time: 5h 23min 30s) | ISO 5000 | 3400K | 103 photos stacked with StarStaX
You can shoot both single and multiple exposures Star Trails, regardless of the equipment you have.
But I have to tell you that I prefer shooting multiple exposures and stacking them using special software (section 7).
Then, I use Luminar Neo to work the image further on and give it my personal touch.
Why?
When shooting multiple exposures:
- You have better control of the sensor heat. So, your images end up with less noise. In other words, you can shoot longer Star Trails with almost any camera.
- You avoid almost any unexpected event that can ruin the shot (e.g. clouds in the sky, no chance to clone out anything when post-processing in Luminar, running out of battery, excessive noise, etc.).
- It's much easier to shoot a Star Trails even when you have Moon or light pollution.
- You capture dozens of images that can be used separately or together to create:
- Other stunning effects (such as timelapse videos).
- How long you want your Star Trails to be.
Let’s see the steps you should follow.
Get to the planned shooting spot on time
Get to the location before sunset. It’s much easier to find the shooting spot when there’s sunlight. It’s much more difficult to compose your shot in the dark.
Once you’re at the location, use the PhotoPills Night Augmented Reality (AR) view to make sure that you’re at the right shooting spot you planned.
Open PhotoPills, and tap on Night AR. Point your smartphone to the sky to see the Star Trails pattern you’ll get.
Go to PhotoPills. In the Pills menu, scroll down and tap on RA Night. Point your smartphone to the sky to see the Star Trails pattern you’ll get.
Use a short focal length
Select a short focal length (10mm, 14mm...) to include as much sky as possible in the frame.
Set the shutter speed to calculate the total exposure time
Since I’ll be shooting multiple exposures, when I’m capturing Star Trails I like to use the same shutter speed I’m using for the Milky Way. This allows me to simultaneously get several cool Milky Way shots.
To figure it out, apply the NPF rule using the PhotoPills Spot stars calculator.
Go to PhotoPills, and tap on Spot Stars (Pills menu). Then, choose your camera, set the focal length and aperture. Set the declination of the stars to 0º, set the accuracy to Default and use the NPF exposure time you got as a result.
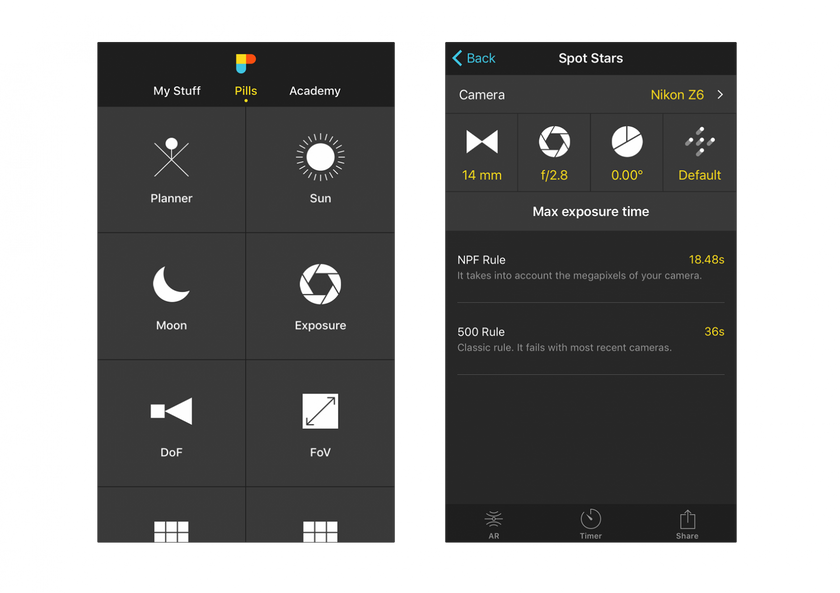
Go to PhotoPills. In the Pills menu, scroll down and tap on Spot Stars. Choose your camera, set the focal length and aperture. Set the declination of the stars to 0º, set the accuracy to Default and use the NPF exposure time you got as a result.
Then, as I mentioned in section 4, you can use the PhotoPills Star Trails calculator to estimate the total exposure time you need to get a determined Star Trails length.
But be careful!
Depending on your camera, you’ll end up with noise produced by sensor heat after one, two or more hours shooting. Every camera is different. You need to test it.
Set the ISO
Don’t be afraid to push the ISO up. Start with an ISO of 3200 or 6400 and take a test shot. If you want to capture the color of the stars, don't go beyond ISO 1600.
Use a wide aperture
Select the Manual shooting mode (M).
Use the widest aperture you can (f/1.4, f/2.8...) to collect the maximum amount of light possible during the exposure.
Focus at the hyperfocal distance (or at the stars)
You can focus on a star. Or at the hyperfocal distance to make sure that everything is tack sharp.
Watch this video to learn how to focus at the hyperfocal distance step by step:
Take a test shot, check the histogram and adjust
Take a test shot and check the framing, the focus and the exposure. If necessary, make the required adjustments.
Set the time frame between each shot and the total exposure time on the intervalometer so the camera knows for how long it has to be shooting.
And that’s it!
7. The Star Trails software you need
Now that the shooting session is done, allow some time the next morning to start creating the Star Trails image.
I recommend you:
- StarStax to put together the Star Trails. I love it because it's much easier and faster than other options.
- Luminar Neo to work out the foreground. If you wish to get started with Luminar, one of my favorite astrophotographers, Ian Norman, has a complete tutorial on Luminar.
8. Post-processing Star Trails with Luminar Neo

Nikon Z6 | 18mm | f/4 | 15s | ISO 800 | 3500k | 157 photos stacked with StarStax
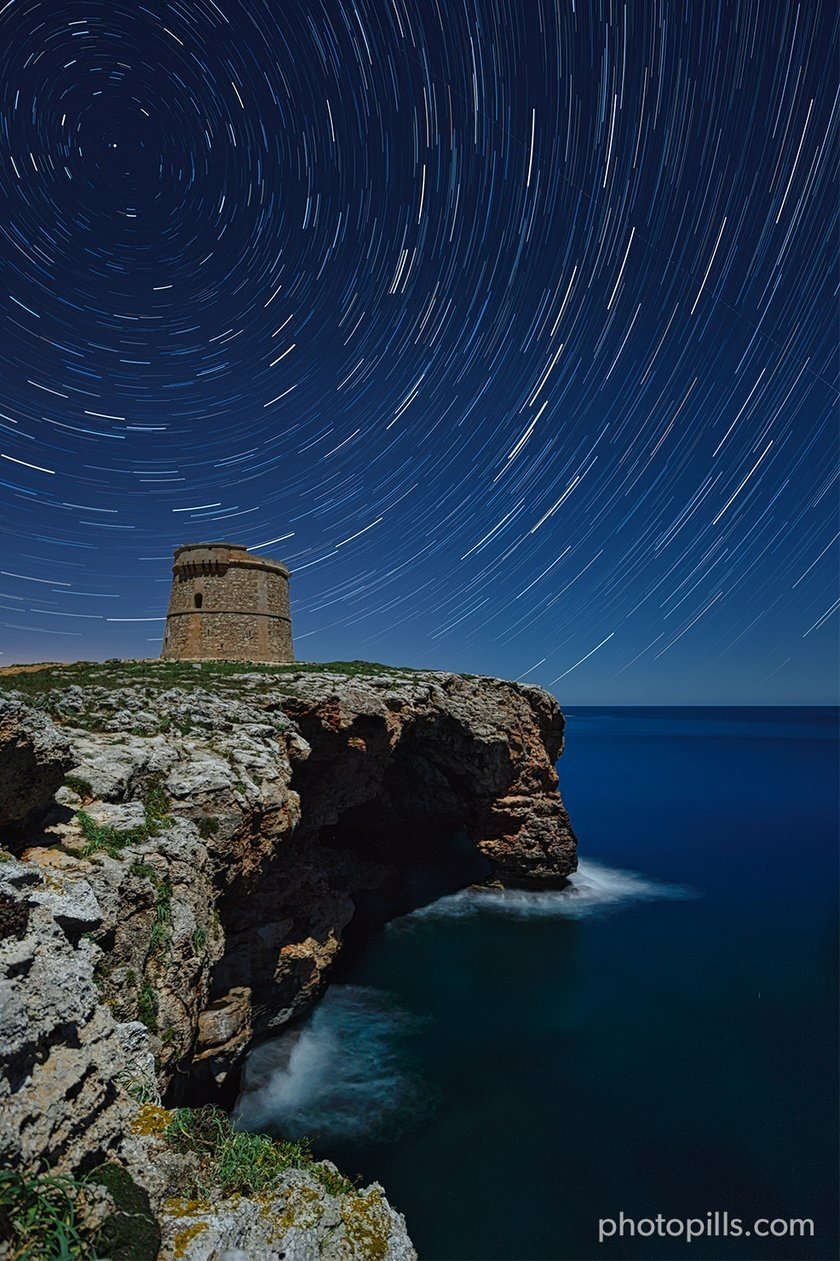
The picture that you see above is the original RAW that I produced during a Star Trails session. That night, the crescent Moon was illuminating the landscape.
When post-processing Star Trails, you have to keep in mind that it’s important to clearly show the nocturnal atmosphere in the image. It must be obvious that the photo was taken at night.
The Moonlight allowed me to illuminate the interior of the caves that you can see below this defense watchtower built during the time the British occupied the island of Menorca.
Once the image has been created with StarStax, I export the image as a TIFF file to avoid losing any quality.
Then, I open the file in Luminar Neo and follow a specific workflow for this type of images.
My workflow is based on the following actions and filters, that are general adjustments or local ones (I use the gradient filter, the radial tool or the brush).
These are the steps I usually follow:
- Basic editing to adjust the color temperature and the volume of the image.
- I use the Improved Accent in the lower zone with a gradient filter to improve the details in the dark areas.
- I selectively use the Eliminate noise in the lower area of the image applying a gradient filter.
- Then, I use the Details improver tool to dramatically change the photo, increasing the contrast and sharpness.
- Thanks to the Sky Enhancer I can improve the volume and the color balance of the top of the image.
- With the Saturation/intensity tool, I slightly saturate the color of the stars. The idea here is to strengthen their own natural color, to reinforce the night atmosphere of the image.
- Finally, I use Darken and lighten to draw special attention to the shadows and the highlights of the image in order to accentuate the volume of the scene.
With Luminar Neo, it’s really easy to create your own post-processing workflow for each type of image. Obviously, you can use the filters in the order that suits you best according to your taste and photographic requirements.
Now, have a look at the resulting image…
Final image after being post-processed with Luminar
What do you think?
9. Imagine. Plan. Shoot!
Here you have it! A complete guide to help you imagine, plan and shoot any Star Trails picture you can imagine.
So choose a powerful location, plan a legendary shot and capture it!
No time to waste!
And once you get a jaw-dropping picture, share it with us... Submit it to the PhotoPills Awards!
Time to start hunting some Star Trails.
Imagine. Plan. Shoot!