Make Your Subjects Pop From The Background | Luminar Neo First Look
November 06, 2023
Have you ever seen photos where the main subject stands out vividly from the background, making it look amazing? We're going to show you how to do just that in this post. It's like a magic trick for your photos!
We'll explore three cool Luminar Neo tricks: Relight AI, Portrait Bokeh AI, and Portrait Background, so you can make your subjects really stand out and impress everyone with your photography skills.
Get ready to learn and make your pictures look incredible!
Why Your Subject Should Stand Out in Photos

In photography, making your subject stand out from the background is really important. It helps your pictures look great and tell a clear story, whether you're taking pictures of people, things, or beautiful scenes. When you do this, your photos look more 3D and interesting. It also gets rid of any distractions in the background, so people focus on what's important.
Especially in portrait photos, it makes the emotions of the person in the picture stand out. It also lets you be creative and make your photos unique by playing with the background. So, making your subject pop from the background is a cool skill that makes your photos look awesome and tells better stories!
Now, let's dive into three main tools, Relight AI, Portrait Bokeh AI, and Portrait Background, that will take your photography to the next level. These tools will help you create images where your subjects truly pop out, making your photos extraordinary.
So, get ready to explore and enhance your photography skills!
Relight AI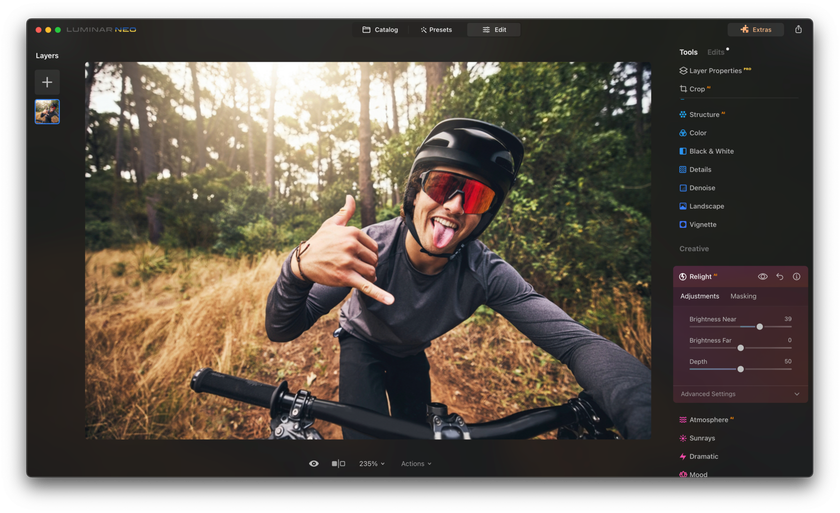

If you want your subjects popping out from the background, Luminar Neo's feature, Relight AI, is a powerful tool in the world of photo editing. It's a game-changer, especially when you face those challenging moments when the lighting doesn't quite cooperate, making it essential for creating images where your subject truly pops.
Picture this: You've taken a nighttime shot, but the lighting is uneven, with some areas too dim and others overexposed. That's where Relight AI comes to the rescue. This feature meticulously evaluates your photo, employing an advanced 3D mapping system to ensure that every aspect is correctly lit, erasing any irregularities in brightness. But what truly sets Relight AI apart is its simplicity, making it an indispensable tool in your quest to make subjects pop from the background!
Here's a quick guide on how to use Relight AI:
Open Luminar Neo and select the photo you want to enhance.
Navigate to the Edit section.
Find Tools, go to Creative, and click on Relight AI.
Adjust the Brightness near and Brightness far sliders to fine-tune the lighting for close and distant objects.
Play with the Depth control to achieve the perfect balance.
For even more control, explore the Advanced settings, where you can adjust Dehalo, Warmth near, and Warmth far.
When you use Relight AI, it not only makes your subjects look perfectly lit but also makes them really distinct from the background. It's like turning a regular photo into something amazing right before your eyes. To show how great this feature is at making subjects pop, we'll share some before-and-after examples to prove its power!
Portrait Bokeh AI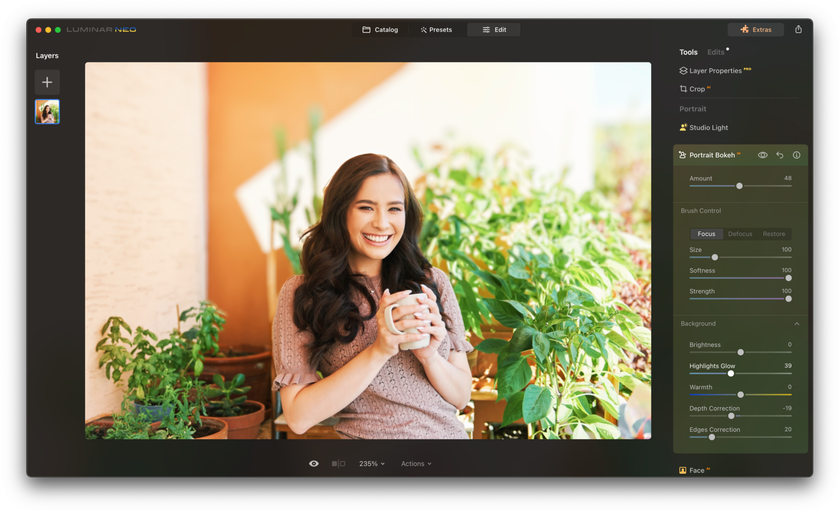

Let's explore Portrait Bokeh AI, the tool that can transform your portraits by adding a beautiful background blur, known as the bokeh effect. If you are new to photography and curious to find out more about this effect, click here and read our detailed post about it!
Bokeh gives your photos a dreamy and charming quality, making your subject stand out against a blurred background. Whether you're using a fancy lens or not, Portrait Bokeh AI in Luminar Neo allows you to create stunning portraits effortlessly in any lighting condition.
With Portrait Bokeh AI, you have complete control over your creative vision without the complexity of manual masking or layers. Adjust the depth of field, blur intensity, exposure, color temperature, and background highlights in just a few clicks. You can also fine-tune the bokeh mask with manual brush strokes and sharpen details as needed. This tool empowers you to achieve your creative ideas effortlessly.
The bokeh effect is all about that creamy and hazy background blur typically created by camera lenses. With Luminar Neo and Portrait Bokeh AI, you can achieve this enchanting effect with a simple click, even if you're not a photography expert!
Here's how to get started:
Open your portrait image in Luminar NEO.
Move to the Edit module.
Find the Portrait Bokeh AI tool in the Portrait section of the main toolbar.
Adjust the Amount slider to activate the Brush Control and Background adjustments.
Fine-tune the bokeh mask with the brush control if needed.
Complete your adjustments in the Background section of the tool.
Portrait Bokeh AI is your key to effortlessly creating wonderful portraits with that captivating background blur that makes your subjects truly shine!
Portrait Background Removal
Getting rid of the background in your photos can be really boring and take away your creative energy. But don't worry! With automatic Portrait Background Removal, you can let your creativity flow without all the dull work.
Why Use Portrait Background Removal?
Removing backgrounds from images can be a tedious and time-consuming process. It can stop your creative ideas from happening. But with automatic background removal, you can be as creative as you want without doing the boring stuff.
You can add as many layers as you want to make your ideas real. You can mix things together, make cool effects, create collages, and more with each layer. Luminar Neo helps you change your layers in different ways, giving you lots of options for your creative projects. In short, Portrait Background Removal lets you be super creative without any hassle!
Here's how you can use this tool:
First, bring in the photo you want to work on in Luminar Neo. You can do this by clicking the "Add photos" button and choosing your picture.
If you haven't used the background removal tool before, you'll need to download it. Then, open your photo and click "edit" to start.
On the right side, click on "Layer Properties," then "Masking," and finally "Background Removal AI." This lets you choose your main subject.
Once your subject is highlighted in red, hit the "Remove" button. The background will vanish, but you might need to use the refinements brush to fix any spots the tool missed.
To put in a different background, click the + sign under "Layers" on the left.
Drag the new photo layer you added under your original one on the left under "Layers." Then, make it completely visible by moving the opacity slider to 100%. And there you go!
With Portrait Background Removal, you can let your creativity fly and explore all sorts of artistic ideas with just a few clicks!
Remove Backgrounds with an Advanced AI Tool
Try it Now!Wrapping It Up
In conclusion, the secret to making your subjects pop out of the background is a game-changer in photography. It's like a magic trick that turns your pictures into something amazing. We've shown you three fantastic tools in Luminar Neo that can help you do this effortlessly.
First, Relight AI ensures your subject looks great, even when the lighting is tricky. Then, Portrait Bokeh AI lets you create that dreamy, blurry background that makes your subject really stand out. It adds a touch of charm to your photos. Lastly, Portrait Background Removal is a handy tool when you want to completely change the background of your photo, making your subject pop out prominently.
By mastering these tools, you not only make your photos better visually but also tell more exciting stories through your photography. So, get ready to level up your photo skills and leave everyone amazed when your subjects truly pop out from the background.
Your creative journey begins now!