April 21
16 min. to read
How to Convert HEIC to JPG on iPhone
 Macro shooting, adjusting focus and exposure, night mode, and other settings give you a chance to realize yourself as a professional photographer. But if you have iOS 11 or a later version, you notice that your images have HEIC format and therefore are not recognized by Windows, Mac, and some applications. So, you need to change iPhone photos to JPG. How to do it? Let’s find out!
Don’t feel like reading the whole breakdown? We’ve pulled together a quick summary below.
Key Takeaways
HEIC (High-Efficiency Image Format) saves high-quality photos while taking up less storage, but it’s not always compatible with Windows or older apps.
You can convert HEIC to JPG on iPhone without extra software—use the Files app or Mail to copy, paste, or send photos to yourself.
To make iPhone always save photos as JPG, go to Settings → Camera → Formats → Most Compatible.
For automatic conversion when transferring to a computer, enable Settings → Photos → Transfer to Mac or PC → Automatic.
If you prefer extra control or batch conversion, use third-party converters or Luminar Mobile, which supports HEIC, JPG, and AI-based photo enhancement.
All You Need to Know about HEIC Format
First, we consider what HEIC file format is and other important information about it. Because it’s a basis that will help you to fully understand the overall picture.
What does HEIC mean?
HEIC is a new format developed by Apple company itself. Its abbreviation stands for High-Efficiency Image File format. And really, being a special container, it saves photos in very high quality, significantly saving space in your phone's memory. So, you can make a lot of content.
Why does iPhone Take Photos in This Format?
Apple company has been using .HEIC image format in modern iPhones and iPods since 2017. In particular, you can notice it in iOS 11 and later models instead of the usual JPEG in the gallery after shooting. But why?
Apple noticed that most people who like to take photos are faced with the fact that the memory of the gadget is completely full. And it happens at the most inopportune moment, for example, when you need urgently take a few photos to advertise a new eco-friendly cosmetics or during a trip to fix a wild bird in the sky on camera. Therefore, the company decided to introduce a format HEIC that takes up space in memory thanks to modern compression technology.
How to Find Out if your iPhone Has Files in a New Format
If you have iOS 15, you only need to take a few simple steps:
- In Photos App, select the image you want to check.
- Tap i.
- Look at the inscription opposite your phone’s model name. If there is HEIF, it means that the format of your photo is HEIC.
Also, there is another option. This is a free Exif Wizards app. After downloading it from the App Store and launching it, open the album and select the photo. Then scroll down, and you will see HEIC or JPEC opposite File Name.
Why HEIC is Better than JPEG
There are some reasons why HEIC is superior to JPEG. Let’s consider them in detail:
- High image quality. Thanks to supporting 16-bit color, HEIC pictures are clearer and brighter than JPEG images, even after multiple editing.
- Significant saving of space in the phone memory. .heic photos take up double lesser the storage space.
- Opportunity to save photos with transparency thanks to an alpha channel. It allows you to create logos and other graphic objects in web design.
But despite such advantages, this format has another side of the coin. Sometimes you need to change the iPhone HEIC to JPG. Why? Because it doesn’t always have compatibility with Windows, Mac, and other devices. And as a result, you can not open and edit photos. We will tell you how to remedy this situation without much effort and spending of your time.
How to Convert iPhone Pictures to JPEG by Using Email
Open the Photos app and select the .heic photo you want to convert.
Tap the Share button and choose Mail.
Enter your own email address as the recipient.
Send the email with the attached photo.
Open the email you just sent and download the attached photo.
The photo will be saved in JPEG format.
All of them are very simple because you don’t spend much time. It’s up-to-date in the realities of dynamic life that requires being fast and flexible. So, let’s get to know them better.
How to Convert HEIC to JPG on iPhone With the Help of The Files App
It’s the quickest way to convert HEIC to JPEG because it doesn’t require downloading additional applications. The process includes several straightforward steps:
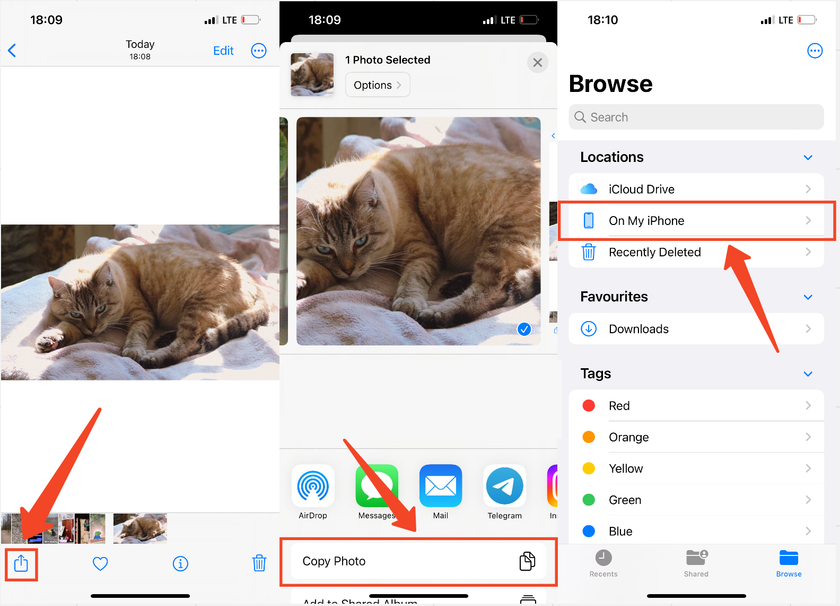
In the Photos App, select HEIC images you want to convert.
Tap Share in the bottom-left corner and select Copy Photos.
Open the Files App, then tap On my iPhone > More Icon > New folder.
Long-press on the empty area and tap Paste.
Your photos are already in JPG format. Now, you can share them by tapping the Share icon.
How to Convert iPhone Photo to JPG by Using Email
It turns up that Apple’s default Mail app is more than a tool for sending letters. You can use it for converting HEIC to JPG on iPhone! But how? Everything is very simple. Just send a letter with the attached .heic photo to yourself and save it. You will see that image will be downloaded in JPEG format.
Convert Photo to JPG on iPhone Thanks to Special Converter
Also, you can use a third-party application to transform HEIC to JPG on iPhone. There are many converters. We recommend paying attention to HEIC to JPEG Image Converter. It allows you to change content with its subsequent sharing via Airdrop. All you need is to download this tool from App Store, install it on your iPhone, and follow the instructions that are in the app.
How to convert HEIC to JPG on iPhone With the Help of The Files App
It’s the quickest way on how to save iPhone photo as JPEG. Here are several steps:
In the Photos App, select HEIC images you want to convert.
Tap Share in the bottom-left corner.
Select Copy Photos.
Open the Files App.
Tap On my iPhone.
Tap the more icon and make a New folder.
Long-press on the empty area and tap Paste.
You see that your photos are already in jpg format. Now you can share them by opening them in the Files app and tapping the Share icon.
After that, you only have to click Save Image if you want to save the modified images or share them on social networks or other apps.
How to convert HEIC to JPG on iPhone Permanently
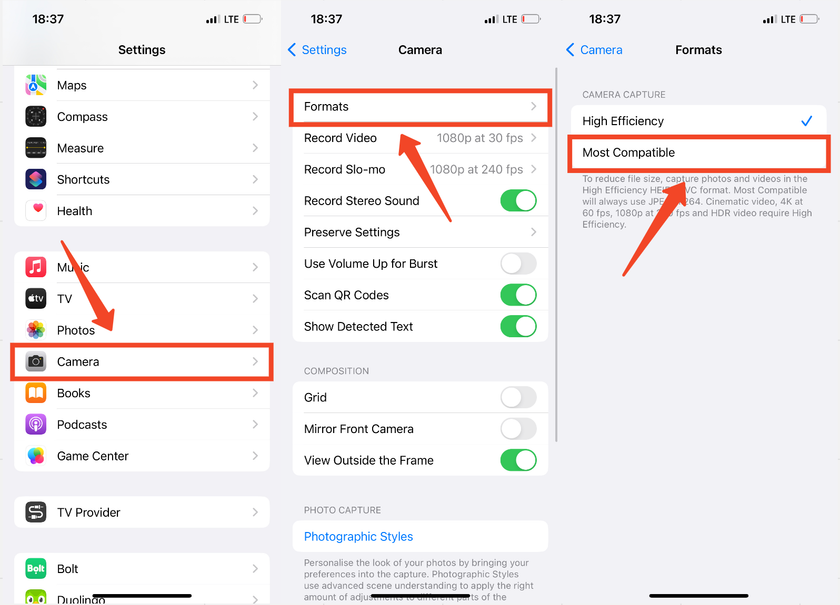
You don’t want to play with changing iPhone photos HEIC to JPG? Or is working with a new format difficult for you? Just configure the camera capture format thanks to using iPhone’s Settings app. Here are some simple steps:
Go to the Setting app.
Scroll down with your finger and tap Camera.
Select Formats from the drop-down list and click on them.
Tap Most Compatible.
Go to the Setting app again.
Tap Photos.
In the Transfer to Mac Or PC section, tap Automatic.
 After these acts, your new photos automatically change to JPG and your phone’s camera will always shoot by default in the familiar old format. So, now you know how to make iPhone photos JPEG.
Sending HEIC Files as JPEG
Also, you can shoot in HEIC format and share photos as JPEGs during sending them on Mac or Windows. For this, you don’t need to convert the file. Just do the following:
- Open the Settings app.
- Tap Photos.
- Scroll down and in the Transfer to Mac or PC, choose Automatic.
Some Things You Must Know After Changing Format
Now you know how to change iPhone photos from HEIC to JPG. They are really easy to convert. But there are some things you must know about:
- The photos that you have previously taken will remain in the same format. But your next images will be JPG.
- After you convert HEIC to JPG on iPhone local storage will fill up faster.
Conclusion
Do you want to make stop your iPhone to take photos in HEIC format? Is it causes many problems after the transfer of content to the Mac or Windows? Now, you know how to turn HEIC to JPG, thanks to the ways we talked about in this article.
FAQ
Why are iPhone photos HEIC?
iPhone photos are saved in HEIC format because it saves space while keeping high image quality. Apple uses it to store better photos with smaller file sizes compared to JPEG.
How to save an iPhone photo as JPEG?
Go to the Photos app and select the pictures you want to convert.
Tap the Share icon and select Copy Photos.
Open the Files app and tap Browse > On My iPhone.
Press and hold any part of the blank area and tap Paste.
The photos are now saved as JPEG images on your iPhone.
Note: For state-issued phones, photos can only be saved locally on the phone. Do not log in to an iCloud account on your work phone.
How to convert picture to JPEG on iPhone for free?
In the Photos app, select the images you want to convert.
Select Copy Photos.
Open the Files app and tap Browse > On My iPhone.
Long-press on an empty area and tap Paste.
Your photos are now in JPEG format!
How can I convert HEIC to JPG without software?
You can use online conversion services like HEICtoJPG or CloudConvert. Simply upload your HEIC files to their website, and they'll convert them to JPG for you. However, be cautious with sensitive photos due to privacy concerns when using online services.
How to convert HEIC to JPEG (JPG) on iPhone for free?
On your iPhone, go to Settings > Photos. Under the "Transfer to Mac or PC" section, select Automatic. This will ensure that when you transfer photos to a computer, they are automatically converted to JPG format. For direct conversion on the device without transferring, you might need third-party apps.
How to convert Multiple HEIC Photos to JPG on iPhone?
To convert multiple HEIC photos to JPG on your iPhone, you can use free apps like "iMazing HEIC Converter" from the App Store. Once installed, you can select multiple HEIC photos and batch convert them to JPG format.
How to turn off Heic iPhone?
Here's a step-by-step guide to turn off HEIC on your iPhone and switch to JPG:
Launch the Settings app on your iPhone.
Scroll down and tap on Camera.
In the Camera settings, choose the option Formats.
Under Formats, you’ll see two options: High Efficiency (HEIC) and Most Compatible. Select Most Compatible to switch to JPG format for photos.
FAQ
How to change HEIC to JPG on iPhone without computer?
You can convert HEIC to JPG directly on iPhone by sharing the image through apps like Files, Mail, or certain photo editors, which automatically export the file as JPG. Some editing apps also allow manual export in JPG format.
How to change Apple Photos from HEIC to JPG?
In Apple Photos, you can export images as JPG by selecting the photo, tapping Share, and saving or exporting it through apps that support JPG conversion. Many third-party editors also provide one-tap HEIC-to-JPG export options.
How to change iPhone camera settings from HEIC to JPG?
To make your iPhone save photos as JPG instead of HEIC, go to Settings → Camera → Formats and select Most Compatible. This changes the default format from HEIC to JPG for future photos.
 >
>
