AI Background Remover Vs. Manual Photo Editors: What To Choose?
September 29, 2023

The image background is a subtle, insignificant detail within photography storytelling. However, it sets the stage for your subject, influencing your photograph's mood, storytelling, and overall impact.
It is where the background-removing feature of photo editing software gives us its helping hand. A well-executed removal can elevate your work, making it more professional and aesthetically pleasing. Conversely, a poorly executed removal can detract from the visual appeal and distract from your intended message.
Just a few years ago, all photography enthusiasts spent much time and energy using manual background removers with a steep learning curve to master. Nowadays, there is one more option to choose if you want to remove the background of your image. Both professionals and hobbyists learn how to remove background in AI and how to select the best AI background remover.
The moral aspect of using AI in any field of art is a source of discussion, and photography makes no exception. "Will AI replace photographers?" — some people ask skeptically, afraid that the machines will take their source of income and creative pleasure. But are these fears reasonable?
The following article covers the strengths and drawbacks of manual and AI-powered background removals from a comparative perspective. It shows a practical example of AI-based editing software called Luminar Neo to remove the image fond.
Advanced yet easy-to-use photo editor
Get Luminar Neo NowAI-Based Vs. Manual Background Removers

In the ever-evolving world of photography, the choice between manual and AI-based background removal techniques has become a pivotal discussion among photographers and editors. Each method offers advantages and disadvantages, so diving into the factors that should be considered before making a choice is necessary.
AI Tool Advantages
The most significant advantage of AI background removal is speed. These tools can swiftly and accurately remove fonds from images, saving you valuable time. It is particularly beneficial when dealing with a large volume of photos that require background alterations.
Consistency of the AI-based software may be an advantage for professional photographers who want to systemize their artwork into a cohesive portfolio. Templates and presets are necessary for beginners and those who don’t want to spend much time on editing.
Choosing the best AI background remover is not easy, but more and more photographers turn artificial intelligence into their reliable companions in photo editing.
AI-powered tools demonstrate exceptional proficiency in managing intricate backgrounds with detailed or irregular patterns. They exhibit a remarkable ability to accurately discern the subject from the background, even in situations that pose significant challenges.
Furthermore, we have delved into the various aspects that warrant consideration when employing AI technology for photo editing, with particular emphasis on background removal online. These software solutions typically feature intuitive interfaces and user-friendly controls, ensuring accessibility for photographers across all levels of expertise. Such design considerations make these tools accessible and usable by a broad spectrum of photographers, regardless of their skill levels.
Experience the Magic of One-Click Background Eraser
Try it NowAI Tool Disadvantages
It is necessary to regard that AI-based software always relies on clearly defined algorithms. It means that if your image deviates from what the software considers a norm, it can lead to errors and worse results. So, if you choose software based on artificial intelligence, select an option with a high level of human control. AI is a helper, not a substitute; trust it sparingly.
AI algorithms perform consistently across various images, ensuring uniform results. Manual editing, on the other hand, can lead to variations in quality and style. That is why many opponents of AI-based photo editors complain that AI-enhanced images lack an artistic touch because they apply one set of basic templates for everything.
Many AI-powered editing software solutions come with subscription-based pricing models, which can become costly. It may be better for photographers on a tight budget. Explore the market to find an affordable tool if you decide to give AI a try.
Some AI tools require cloud-based processing, raising potential privacy and data security concerns. Photographers handling sensitive content should exercise caution. So read the privacy policy attentively and do not hesitate to ask questions on the official website or support forums if something concerns you.
Consider the pros and cons of each specific AI functionality for your needs and choose the best. Consider the advantages and disadvantages of manual removal if you still want to remove it conservatively. Is it worth your time and effort?
Remove Background With Luminar Neo: 8 Easy Steps
AI-based background removers have weaknesses but can be evitable if you choose the right tool among many options. Now, let’s move from theory to practice and learn how to remove background in AI on the example of Luminar Neo.
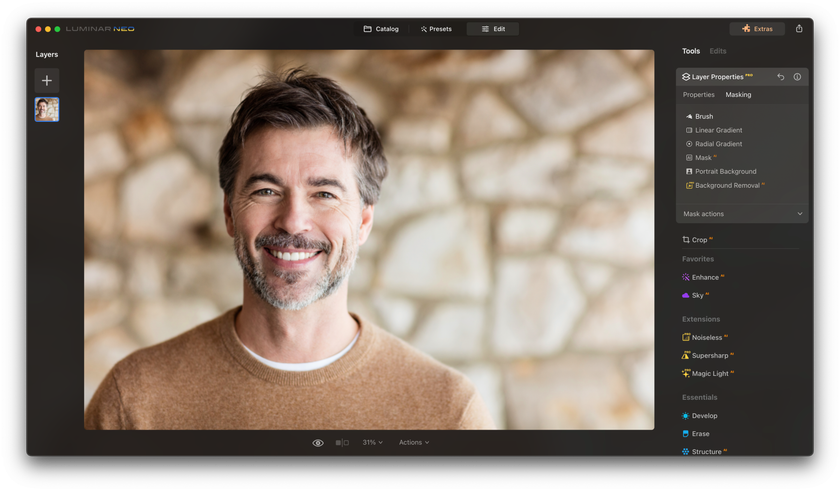
Step 1: Import Your Image

Begin by opening Luminar Neo and importing the image you wish to edit. You can do this by clicking the "Import" or "Open" button and selecting your image file from your computer.
Step 2: Choose the “AI Background Remover” Tool

Once your image is loaded, navigate to the editing tools on the sidebar. Look for the "AI Background Remover" tool and select it. It will activate the AI-powered background removal feature.
Step 3: Adjust the Brush Size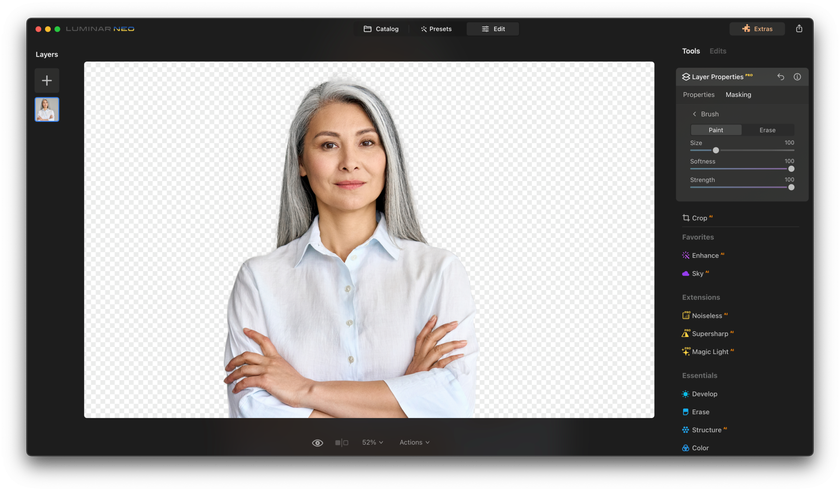

Before removing the background, adjust the brush size to fit the details of your subject. For precise removal, use a smaller brush; opt for a larger brush size for larger areas. You can do this by clicking on the brush size option and dragging the slider.
Step 4: Start Removing the Background
With the AI Background Remover tool selected and your brush size adjusted, begin painting over the areas you want to keep (the subject) while avoiding the background. Luminar Neo's AI will automatically identify and separate the subject from the background as you paint.
Step 5: Refine Edges
Use the "Refine Edges" tool to fine-tune the selection for a cleaner result. This tool allows you to enhance the accuracy of the subject's edges, ensuring a seamless transition between the subject and the removed background.
Step 6: Preview and Adjust
After refining the edges, take a moment to preview your work. You can toggle between the edited and original views to ensure your subject is accurately separated from the background. If adjustments are needed, use the brush to touch up any areas that require refinement.
Step 7: Confirm and Apply
Once satisfied with the result, click the "Apply" or "Confirm" button to finalize the background removal. Your image will now feature a transparent fond, allowing you to seamlessly integrate it into various settings or add a new background.
Step 8: Save Your Edited Image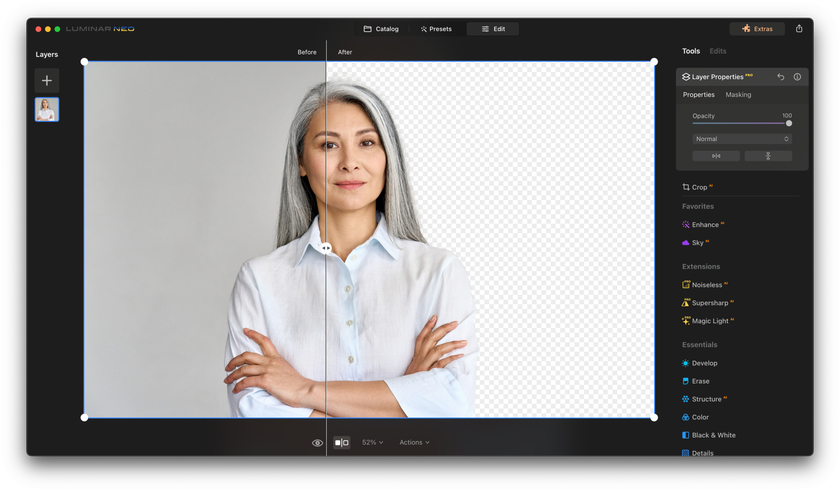

To preserve your edited image, click the "Share to" option and choose your preferred file format (e.g., JPEG or PNG). Save the image to your desired location on your computer.
Congratulations, you have successfully removed the fond from your image using Luminar Neo's AI Background Remover tool.
A 7-day Free Trial of Luminar Neo with No Obligation
Get it now!Bottom Line
Within the constantly evolving realm of photography, individuals, whether enthusiasts or seasoned professionals are faced with a pivotal choice: opting for AI-based background removal tools or relying on manual photo editing techniques.
In this article, we have undertaken a comprehensive examination of the merits and drawbacks inherent to each of these approaches. Furthermore, we have delved into the various aspects that warrant consideration when employing AI technology for photo editing, with particular emphasis on background removal.
We have also learned how to remove background in AI on the example of Luminar Neo - a convenient, user-friendly, efficient photo editing tool based on artificial intelligence that includes many presets and editing features useful for both newbies and advanced photographers.
So, pick your tool wisely, experiment, and continue to capture the world through your lens, with or without a background.