Can you light a photo AFTER you take it? Luminar Neo Preview
October 27, 2023

Picture this: You're out in a beautiful location, camera in hand, ready to capture a breathtaking scene. You press the shutter button, and there it is—a photo that seems almost perfect. Almost. What's missing? The answer often lies in one crucial element: lighting.
Welcome to our journey into the world of photography, where we'll be exploring essential tips on lighting for your photography game. Whether you're a novice or a seasoned pro, understanding how to use the power of light can make the difference between an ordinary snapshot and an extraordinary masterpiece.
In this captivating voyage, we'll dive deep into the art of post-processing magic using innovative editing tools like Luminar Neo. Get ready to discover how you can turn your snapshots into extraordinary works of art by mastering the art of lighting manipulation, even after you've clicked the shutter!
So, let's dive in and shed some light on photography!
Capturing the Right Light

Light is like the paint for a photographer's canvas. It makes photos look great or not so great. Good lighting can make a normal picture into something amazing, while bad illumination can make pictures seem dull and boring.
Light doesn't just make photos brighter. It also changes how images feel and look. Learning how to use and control it is one of the most important things for a photographer. Imagine the light as your photography brush, allowing you to paint emotions, drama, and depth onto your canvas. Mastering this art opens up a world of creative possibilities in every shot.
Advanced yet easy-to-use photo editor
Get Luminar Neo NowTips for Capturing Photos with Good Lighting Right Away

Getting the lighting just right in your photos can sometimes be a challenge, but it's a skill that can make a big difference. Here are some tips to help you capture photos with good illumination right from the start:
Where's the Light Coming From: Pay attention to the place of the source of the illumination. Light from the side can make things look interesting, while from the front might make things look flat.
Is the Light Soft or Hard: Sometimes, the light is sharp and strong, and other times it's gentle and soft. The soft one is nice for portraits because it doesn't make harsh shadows.
Time of Day Matters: The best times to use natural light are in the morning and the evening when the light is warm and pretty. The middle of the day can be too bright and harsh for good photos.
Controlling Artificial Light: If you're using lamps or studio lights, learn how to change their brightness and direction. You can also use things like softboxes and reflectors to make the illumination look better.
Mixing Natural and Artificial Light: Sometimes, you'll need both natural and artificial light. That's okay! You can use both to get the best result.
Try Things Out: Don't be afraid to try different lighting to see what looks best. The more you practice, the better you'll get at using light to make your photos amazing.
Remember, learning how to use light is important for making great photos. It doesn't matter if you're using natural or artificial light; knowing how to work with light can make your pictures stand out!
Discover Luminar Neo's Power

Let's talk about Luminar Neo, a tool that can turn your photos from ordinary to amazing. This AI editor can help you make your photos look wonderful!
If you're new to Luminar Neo, don't worry! We've got you covered with a beginner-friendly video guide to help you get started. Whether you're a seasoned pro or just starting your photography journey, this guide will make harnessing Luminar Neo's power a breeze.
In this post, we'll focus on two special features in Luminar Neo: Relight AI and Enhance AI. Relight AI helps you fix the lighting in your photos, and Enhance AI makes them clearer and sharper so you can see every detail.
Throughout this post, we'll show you how to use these features in simple steps. By the end, you will be able to use Luminar Neo's power to enhance your photos. So, let's jump right in and start creating fantastic photos!
Relight AI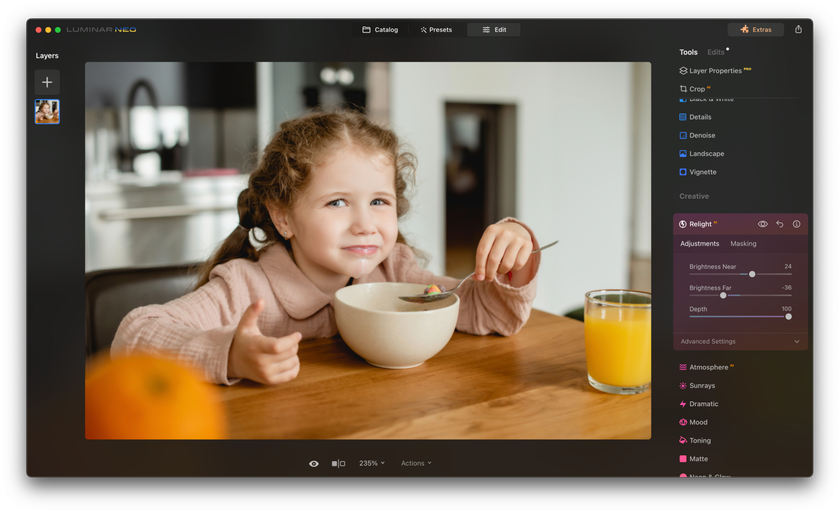

Relight AI is like a superhero for your photos, especially when lighting is a challenge. This incredible tool is here to rescue your pictures from those moments when the lighting just isn't perfect. Let's dive into what makes Relight AI so amazing and how it can make your photos shine.
How does Relight AI enhance exposure and illumination? It carefully examines your photo and uses a 3D mapping system to make sure every part gets just the right amount of light. This means no more uneven brightness—every detail will pop. And what's truly remarkable is that it's incredibly easy to use. Let's see it in action!
Here's a quick guide on how to use Relight AI in Luminar Neo:
Open up Luminar Neo.
Pick the photo you want to make better.
Head over to the Edit section.
Find Tools, then Creative, and click on Relight AI.
Adjust the settings for near and far brightness using the Brightness near and Brightness far sliders.
Play around with the Depth slider to find the perfect balance.
Want even more control? Dive into the Advanced settings and tweak Dehalo, as well as Warmth near and Warmth far.
That's it! Your photo now has perfect lighting, thanks to Relight AI. It's like having a professional photographer right by your side.
The best part? You can see the magic happen. Your photo goes from okay to amazing in just a few clicks. We're excited to show you some examples of how Relight AI can turn a dull photo into a stunning masterpiece. Get ready to be impressed!
Unleash Your Creative Potential with Luminar Neo
View PlansEnhance AI
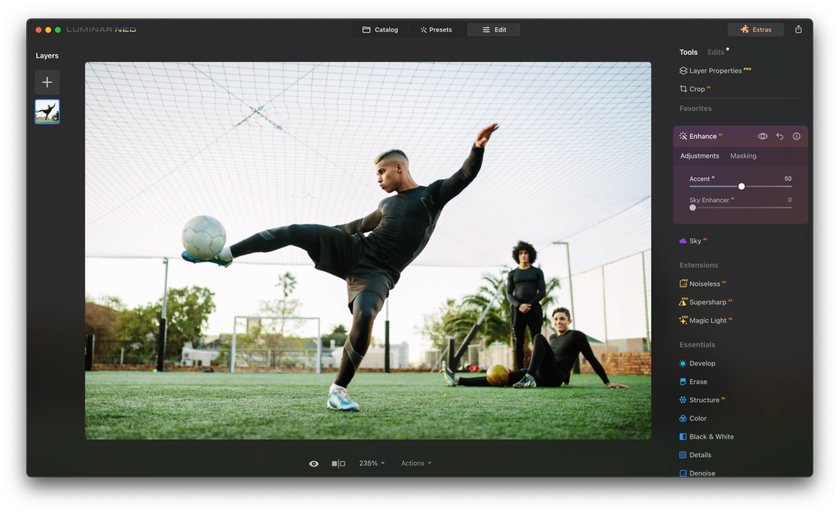
Have you ever wondered why you need Enhance AI? This tool is like having a team of experts at your fingertips. It combines multiple adjustments into one simple slider, covering everything from shadows and highlights to contrast, saturation, and more. Enhance AI sets the foundation for further improvements. It does wonders for your photos by making them clearer and sharper. It's like giving your images a boost, making every detail stand out.
Enhance AI is incredibly user-friendly. Follow these steps:
Open your image in Luminar Neo.
Go to the Edit module.
Find the Enhance AI tool in the Essentials section.
Click the down arrow to access the tool.
Slide the Accent AI or Sky Enhancer AI slider to the right until your image looks perfect.
That's it! Your photo is now enhanced and looking its best, all thanks to Enhance AI. Let's make your photos shine together!
If you want to learn more about AI in photography, check out our post, ‘Leveraging AI in Photography: How to Stay Ahead of the Curve.’
Wrapping It Up
In the world of photography, light is like your magic wand. Whether you're a newbie or a pro, understanding its power can transform your photos.
We've explored Luminar Neo, a tool that makes your photos pop even after you've taken them. With Relight AI and Enhance AI, it's like having a photography genie at your service.
Relight AI fixes tricky lighting, making every detail shine, and it's a piece of cake to use. Enhance AI boosts clarity and sharpness, revealing all the magic in your photos.
So, as you continue on your photography journey, remember that the power of light can be harnessed even after you've clicked. Whether it's natural or artificial light, it's your secret weapon. And don't forget our tips for well-lit photos; they'll make your images stand out. With this knowledge and Luminar Neo's AI, your photos are bound to shine.
Go ahead, light up your world, one photo at a time!