How a Successful Wedding Photographer Uses Luminar Neo in His Editing
July 07, 2022
I’ve been a wedding photographer for almost 10 years, having shot ceremonies all over the world.
I’ve also been working on Shotkit for a similar amount of time, writing articles, reviewing camera gear and building a community of enthusiastic and talented photographers.
Over the years, I’ve witnessed the emergence and consequent widespread use of new hardware and software in the photography industry.
We live in exciting times as photographers, with new technology making our lives shooting photos easier, more fun and a lot more exciting.
- Mark Condon | Shotkit Founder
In this article, I’d like to show you how I use Luminar Neo in my wedding photography to help make my time in front of a computer shorter, and create (even more) awesome images for my clients!
Replacing Skies
Ever since Skylum introduced their Sky Replacement tool back in version 4, photographers around the world have had to reassess what’s possible with photo editing.
For my latest Luminar Neo review, I imported a low resolution photo of the Eiffel Tower and replaced the sky behind it with just one click, with every tiny gap in the tower’s rungs being filled in perfectly with the new sky - it’s truly mind-blowing what this tool can do.
For wedding photographers who often have little to no control over the time of day that they photograph certain moments, the ability to change a boring cloudless sky to one with dramatic clouds at sunset, for example, is a gamechanger.
I confess that manipulating wedding images in this way does leave me a little uneasy, especially as I call myself a ‘documentary wedding photographer’, but when my clients see the final image, I’m reminded that their satisfaction is all that matters.
Essential Wedding Photography Checklist for Capturing Every Moment
Learn more

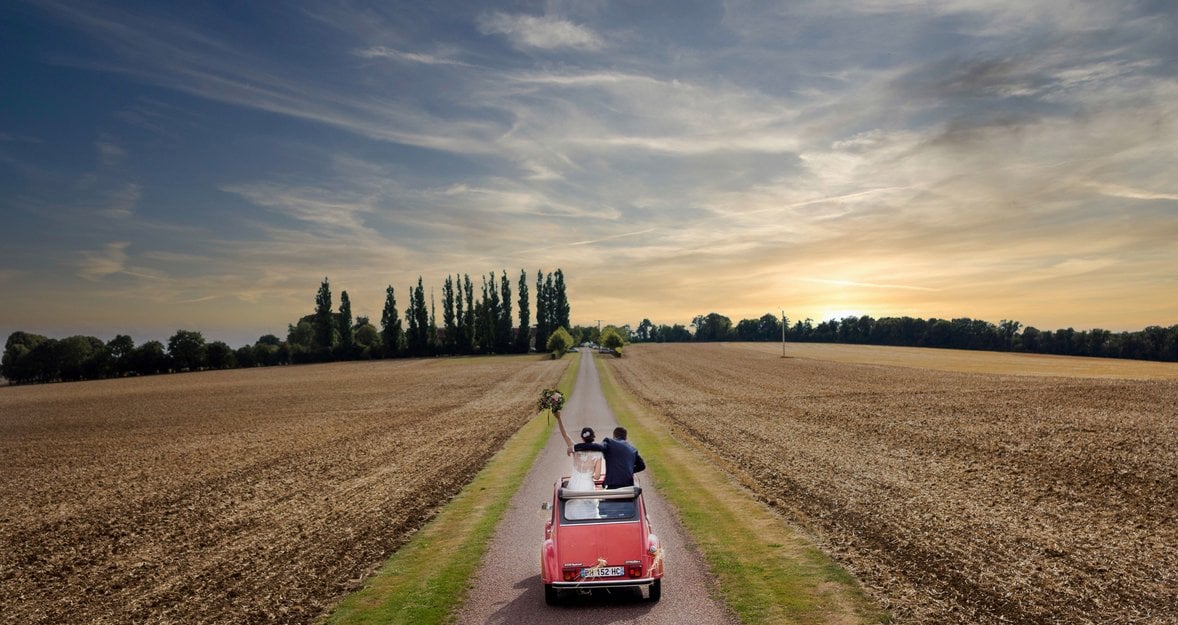
In the shot above, I’d traveled some 17,000km from Sydney to a destination wedding in a small French town and had one chance at getting a photo of the newly weds driving along in their car.
The sky was rather lackluster, so back home in the Luminar app, I spent all over 1 minute choosing a new sky and applying it to the photo.
Batch Adjusting the Exposure of Faces
If you don’t use flash or have something that reflects light back onto your subject, it’s notoriously difficult to get the right exposure on a face when there’s a bright background.
(Even when there’s not a bright background, exposing for the faces in a scene can lead to an overexposed background.)
Luminar’s Face AI tool is an absolute godsend for adjusting the exposure of multiple faces in a scene, and it’s especially useful for wedding group (family) shots.
I explain this better in the video below, but in a nutshell, Luminar automatically recognises the faces in your photo using artificial intelligence, and selects them ready for subsequent exposure adjustments.
Faces should usually be the brightest element in a photo, to draw the viewer’s attention - this is precisely where Face AI helps.
The most amazing feature, though, is how Face AI lets you copy and paste the edits to other photos, all the while adjusting the positioning of the mask so that only the faces in each photo are affected - this is an enormous time saver when you have lots of group photos to edit.
Adding Creative Overlays
When I first saw the new Layers feature in Luminar Neo, I admit to being a bit disappointed - I was expecting full layer-based editing, much like Photoshop (maybe that’s still to come?!)
However, after playing with it for a while, I realised that it’s actually a fun and handy way to give photos an interesting look.
I must admit, this is one tool I don’t use often for my wedding photography, but when I do, my clients seem to love the results (...maybe I should use it more!)
Adding things like flares and light leaks to photos using in-camera techniques is tricky during a fast-paced wedding. While I do like to experiment with directing an off-camera flash directly into the camera’s lens to achieve a flare, it’s not always possible to find time to do it.
With Luminar’s Layers tool, I can add an overlay to simulate the effect, resulting in an image that’s much more alluring than the original.


It’s also great that you can edit the layer using blending modes, orientation and sizing, to ensure the overlays don’t look too repetitive - I find that mixing in one of the Luminar presets with the Layer helps to make the photo even more unique.
Manipulating Body Parts
It’s very rare that a bride or groom asks me to do some intensive retouching to their photos. By this I mean, manipulating a portrait image to slim body parts, remove pimples, change dress colour etc.
Infact, after shooting hundreds of weddings, I can only recall a couple of times that this has been the case.
In one instance, I’d mistakenly shot the bride from the side with her arm pressed flat against her torsos, which meant it looked wider than normal.
Back then, Luminar hadn’t even been invented, so I had to resort to Photoshop to make the adjustment.
Anyone who’s ever used the Liquify tool can attest - it’s very much trial and error, and probably not something an amateur retoucher like myself should be attempting!
If I’d had Luminar, I would have been able to make the edit in seconds by using Body AI.
The next time I’m requested to perform a similar edit, I’ll be ready :)
—-
No matter what type of photography you shoot, Luminar Neo is a piece of software which can help you achieve your goals… or just have some fun with creative experimentation.
I encourage everyone, wedding photographer or not, to have a play around with Luminar to see how it can help you this year.
Mark Condon | Shotkit Founder


