How to Improve Photo Backgrounds with Luminar Neo: Essential Tips
May 16, 2024
In this article, we’ll show you how to work with your photo's background: blur, remove, or replace it. Stay tuned!
Sometimes, manipulating the background is crucial to achieve a certain effect in your image, especially when the original shot doesn't meet your expectations. In this tutorial, we will demonstrate how to use Luminar Neo, an AI photo editor, to improve your backgrounds quickly.
Without further ado, let's get it started!
How to Blur the Background
A blurred background is usually created with the aperture setting during a photoshoot. But if you didn’t achieve that, it’s all right. With Luminar Neo, you can easily recreate this effect. Below, you’ll find a step-by-step guide with a detailed description of each tool:
Step 1: Locate the Blur Tool
Open your photo in the Edit tab. Then, scroll down the toolbar until you reach "Creative Tools." The second tool from the bottom of the list is the Blur tool—click it.
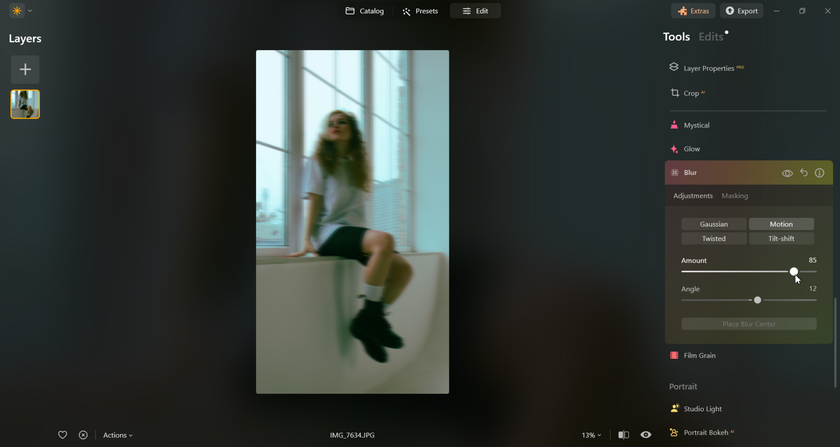
Step 2: Choose Your Blur Type
Now, you have four options for blur: Gaussian, Motion, Twisted, and Tilt-shift. Below is an explanation of how each of them works:
Gaussian. This is the classic blur option. It blurs your image evenly, reducing the clarity and sharpness of the objects. At very low values (up to 5), it can also help remove noise from the photo, which often appears when photographing with high ISO settings in dark or poorly lit spaces.
Motion. This tool blurs your image to emphasize speed and dynamism. It simulates the effect commonly encountered when photographing a moving object or intentionally moving your camera to track motion. By default, Motion blur in Luminar Neo appears horizontally, but you can adjust its angle using the “Angle” slider.

Twisted. This tool is similar to Motion blur. It spreads from a central point outward in all directions, mimicking the effect of rapidly moving towards a specific point, similar to looking straight ahead from the front of a moving bus. By default, the blur emanates evenly in straight lines from the central point, but you can twist these lines into circular patterns by adjusting the “Angle” slider. You can also move the Blur Center anywhere on your photo using the button under the Angle slider.
Tilt-shift. This blur creates a depth-of-field and perspective effect by blurring your photo's closest and furthest planes. It gives the illusion of enhanced depth and a wide perspective. You can adjust the focal point of your photo using the “Place Blur Center” button.
Step 3: Mask the Main Object
After selecting the type of blur you want to use, mask the main object to ensure it appears sharper and clearer against the blurred background. Normally, you don’t need to mask anything if you use tilt-shift, but you might want to highlight your main object if it has an unusual shape. For what to do next, refer to the following section.
Masking the Object: A Quick Guide
Step 1: Set Your Blur
Once you've selected the desired blur intensity, navigate to the Masking tab within the Blur tool interface without closing the tool window.
Step 2: Create Your Mask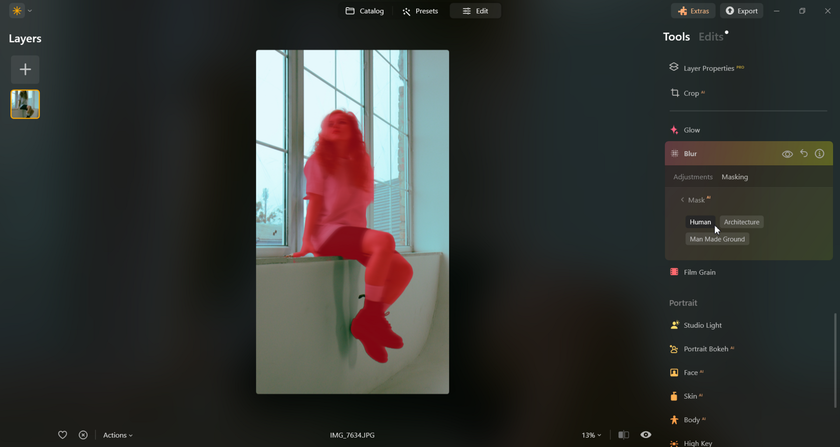

Apply the blur effect only to the areas you choose by creating a mask. There are six options for Masking:
Brush. Manually select the areas where you want the effect to be applied.
Linear Gradient. Click & drag your mouse to create a smooth transition from one side to another.
Radial Gradient. Click & drag your mouse to define the radius of your circle. If necessary, you can also adjust the shape to an oval.
Luminosity. Choose the masked area based on the luminosity levels.
Mask AI. Choose the automated masking offered by the AI assistant.
Object select AI. Click on an object to have it chosen automatically.
Step 3: View and Modify Your Mask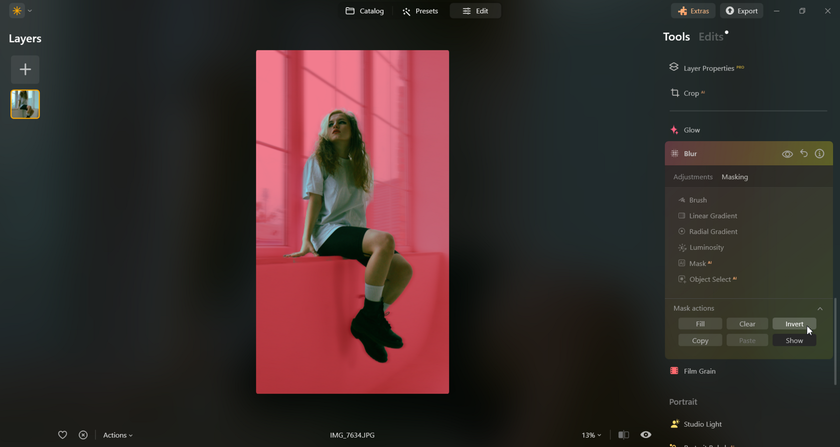

Finally, you can go to Mask actions and click “Show” to see your mask:
Fill. The mask will fill your image.
Clear. The mask will be removed completely.
Invert. Use it if you masked the main object, and the mask will fill the area that wasn’t masked before, unmasking the previously masked area.
Copy. Use it to copy your mask and apply it to another tool.
Paste. Paste the copied mask from another tool.
Show. This button has double functionality: click it to Show or Hide your mask.
Step 4: Final Adjustments
After you’re done with Masking, click on the Adjustments tab without closing the Blur tool. Now, you can make your final corrections and adjust the sliders perfectly, seeing the result instantly.
Tip: If you closed the tool by mistake and didn’t finish working with the mask or want to readjust something—no worries! Go to the Edits tab at the top right corner, and you’ll be able to continue editing unfinished adjustments.
Advanced yet easy-to-use photo editor
Get Luminar Neo Now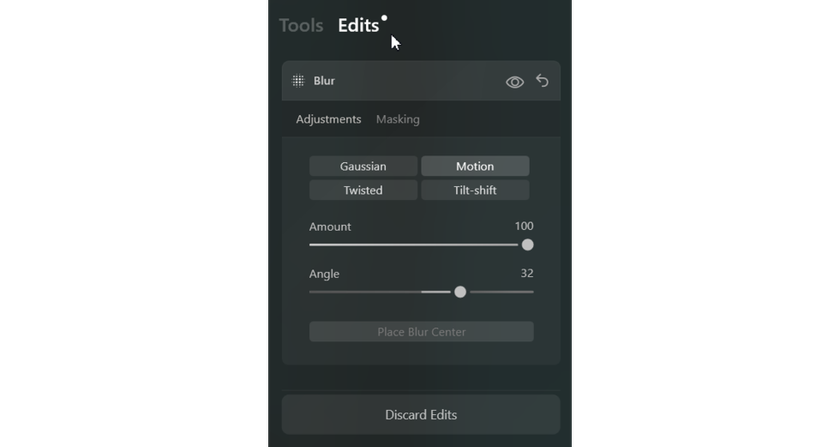
How to Remove the Background
Sometimes, you want to remove the background completely and save your object with a transparent background for different purposes: use it on another image, paste it into another scene, etc. Here are steps that will guide you through the background removal:
Step 1: Get Started with the Layers
To remove the background, open your photo in Edit mode and choose Layer properties, which are at the very top of the right-side tools panel.
Step 2: Create Your Mask
Go to Masking, and you’ll see the Background Removal AI button. Click on Background Removal AI and wait till AI analyzes your photo.
Step 3: View and Modify Your Mask
After the analysis is done, you’ll see options such as Main object, Human, Flora, and any other detected objects. The main object is usually selected by default, but you can choose different options and refine the selection afterward.
Step 4: Final Adjustments
Now, click “Remove,” and the background will be removed (transparent). You’ll see the “Refinements brush” option, which allows you to adjust the mask. Read more about it below.
How to Use Refinements Brush


To adjust the mask with the Refinements Brush, you have three options:
Transition. This tool is used on the borders of your object.
Tip: You can use Transition on thin, detailed objects, such as hair strains. The brush will identify the contrasting objects (hair strains) and remove the gaps between them.
Object. This tool highlights the object that is supposed to remain in the photo.
Background. This tool removes the application area from the photo, making the background completely transparent.
Important: Save your photo as a PNG file to preserve the transparency of the background.

How to Replace the Background
So, you've learned how to remove the background from your photo using our instructions from the previous paragraphs. Congratulations! Now, it's time to learn how to replace it with another one to bring your photo to life.
Step 1: Access Layers
To add another picture as a background for your object, you’ll need to work with Layers. Look at the top left corner in the Edit mode, and you’ll see Layers. To open the panel, click the “+” (plus) sign.
Step 2: Add a New Background
Within the Layers panel, choose a “+” (plus) in “My images” to open the Finder/File Explorer window. Then, navigate through your files and find the image you want as a background. Select and open it.
Step 3: Adjust Layer Order and Opacity
Once your desired image opens, it will be on top of your object with 50% opacity by default. Paste the background beneath your object by holding the layer with the background and dragging it under the layer with the object. Then, move the slider with opacity in Layer Properties to 100%. 
Tip: Utilize layers to add any objects with a transparent background to your photo. This technique allows for creative compositions and the creation of unique collages
That’s it—you successfully replaced the background! Now, your image is ready—or almost ready… If you want to play with your photo a little more and perfect it, we invite you to discover other Luminar Neo tools.