HDR Real Estate Photography
October 24, 2018

Useful tips from pro photographers: how to take photos and how to merge them into one image.
For real estate agents, there’s hardly a more effective way to sell houses than showcasing photographs. That’s where real estate photographers are useful.
Great shots make a house appealing to buyers, increasing the chance of a sale. Hiring a professional photographer is a must. The task of a professional photographer is to take natural-looking photos of a property that make it attractive to buyers.
Here are some of the most crucial things to consider when starting your real estate photography career. The first thing to consider is that HDR photography can help you greatly. One of the best HDR editors is Aurora HDR.
Preparation
Prepare equipment
Prepare the night before the shoot so you don’t forget anything. Charge your camera batteries and bring your charger and an extra camera just to be safe. Make sure you have a memory card with enough storage and format it if necessary. Clean your lenses and don’t forget to pack your tripod and anything else that you might need in a handy bag that’s easy to carry around. Plan ahead how you’ll get to the property and how much time it will take. Bring an umbrella.
 Photo by Chad Sucher
Types and number of photos
Photographers often ask how many photos is enough. There’s no fixed number, since it depends on the size of the home and its condition. For an average two-storey home, 20 shots may be ideal. Compile a checklist to make sure not to leave any room out. A list will be useful for future contracts with real estate agents, who will know what to expect from your work. You can get multiple shots of the bedroom or living room if they’re spacious or contain some custom features that make an impression. Bathrooms, kitchens, and small bedrooms don’t need extra photos — one per room is enough. Make sure to take photos of the basement, attic, patio, and balcony — anything that can give a full tour of the house to the potential homebuyer. At the same time, don’t show mediocre spots; sometimes less is more. Remember that your objective isn’t photojournalism but capturing an attractive living space. And even with great shots, you’ll still need to edit. You can do that in Aurora HDR.
Walk around
When you just arrive at a house, you can take a moment to walk through it, check how many rooms there are, find the best points to take photos, decide how to rearrange the furniture, and determine where to start with your photoshoot. Looking at the project as a whole will lead to fewer surprises and help you estimate the amount of work to be done, organizing it and structuring it in your mind.
Tidy up
Let the real estate agent know that the property needs to be clean and decluttered before the shoot. This isn’t a job for real estate photographers, but be prepared that you may still need to rearrange furniture since you know the advantageous shooting angles and they may differ from what the designer had in mind. Sometimes, you’ll also need to hide objects or move furniture so the buyer can see the full potential of the rooms. Stage the scene however you need. You can leave some simple decor, but be sure to make it tidy and relevant. Flashy paintings or bouquets of flowers will draw attention away from the room. Everything should be clean, including floors, windows, and screens. Sometimes real estate photographers need to help with this.
Types of real estate photography
Of course, the majority of real estate photography is of residential houses. However, sometimes you’ll be required to shoot restaurants, gyms, shops, and other types of commercial real estate. Always think about the purpose of your shoot. If you’re taking photos of a new restaurant, think about the feeling the owners want to evoke: is it cosy and romantic? Is it a place for corporate parties? Is it high-class? Your photos should reflect the purpose of the place and make it appealing to the target audience.
Real estate photographer’s work process
You’re there at the property, everything’s clean, and your gear is ready. Now let’s start the actual shooting.
Exterior
One of the most crucial tips for exterior real estate photography is to shoot at the right time of day. Everything looks better in the golden hour, which is a great time to shoot if you want to give a warm feeling and are selling a house to a family that’s looking for coziness and domesticity. Turn the lights on inside the house and draw the curtains: this will make it look inviting to come home to after a long work day. When you take a picture of a house, make sure that it takes up just the right amount of space in the shot. If you have access to a drone, you can take some shots of the neighbourhood, especially if the house is located in a great area.
Interior
Most of your photos will be of the interior of the house. Don’t let furniture crowd the foreground or take up too much space in the house. Try to make each room into a livable space that’s spacious, comfortable, and full of potential. Cover up any bad design choices or weak spots. When a person is buying a house, they’re also buying a lifestyle, so make sure that your photos reflect that. Another tip that photographers use is to breathe life into a scene during post-processing: fill up the empty pool with water or add some fire in the fireplace during editing. Sure, it’s not real, but it can show potential by making these objects look usable, and that’s what real estate photography is about. Some people think that overly processed HDR images look fake, but when edited well, they can make any interior pop.
 Photo by Chad Sucher
Vertical lines
Make sure that the vertical lines in your photos are straight. You can edit photos later, but you can also minimize this problem by using a tripod and paying attention during the photoshoot. Look at the corners of the room, windows, door frames, and electric appliances such as the fridge and television and observe how straight the vertical lines are.
Lights
Your HDR real estate photography software should correct issues such as bad lightning, but isn’t it better when these issues never occur? Decide beforehand whether to keep the lights on or off. Each option has its advantages and disadvantages. With the lights on, a house looks inviting and cozy. But at the same time there are varying light temperatures. This needs to be balanced out in your HDR editing software. Turning lights off provides you with an even color temperature that doesn’t need much editing. However, you’ll get a cold feeling in your interior photos.
Technical details of real estate photography
Choose your camera
A camera is the main tool of real estate photographers. Shoot with a 24mm wide-angle lens so that rooms seem more spacious and so you can provide more detail. The camera you should use truly depends on your budget. Advanced real estate photographers can afford more advanced gear. For a budget of $500 some great cameras for shooting real estate photography are the Nikon Coolpix B700 and the Panasonic Lumix FZ300. For a budget of $2000, you can afford a great Panasonic Lumix DC-FZ80.
Other gear
There are a lot of different kinds of lenses that you can invest in. Lenses power up your game. With a wide-angle lens, you can capture a wider field of view than the human eye can see, grabbing a whole lot of the room without needing to take multiple photos. A tripod is a must for shooting real estate photos. Invest in one that will keep your camera stable while you check for vertical lines. Also, look into other gear that may be handy for HDR real estate photography.
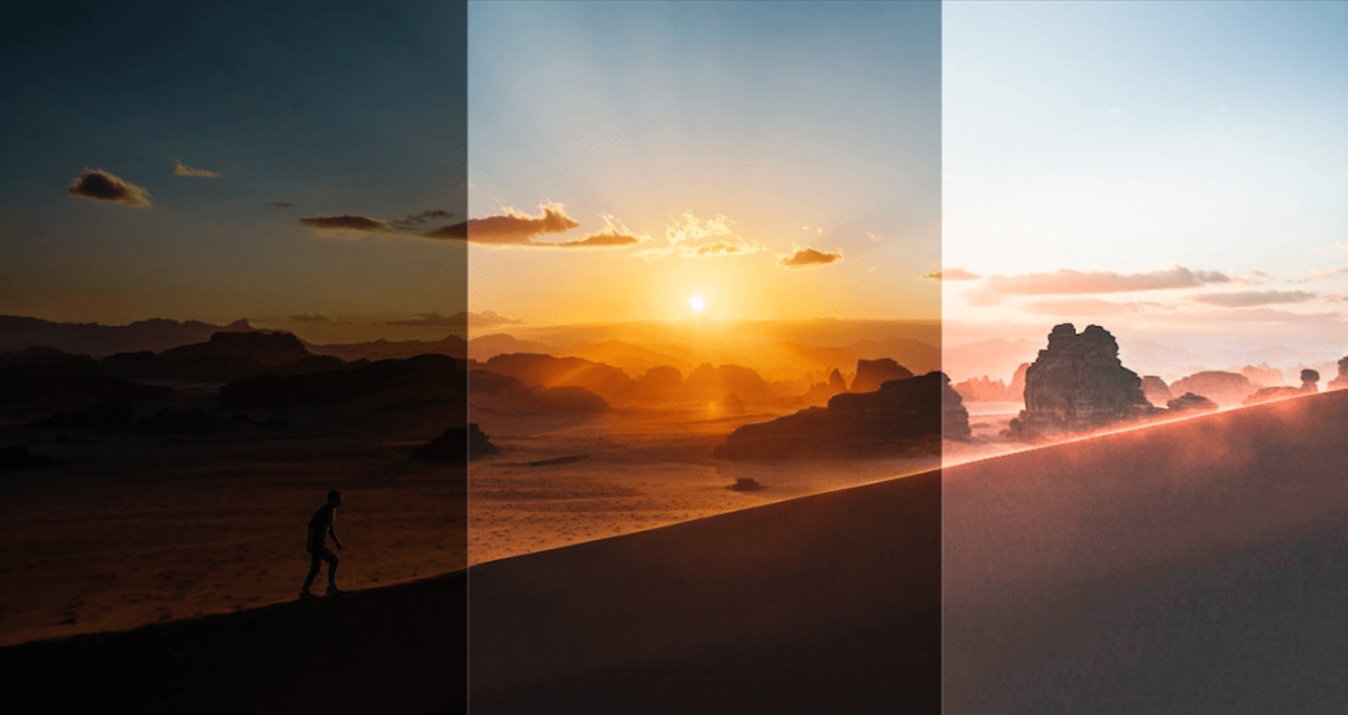
Shoot in HDR
HDR is also crucial if you want to make your photos look great. Aurora HDR is photo editing software that’s specially calibrated for HDR photography, including landscapes and real estate. In Aurora HDR, you can create an HDR image from a single shot or from multiple images. The trick of HDR photography is that uses the information contained in each bracket with different exposures or in a single RAW photo to create a result that pulls out all parts of the scene. For example, in interior photography the view out the window often looks less than ideal because of the difference in lighting and window flare. HDR takes the best from different exposure brackets and combines all details into a single image that looks just like our eyes see it, without flare. Another tip to remember is to always choose RAW format when shooting. RAW files provide a lot of detail that you can work with later in your software. Aurora HDR 2021 supports RAW files and provides great results effortlessly and quickly.
Drone photography
Photographers dealing with big, million-dollar houses should use drone photography. You can take a picture of the neighborhood to highlight the area where a family can live, especially if there are parks or lakes nearby. Open the blinds and windows to make the house look spacious. Always ask for permission before doing drone photography, as the neighbors might object. Be aware of other ways that agents showcase real estate, including videos and virtual tours.
HDR real estate photography tips
Now that you’ve taken photos of the property, it’s time to edit. You can create stunning real estate photos in Aurora HDR. Here’s an HDR tutorial series to give you an idea of what this software can do.
Vertical correction
Sometimes, you look back at your HDR real estate photography and realize that some lines aren’t vertical. It’s necessary to correct the vertical lines of walls and furniture. They should all be parallel to create the effect of a real house; otherwise, it will look like the walls are tumbling. Aurora HDR can fix a variety of problems related to this with just a few adjustments. Distortions can be fixed with the Lens Correction and Transform tools to significantly enhance photos by straightening out the interior lines of rooms, correcting the horizon, and much more.
 Photo by Chad Sucher
Natural results
Aurora HDR has in mind the needs of real estate photographers. Indeed, there’s no HDR software that can provide as good of a result as Aurora HDR both from multiple brackets and from a single image. The main advantage of Aurora is that there’s no chromatic aberration in the results. Real estate photography software should turn out images with pleasing colors and vivid details, making interior photography appealing and worth selling to real estate agents and home sellers. Aurora HDR does exactly that. With Aurora, there are no artifacts and no halos, which are often a problem in HDR photography. The AI-powered tools in Aurora offer the most complete arsenal you can get to battle all the issues that may arise when trying to edit your photos.
Aurora Looks
If you’re using our HDR software program, you already know what makes it great. However, there are also really great extra features to consider. Aurora provides you with really great one-click Looks, developed by famous photographers such as Trey Ratcliff, Serge Ramelli, and Randy Van Duinen. Whether you’re a beginner photographer or a pro who needs to save some time,Aurora Looks can help. Get great results in no time that will please your clients and earn you money and a reputation as an HDR real estate photographer.
If you’re not ready to buy Aurora HDR, you can still test the free trial version. Download this real estate photography software to find out if it suits your workflow.