3 Start-to-finish Luminar NEO landscape photography edits
January 25, 2024
Hello there! In this guide, we delve into the art of editing landscape and nature photos using the cutting-edge tool Luminar Neo. Let’s get it started!
Embarking on the landscape photography journey is exhilarating, but the real magic happens in the editing room, where raw images transform into breathtaking vistas. As we explore three start-to-finish editing processes, you'll discover the secrets to bringing out the full potential of your raw captures. From coastal serenity to mountain majesty and the warm hues of a sunset oasis, each edit unfolds as a visual narrative, demonstrating how to edit landscape photos and infuse them with the essence of nature's grandeur.
Join us on this editing odyssey, where Luminar Neo becomes your artistic ally in crafting landscapes that transcend the ordinary and evoke the sublime beauty of the natural world!
Unveiling the Raw Landscape Images
The journey into transformative landscape photography edits begins with the unveiling of raw images, each a canvas waiting to be painted with the hues of nature's beauty. In this crucial starting point, the inherent potential of these unprocessed captures becomes evident, capturing diverse landscapes from serene coastlines to majestic mountains and sunset-kissed oases. These raw images serve as the foundation for an editing process, where the intricate details and dynamic range are patiently waiting to be revealed. In this unveiling, the essence of the natural world, frozen in pixels, beckons the editor's creativity, promising exploration into the artistry beneath these unedited landscapes.
If you are new to landscape photography, we invite you to familiarize yourself with the beginner's guide to editing landscape photos. In this article, we will show how to edit nature photos using the example of three different landscapes.
Main Functions
1. Catalog
It is one of the first menu sections when you open Luminar Neo. Add your photos that you are going to edit. Immediately in the right window, you will see HDR Merge. It is a technique that combines multiple photos taken at different exposures to create an image with enhanced detail, particularly in challenging lighting conditions.
To begin, import your similar shots with other exposures into this field. The software's HDR merge feature will automatically align and merge these images, producing a single photograph with an extended dynamic range.
2. Presets
Next to the Catalog section is the Presets section. Luminar Neo offers many presets that instantly transform your landscape photos. Start by browsing the available presets and selecting one that suits the mood and style you want to convey in your image. These presets can be a fantastic starting point for your edits, saving you time and effort. If you still want more control over editing, we invite you to the next section, next to Presets.
3. Edit
In this section, you'll see a variety of manual editing tools on the right-hand side of the screen, including AI-based tools. As an AI Image Editor, Luminar offers all available modern functions for image processing. Next, we move on to three examples of landscapes you can create in this software.
Discover AI's Power in Landscape Photography
Dive In Now!Editing a Stunning Sunset


This type of photo is quite common. We can remember many stunning sunsets we have seen in our own experience or pictures in books, magazines, Internet sites, social networks of our friends, and the like. The orange, pink, and red sky over the sea, mountains, forest, city, desert... Always a unique grand spectacle that lasts only a few minutes. And we often have a desire to freeze it in a picture. But even the best lenses of the most expensive cameras cannot convey the picture as our eyes see it. However, we can bring the photo closer to the desired effect of real delight if we add a little magic in post-processing.
Sunsets are a popular subject in landscape photography, and Luminar Neo provides several tools to make your sunset shots truly breathtaking. The AI-based landscape photo enhancer is the easiest way to process natural images quickly. You can adjust the level of changes with the slider to get the desired result.
But you can still manually adjust the settings you want. First, change the colors, contrast, and saturation to make the sky and the sun's hues pop. Fine-tune the exposure and highlights to capture every detail in the foreground, and apply a soft vignette to draw the viewer's eye toward the sun. Control the warmth of the shot to convey the atmosphere without making the photo too orange or unnatural.
Use the Optics tool to align the horizon and remove unnecessary roundness or deformations.
Remove unnecessary objects from the photo with the help of the Erase tool for manual changes, or use GenErase.
Pay attention to details and objects in the image. You can edit each individually, adding exposure, contrast, brightness, detail, and more. Experiment with filters and add sunlight or additional clouds.
Check your changes, save the photo, and share it with your audience.
Bringing Forest Photos to Life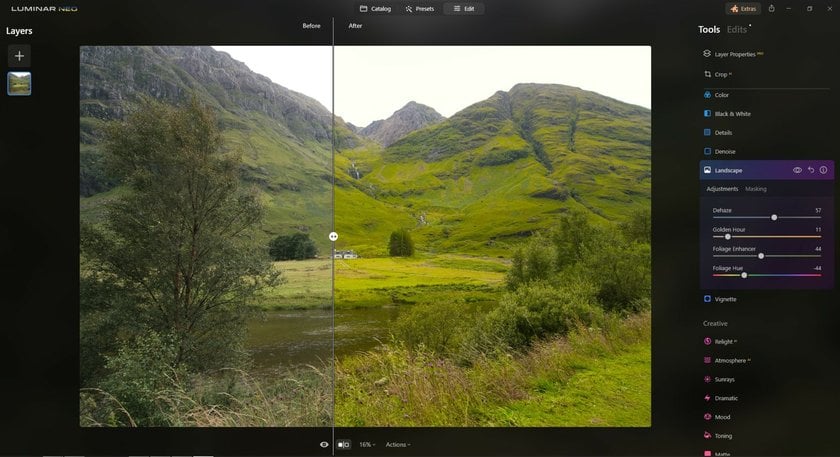

Forests are filled with intricate details, and Luminar Neo lets you emphasize them effectively. Photos of the forest can be very different — from capturing a distant plan to the image of paths between trees with all the various flora. Preserving the naturalness of the colors and the overall composition is important in editing forest scenes. You can use the editing tips from the previous section to level the horizon, smooth the corners, and add changes to individual objects in the frame.
Adjust the saturation and vibrance to enhance the rich greenery, and use the dodge and burn tools to brighten or darken specific areas selectively. Applying a subtle vignette can also draw the viewer's attention to the heart of the forest.
Try adding Mystical and Glow effects to convey the atmosphere. Use gradients to treat certain parts of your landscape.
Use AI tools like Noiseless AI for better detail.
When satisfied with the result, save the photo and show it to your audience.
Revolutionize with Sky Replacement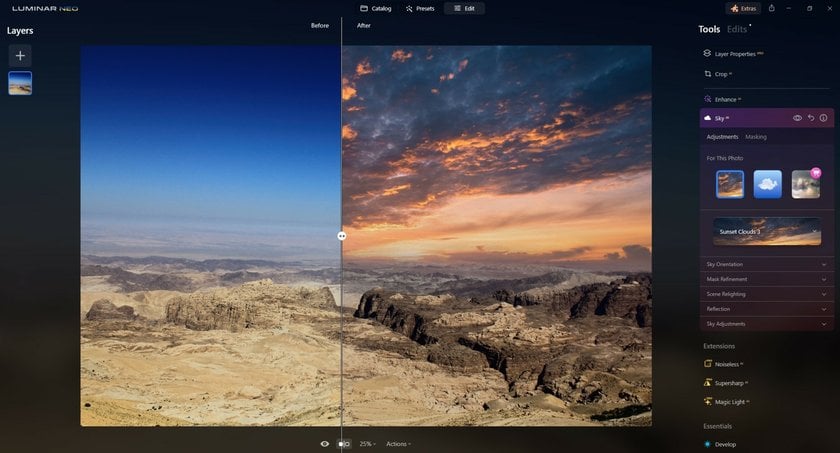

Whether photographing the sea, mountains, forest, desert, or even a cityscape, if there's a sky in the frame, you can create a headline-grabbing image in one click. Whether photographing the sea, mountains, forest, desert, or even a cityscape, if there's a sky in the frame, you can create a headline-grabbing image in one click. First, make the general light and color settings as described in the sections above, and then we will move on to the absolute magic of achieving the wow effect.
Luminar Neo's Sky Replacement feature is a game-changer for landscape photographers. If your original sky doesn't do your landscape justice, replace it with a more fitting one. Choose from a vast library of pre-loaded skies, or upload your own. Adjust the sky's brightness and color, and blend it seamlessly into your image for a completely transformed landscape.
You can create the atmosphere of dawn, bright day, sunset, storm, twilight, etc. Thus, your photo will be completely different from the original. Add final tones to make the image look as harmonious as possible.
Save images and show them to your audience.
A 7-day Free Trial of Luminar Neo with No Obligation
Get it now!Bonus Editing Tips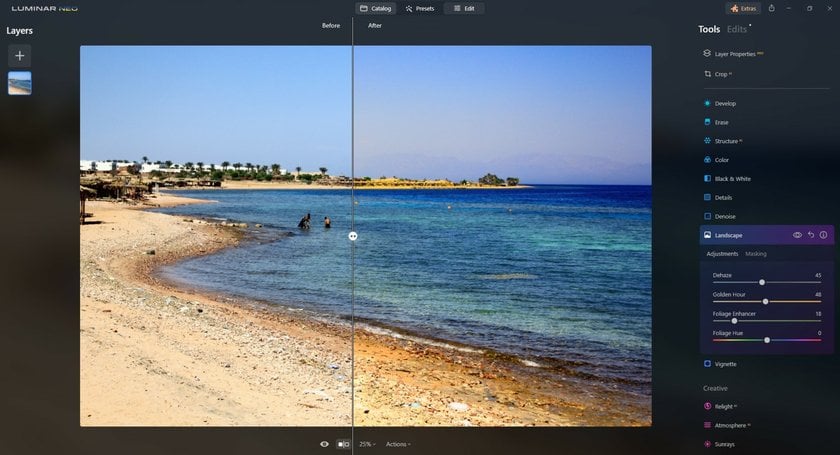

Mountain landscapes often involve complex lighting situations. Luminar Neo's editing tools can help you bring out the grandeur of mountains in your photos. Adjust the clarity and structure to enhance texture, and use the color grading feature to emphasize the natural colors of the terrain. Graduated filters can also balance exposure between the sky and the mountains.
Sea landscapes can be challenging due to the changing tides and reflections. In Luminar Neo, use the dehaze tool to reduce atmospheric interference and make the sea appear crystal clear. Adjust the temperature and tint to create a harmonious color palette, and enhance the waves and textures with the structure and sharpening tools.
Bottom Line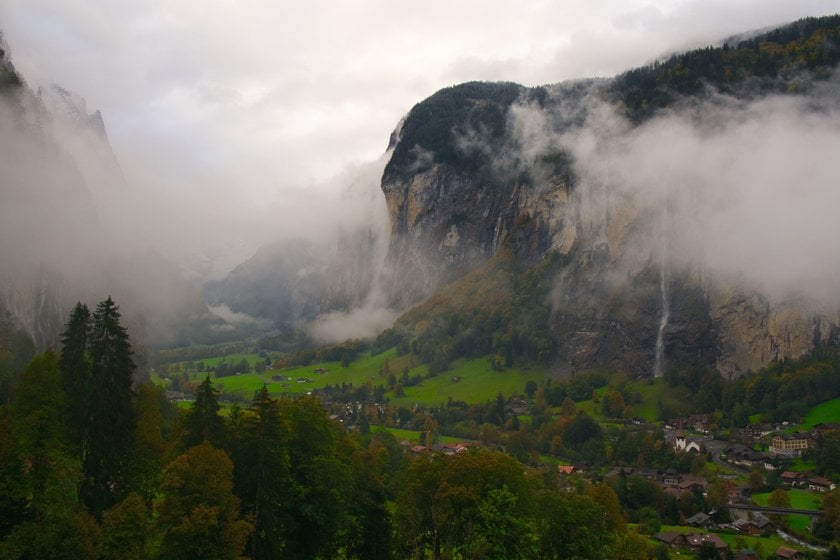

Thus, we learned how to edit landscape photos using the example of 3 options. Luminar Neo offers comprehensive tools to help you create stunning landscape photography edits from start to finish. Whether working with HDR merges, presets, sunsets, mountains, seascapes, forests, or sky replacement, this software empowers you to unleash your creativity and take your landscape photography to new heights. With practice and experimentation, you'll be able to craft breathtaking landscapes that captivate viewers and showcase the beauty of the natural world.