July 17
13 min. to read
How to Make a Picture Large: Effective Techniques for Image Enlargement

Imagine capturing a great photo from your smartphone but you now feel like printing it out – like, a really BIG print. To make that happen, you would need to enlarge the image.
Although it’s very easy to enlarge any image using a variety of photo editing software, it’s very hard to make those changes without sacrificing quality. However, in this article, we’ll explain how you can easily enlarge an image without quality taking a hit. Today you're going to find out for sure how to make a picture larger in a few simple steps.
Before we get to the good stuff, you should know why images lose quality after being enlarged. By the way, if you use Luminar Neo photography editing software, you can avoid this problem.
Understanding the Importance of Image Enlargement
Before we tell you how to make a picture size bigger, we need to talk about the basics. Photo enlarging is a valuable process for several purposes. Here are some reasons why it is important:
- When you want to print a photo in the largest size or display it on a large screen or billboard, resizing becomes crucial. It allows you to maintain the desired resolution and pixel dimensions. Also, it ensures that the image retains its sharpness and detail when enlarged. Making a picture bigger without compromising its quality is essential for creating visually appealing prints or eye-catching displays.
- In the world of photography and fine art, photo enlargement can play an important role in expressing the artist's vision. When artists know how to make photos bigger, they can highlight specific details, emphasize textures, or create a more immersive viewing experience. It offers greater flexibility in presenting subject matter and allows for creative cropping and composition options.
- Zooming in on a photo can help reveal finer details that may not be easily seen at the original size. This is especially useful when the ability to examine the finest elements is critical. Knowing how to make the picture size bigger can help you preserve the original details and ensure that important info is not lost in post-processing.
- By enlarging and printing your favorite photos, you can create lasting keepsakes that capture the essence of special moments. Whether it's a wedding, family reunion, or milestone celebration, knowing how to make the picture bigger allows you to present the finest details and treasured memories in a tangible and visually striking way.
And there is one more thing. When working with older or low-resolution images, understanding how to make a photo bigger can help restore and improve its quality. By enlarging the image, it becomes easier to identify and repair imperfections, remove noise, or improve overall clarity. This is especially valuable when archiving historical photographs or restoring damaged images.
How Do You Make a Picture Bigger: Maintaining Aspect Ratio
The aspect ratio represents the proportional relationship between the width and height of a picture. Changing it can distort the overall image. For instance, if you stretch or shrink a photo by changing the aspect ratio, the subjects in the frame might appear unnaturally stretched or compressed.

Also, many pictures are carefully composed with specific elements and objects placed in certain positions. When you resize an image without preserving the aspect ratio, the relative placement of these elements can change. This can result in a loss of visual balance or unintentional cropping of important parts of the photo. So, by maintaining the aspect ratio, you ensure that the composition remains consistent.
The Reason behind the Loss of Image Quality
Image editing software programs transform pixels to enlarge or shrink an image. These pixels are the building blocks of bitmap images (JPEGs, PNG, etc.) that are commonly seen on the internet. You can see these tiny little squares (pixels) by zooming in on any bitmap image. These images are called bitmap images because the pixels are mapped to a fixed location on the image, giving it life, colors, and much more.
Is it possible to enlarge a photo without losing its clarity and quality settings? There is one more thing you should know before we get to the subject of how to make a picture larger. Shrinking the images doesn’t take a toll on the quality because what you’re really doing is making the pixels smaller – so the pixels would be less visible, and in fact, might make the image look sharper as a result. However, when you enlarge an image, you’re actually enlarging the pixels – making the whole image appear blurry and pixelated.

This is mainly why you will see image quality sinking after it is enlarged. If you want to learn more about this, check out this guide here, which discusses image interpolation in detail – the reason why images get pixelated.
With that said, let’s talk about enlarging an image without losing image quality. Let's just say you can do more than just Photoshop. One of the fastest ways to enlarge a photo without losing quality is to use the Luminar Neo auto picture editor. You can also try other interesting options. For example, our blog features a selection of photo editing open-source software, so you may find something that works for you.
How to make a picture bigger in Luminar Neo
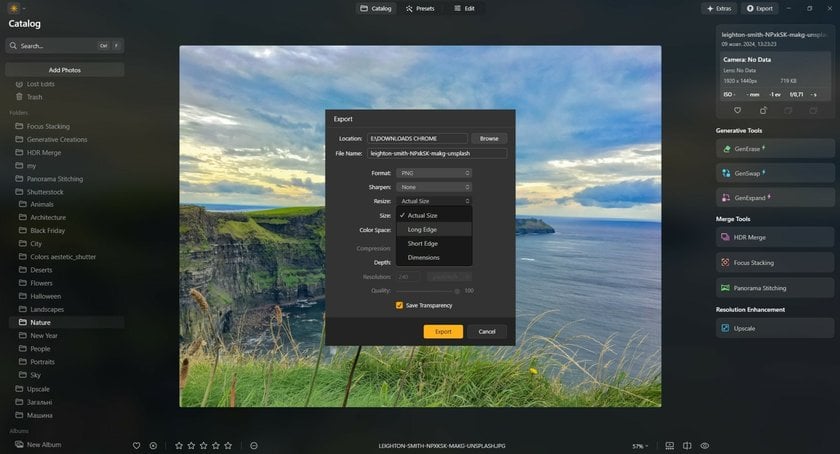
Developed by Skylum, Luminar Neo is excellent editing software that offers a wide range of features, including resizing images. Here's a step-by-step guide on how to make a picture wider using Luminar Neo:
- Locate the desired picture within your Luminar Neo library, utilizing the handy organization system based on date or assigned color tags.
- Press the keyboard shortcut Shift-Cmd-E (Mac) or Shift-Ctrl-E (PC) to access the export menu.
- Select the "resize" option, which provides choices to maintain the original size or specify the number of pixels for the long or short edge. Alternatively, you can freely define the size by entering specific pixel values for height and width.
- Click on "resize”. You'll be presented with options to preserve the original size or set specific pixel dimensions for the long or short edge. Alternatively, you can freely define the size by entering the desired pixel values for height and width.
That's it! Luminar Neo efficiently stores, organizes, resizes, and edits your photos, enabling you to achieve the desired results quickly and intuitively.
Luminar Neo is a powerful program that allows you to resize pictures without compromising quality, while also providing cropping, editing, and photo organization features. With its range of useful tools, Luminar Neo is an excellent option for enlarging images. You can give it a try right now by clicking the button below.
Conclusion
Now you know how to make pictures larger without pixelation. If you liked this article then leave a thumbs up and do share it so others might also take benefit from it. We always love to know your thoughts so don’t forget to leave your comments below. Now go and enlarge that image.
And if you want to discover new facets of post-processing your best shots, you should definitely try our Luminar Neo AI photo editor. This software provides a wide range of tools for editing skin, enhancing colors, and the overall quality of any picture. It's perfect for novice and professional photographers alike. Alternatively, if you need a quick photo edit, check out Skylum's online photo editor. You don't even need to download it!
By the way, AI technology is really popular today and helps to achieve amazing results in both enlarging and shrinking the image. For example, using advanced techniques, AI-based software can help you make significant reductions in file size, while still maintaining high image quality, which allows you to increase storage capacity and optimize your digital resources.
FAQ
How Do I Make a Picture's Original Size Bigger Using Photo Editing Software?
Simply open the image in software such as Photoshop, find the resize or image size option, enter the desired dimensions while maintaining the aspect ratio, and save the enlarged version. This process ensures that the photo is resized without distortion or loss of quality.
Can I Enlarge a Small Picture without Losing Quality?
When you enlarge a picture, the software must interpolate and create new pixels, which can result in a loss of sharpness and detail. However, some advanced resizing algorithms and techniques can minimize, but not completely eliminate, quality degradation, especially for very small pictures.
When Should I Seek Professional Assistance for Picture Enlargement?
You should consider it when you need high-quality results or when you are dealing with complex enlargements. Professionals have expertise in using advanced software and techniques to minimize losses in clarity, handle specific requirements, and ensure optimal results. In addition, they can use Luminar Neo to achieve the desired magnification while maintaining image quality.
 >
>
