December 19
25 min. to read
How to Remove Glare From Photo: Detailed Guide
You can get rid of haziness and any other imperfections with a photo editor by using a retouch tool. But our tutorial will tell you the best ways how to remove glare from an image and solve the source of the problem without touching the details of the shadows in a matter of minutes without post-processing.
Why Does Glare Appear in Photographs?
This glare occurs when a point of a light source, such as the sun, is much brighter than the rest of the scene, and it either ends up in the image (within the different angle of view of the lens) or simply hits the front of the lens element without being directly present.
Depending on the position of the bright light source, this can result in noticeable clouding/lack of contrast, spheres and polygonal artifacts scattered throughout the image, as well as semicircular shapes with iridescent colors.
This is due to internal lens reflections and even occurring between the image sensor and the lens. It can also be reflected light from the lens aperture as it passes through the lens, resulting in even more noticeable glare.
Unfortunately, glare can be exacerbated by a number of factors such as dust inside the lens, a dirty front element, a dirty/ poor quality lens filter, a lack of anti-reflective multi-coating technology, etc. In some cases, the effect can look pretty bad in images. You can fix glare in photos by removing these problematic factors.
Sun/Light Glare
This refers to the flare resulting from the reflection of light between the image sensor and the lens elements. Unlike the flash on the lens, the red dot is not only the reflection of light from the lens elements and aperture but also the reflection of light from the image sensor to the lens, which then returns back to the image sensor. Unfortunately, it seems that newer models of short cameras are particularly prone to this key moment of problem.
While most modern lenses are designed with special multi-coating technologies to reduce flare, even some of the best professional-grade lenses are still prone to flare. The position of the light source in the frame and the angle at which the light reflects the lens (and then the film/camera sensor) have a strong influence on how flare appears in images and at what intensity.
Flash and Glasses Glare
In addition, there are other factors that can also seriously affect images. Let's look at them in more detail.
- Lens elements. The more lens elements there are, the more "ghosting" will appear in images;
- Focal length. Not only do wide-angle lenses do a good job with flare, but with shorter focal lengths the light source looks smaller. Telephoto lenses, on the other hand, are much worse because they intensify everything and that's why they have big hoods;
- Lens design. Good lens design can definitely affect flash glare. For example, Nikon designs lenses with pressed fronts which allow reduce glare in photos even without expensive coating techniques. Take a look at the comparison of 50mm lenses shown below, and you'll see that the latest generation 50mm lenses are noticeably superior to their AF-D counterparts in handling glare and halos;
- Multilayer coatings. Lenses with multilayer coatings certainly have a huge impact on flare characteristics;
- Filters. Low-quality filters have been known to create more flare and ghosting in original images;
- Dust on lenses. All lenses accumulate dust over time, and internal dust can cause glare problems;
- Cleanliness of the front element. Grease and other particles on the front element can also create glare.
Next, we'll look at how we'll tell you how to get rid of glare in photos in the photography phase.
How to Reduce Glare in Photos?
If you don't want to see the glare in your images, there are some simple steps you can take to prevent it.
- Use a lens hood. Hoods are very helpful in blocking direct sunlight to the front element;
- Use your hand or another object;
- Simply touching your hand to the lens to protect it from sunlight can completely eliminate glare;
- Use quality lenses;
- They are expensive, but more often than not, these lenses have amazing coating technologies that help greatly reduce or even eliminate glare problems;
- Use fixed lenses instead of zooms;
- As a general rule, fixed lenses have simpler optical formulas than zooms, and certainly fewer optical elements. The fewer elements, the lens frame;
- Change the perspective/framing;
- Sometimes changing the position of the light source in the frame can make a huge difference.
Another way how to get glare out of pictures is a good lens hood. Unfortunately, although it is recommended that you hold the lens hood or block glare caused by the light with your hand or other objects, shooting directly into the sun and incorporating it into the images you want will render these efforts useless. In such situations, either change the perspective/frame completely or use only high-quality lenses with multi-coated lenses.
This section can be summarized as follows:
- How do you get rid of glare? Removing bright light sources from your frame and keeping the light rays out of the lens can completely remove sun glare from photos. When shooting in light reflection, as written above, be sure to use a lens hood to prevent sunlight from hitting the front of the lens;
- How do you get rid of lens flare at night? If you want to remove it when shooting at night, you should avoid using small apertures, which can increase this effect in your images. Also, try using a high-quality fixed lens with good coverage. It should help to fix glare. Finally, don't forget to remove any filters from the lens;
- Do I need to use a lens hood at night to avoid sun glare in photos? A lens hood is designed to prevent sunlight from hitting the front of the lens. However, if you're shooting at night and you have a moon or bright street lights overhead, you'll benefit from using it as well.
Below we will tell you how to remove light glare from a photo while it is still being taken.
How to Remove Glare From Photos During Photoshoot
We'll tell you a few ways to help block glare in the frame while you're still shooting:
Polarizing Filter
When shooting subjects, a polarizing filter is used to remove the light haziness on non-metallic objects. It works best when the light source is perpendicular to the shooting line. The greater the deviation from the perpendicular, the weaker the filter works. The light source can also be from above, as long as it is perpendicular to the shooting line. Once again, please note that the polarizing filter does not remove reflection from photos on metal surfaces near.
Thoughtful Drawing of Highlights
If you shoot correctly, you need to thoughtfully "draw" highlights and reflections on all surfaces. by placing sources and reflectors (including colored ones) accordingly. If you can not do it in one shot, you can put the camera on a tripod and on each side or part of the object to put a separate light, make a separate frame, and then make post-processing in Photoshop or another editor.
Set Up The Lighting
Another way how to remove sun glare from photos is correct light. You're going to need a lot of room to let the light shine through your subject towards the camera. Make sure you have a large room to shoot in, also because you're shooting fragile items. It's a good idea to tape the cables to the floor and check the stability of the platform or table where you'll be placing the glass objects.
Position the light source behind the object to be photographed so that the emitting surface shines through the glass. Find the position of the light source and/or the object to be photographed so that the contours of the object are highlighted.
If the light source needs to be lowered or raised relative to the object to be photographed, put a box under the object or increase the height of the stand on which the light source is mounted.
What kind of light should I choose: pulsed or constant? Both options are fine since you will be taking pictures with a tripod. Also, you need to soften the light. To do this, use an attachment that increases the area of light, such as an umbrella, and/or place several layers of white, translucent paper or tissue strips in the space between the light source and the subject. Add foam panels to the construction: place one under the object to be photographed and the other two on each side of the object.
Styrofoam panels in this scheme soften the light: they "wrap" the object being photographed on all sides and reflect the rays from a single source onto it. For the same purpose, we suggest putting a sheet of white paper or a cloth on the side panels. This surface will reflect the light onto the subject from top to bottom.
Think of the resulting light "cube" as an imitation of natural light from a large window: your task is to create "enveloping" lighting and avoid bright spots or reflections that disturb the composition, on the surface of the product.
So, foam panels are perfectly suited to the role of reflectors.
To emphasize the contours of the glass object, use styrofoam panels painted black. Place them on the sides of the object you're shooting. They will make the outline dense and the color of the glass near it richer.
Adjust The Camera
Another way how to fix glare in photos and hide imperfections is correct the settings on your camera. Depending on the light sources with which you create your lighting, choose the appropriate white balance value in the camera menu. In this tutorial, we will use pulse sources, so "Flash" will work for us. That way, we will remove the unwanted blue cast from the photos. If you are in doubt about the choice, set "Auto White Balance".
You may have difficulty focusing on clear glass. So choose a focus point that corresponds to a tighter outline and sharpen it. In our case, we focused on the base of the vase, because it is darker and more visible than the rest of the vase.
I recommend taking photos in manual (M) mode. This way you have full control over the exposure: how the camera measures the light and how much of it is transmitted to the light-sensitive layer.
Set the aperture to 11 or 16. You'll get a sharper image of the subject all around it. Set the ISO sensitivity to the lowest setting, such as ISO 100 so you don't have to move the sliders in the photo editor. That way you will reduce digital noise, which gets worse with increasing ISO sensitivity, and you will save more details in the very dark and very bright areas of the subject.
If you are shooting with constant light sources, rely on the exposure meter built into the camera to choose the best shutter speed. In this scene, you want to lighten the background as much as possible, so you can safely overexpose the photos. To do that you need to lengthen the shutter speed by 1-2 stops relative to the shutter speed indicated by the exposure meter of the camera.
Eliminating Sun Glare in Photos
Sun glare can transform a sunny day photo into a haze of brightness, often overshadowing the actual subjects of the image. But fret not, as there are proven ways to handle this common problem.
Angle and Positioning: Sometimes, all it takes is a slight shift in your stance or the angle of your camera. By simply moving around and experimenting with perspectives, you can figure out how to get sun glare out of a photo effectively.
Use a Lens Hood: This simple accessory can block out the direct sun, preventing its harsh rays from hitting the lens directly.
Post-Processing: If you've already taken the shot and the glare is ruining your image, you might wonder how to remove light glare from a photo using software. Tools like Photoshop, Luminar Neo, or any other online photo editor can be instrumental in reducing or even eliminating unwanted glare in post-production.
Getting Rid of Glare on Glasses
It's a frequent challenge: the flawless portrait disrupted by an undesired reflection. Here's your game plan on how to remove glare from glasses in a photo:
Change the Lighting Angle: One of the most straightforward solutions is to adjust the angle of your light source. This often shifts the reflection away from the camera's line of sight.
Ask the Subject: Sometimes, merely tilting the head or adjusting the glasses slightly can reduce or remove eyeglass glare from a photo.
Post-Processing: If you're wondering how to remove glasses glare from photo after the fact, photo editing software can be your savior. With the retouch tool or clone stamp, you can often diminish or erase the unwanted glare.
Minimizing Glare on Faces
Faces, particularly when sweaty or oily, can reflect light in ways that distract from the subject's features. Here's how to manage this:
Diffuse the Light: Soft, diffused lighting can prevent harsh reflections. If you're outdoors, look for shaded areas or use a diffuser to scatter the sunlight.
Makeup: For planned photoshoots, matte makeup can significantly reduce facial shine, ensuring you won't have to worry about how to remove flash glare from a photo later.
Post-Production: If you're trying to determine how to remove flash from a photo where the glare is on a face, consider using editing software. Gentle adjustments with the dodge and burn tools can often reduce the appearance of glare, bringing focus back to the subject's features.
How to Remove Glare From Photos with Luminar Neo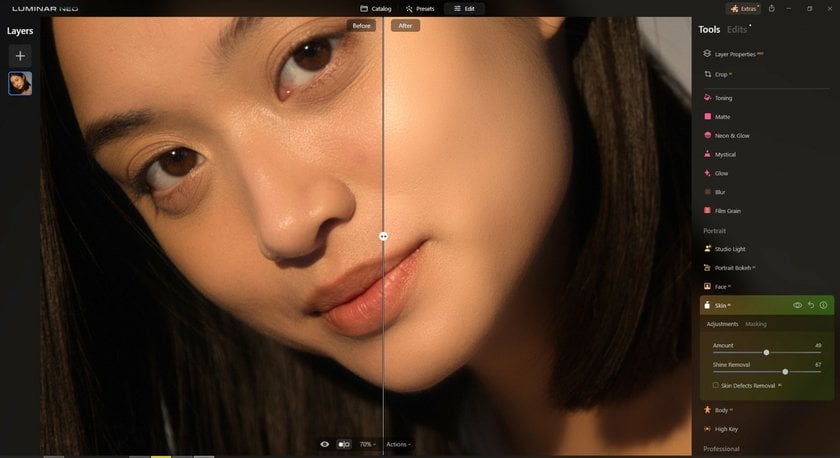

You can remove glare from photos with the best photo editor Luminar Neo. Its extensive toolset will improve your photos with artificial intelligence processing that can fix glare automatically! The application offers many presets and tools for photo processing. Thanks to the user-friendly interface, it will be easy to work with not only professionals but also beginners. I strongly recommend you make a copy of the original image before you start photo editing.
Step-by-Step Guide: How to Remove Glare from Photos
1. Select the photo you want to edit and upload it to the editor.
2. Go to the Portrait tab and locate the Skin AI tool.
3. Adjust the "Shine Removal" slider to the desired level.
Additional Tip:
To remove skin imperfections, click on the "Skin Defects Removal AI" and manually adjust the "Amount" slider.
Conclusion
Now you learn how to remove light glare from a photo and properly set up your camera for a similar task. By reading this article you can improve your photos with unwanted glare or prevent them from appearing while you are still shooting! Get creative, add new effects to the picture that you want to edit, do quick fixes and retouch photos. I wish you good luck!
FAQ
How to get rid of light glare in photos?
To achieve a natural and glare-free image, combine various methods. Start by adjusting your camera’s exposure settings to minimize glare before taking the photo. Use physical barriers like lens hoods or your hand to block direct light. In post-processing, apply tools like "Dehaze" in Photoshop or Shine Removal feature in Luminar Neo. These combined techniques will help you effectively reduce glare and enhance your photos.
What are free methods for eliminating glare in pictures?
Eliminating glare from your photos can make a significant difference in their overall quality. Here are some methods you can use:
Adjust the Shooting Angle: Changing your angle can help in avoiding direct reflections, especially when shooting through glass or taking photos of reflective surfaces.
Use a Polarizing Filter: This can help reduce reflections from non-metallic surfaces like water or glass.
Position Your Light Source Properly: If using an external flash or another light source, position it in a way that it doesn't cast direct glare on your subject.
Use Shadows and Natural Barriers: Position your subjects in the shade or use natural barriers like trees or buildings to reduce direct sunlight.
Edit in Post-Production: Use software like GIMP or other photo editing tools to reduce or remove glare in post-processing.
How can I minimize glare in my photos?
Avoid using direct flash; instead, try bouncing it off surfaces. Place subjects away from windows to prevent unwanted reflections. Shooting during the golden hour gives softer light. Post-production tools like the healing brush can also correct glare.
Are there online tools to remove glare from photos for free?
Certainly, GIMP, Photopea, and Pixlr are accessible online solutions for glare issues. Luminar Neo, while not free, is another AI photo editor that offers impressive features for glare and reflection removal. For on-the-spot adjustments, mobile apps like Snapseed can be handy.
 >
>
