How to Capture Water Drop Photography
Last Updated on July 22, 2025
Splashes, ripples, and shimmering droplets—water drop photography turns these fleeting details into stunning images that stop you in your tracks.
Have you ever seen a photo of a single water droplet hanging in mid-air or making a perfect splash? That’s the magic of water drop photography. It’s a special kind of macro photography that’s beautiful and more doable than you might think. You can turn your kitchen counter or home studio into a mini liquid art studio with the right setup and patience. This guide will walk you through everything—from gear and camera settings to shooting techniques and editing tips.
What is Water Drop Photography?
 Water drop photography is attempting to capture a small, magical moment—when a droplet falls, splashes, or waltzes with another. It might feel a wee bit technical initially, but after you try, you’ll be addicted. The best part? You don’t need a slick studio or an expensive setup to get on in there. This type of photography is a work of art in which you get to experiment with timing, color, and shape, and the whole process is simply fun.
Your AI-Powered Photo Editor for MacOS and Windows
Discover Now!Essential Equipment for Photographing Water Drops
You’ll need the right gear to get amazing shots in water drops photography. Here’s a simple rundown of the equipment that can help you capture professional-quality photos, even if you’re just starting as a hobbyist.
Camera and Lens Recommendations
DSLR or Mirrorless Camera (e.g., Canon EOS R6) — full manual mode is a must
Macro Lens for sharp close-ups (e.g., Canon EF 100mm f/2.8L Macro IS USM)
Remote Shutter Release to prevent shake (e.g., Vello ShutterBoss II)
Manual Focus Capabilities (supported on most macro lenses, use focus peaking if available)
Flash Compatible for high-speed lighting (e.g., Godox V860III)
The Importance of Using a Tripod
Stability to keep framing steady (e.g., Manfrotto 190XPRO Aluminum Tripod)
Precision for fine manual focus adjustments (use with a ball head like Manfrotto XPRO Magnesium Ball Head)
Long sessions become easier—avoids hand fatigue
Free hands to trigger drops or adjust lights without moving the camera
Lighting Setup for Water Droplet Photos
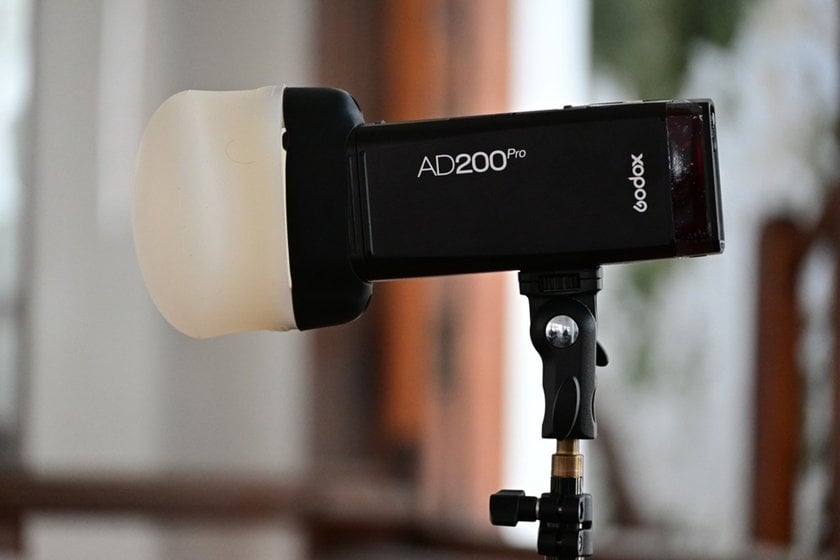
External Flash to freeze motion (e.g., Godox AD200Pro)
Diffuser or Softbox to soften harsh light (e.g., Rogue FlashBender 2)
LED Panel (optional) for ambient fill light (e.g., Neewer 660 LED Video Light Kit)
Positioning gear like light stands with boom arms (e.g., Neewer Adjustable Light Stand with Boom Arm)
Specialized Equipment for Advanced Water Drop Splash Photography
Water Dropper Valve Kit for precise drop control (e.g., MIOPS Splash Water Drop Kit)
Timing Controller to sync flashes and drops (e.g., MIOPS Splash Controller)
Drip Stand for adjustable drop height (lab stand with clamp or DIY PVC setup)
Reflectors/Gels to add color and mood (e.g., Neewer Color Gel Kit)
This focused gear list will help you build an efficient, effective, and beginner-friendly setup!
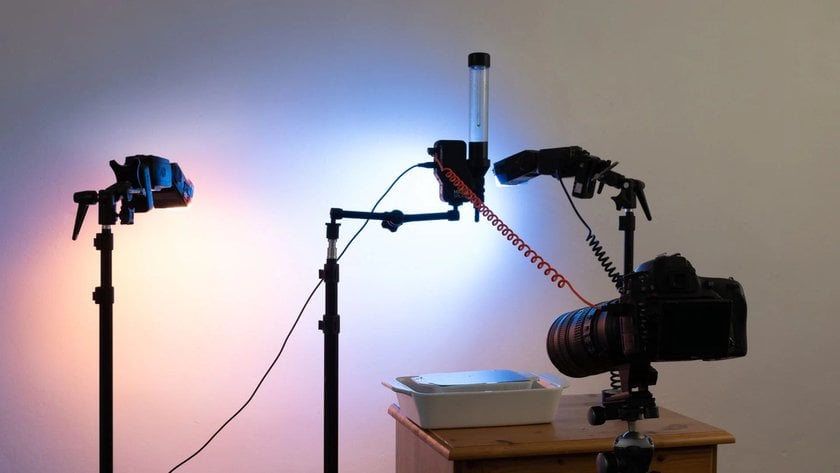
Setting Up Your Water Drop Photography Studio
 You don’t need a professional studio—just a controlled environment. This could be your kitchen or a quiet room with blackout curtains. Reducing natural light gives you full control over artificial lighting.
Creating the Perfect Water Drop Setup
Start with a simple container like a bowl or tray of water. Put a water dropper that hangs above it. Move in close to the action with a macro lens, and have your flash units positioned at 45° to reduce glare.
Controlling Water Droplet Formation
For consistent droplets:
Use a drip kit or IV bag with adjustable flow
Maintain a steady water level in your container
Try using thicker liquids (like milk or glycerin) for slower drops and bigger splashes
Background and Surface Considerations
A good background can elevate your shot:
Use black or colored paper
Try metallic or reflective surfaces for cool effects
Consider placing printed textures or gradients for unique water droplet pictures
Best Camera Settings for Water Drop Photography
 Settings are everything in waterdrop photography. Manual mode gives you the control to freeze motion and adjust depth. Here’s how to dial in your settings.
Shutter Speed: Freezing the Motion of Water Droplets
To capture the exact moment a droplet splashes or collides, shutter speed matters.
Shutter Speed | Result |
1/1000 sec | Freezes medium-sized drops |
1/2000 sec | Stops fast droplets mid-air |
1/8000 sec | Best for double-drop splashes or crown shapes |
Aperture and Depth of Field
Your aperture controls how much of the scene is in focus.
Aperture | Use |
f/5.6 | Narrow focus, soft background |
f/8–f/11 | Balanced sharpness and blur |
f/16+ | Maximum detail, less light—use with flash |
ISO and White Balance Adjustments
Get the cleanest, most accurate shots by choosing the right ISO and white balance.
Setting | Tips |
ISO 100–400 | Keep it low to avoid noise |
ISO 800+ | Only if shooting in very low light |
White Balance | Use custom or flash WB for consistent color |
Techniques for Capturing Stunning Water Droplet Photos
 Once your setup and settings are ready, it’s time to shoot. The following techniques will help you move beyond basic water droplet photography and start producing stand-out images.
How to Focus Manually for Sharp Water Drop Photos
Autofocus often fails in fast-paced macro scenes due to the speed and scale involved. A tiny miscalculation can throw the whole image out of focus. Instead, try this approach:
Place a pen, toothpick, or any small object where the drop will fall
Manually focus on that point using your camera’s live view
Take a few test shots, adjust, and lock the focus
If your camera has focus peaking, be sure to use it. It lights up the sharpest areas of your image, making it much easier to get your focus right. Taking those sharp, clear water drop photos ultimately comes down to being diligent about where the droplet falls, so don’t neglect this critical step!
Using High-Speed Flash for Crisp Water Droplet Pictures
Shutter speed alone will not always freeze movement in the dark interiors. That is when flash comes into play. High-speed flash assists in freezing quickly moving targets in luscious detail. Here’s how to do it:
Set flash duration to 1/10,000 sec or faster to stop motion cleanly
Employ a small flash output to provide shorter flash bursts
Position the flash off to the side or in back of the droplet to add depth
Use modifiers like snoots or softboxes to generate and soften the light
Don’t forget to test flash sync with your camera. This method is especially effective when exploring Double Exposure Photography, where multiple splash moments are layered creatively.
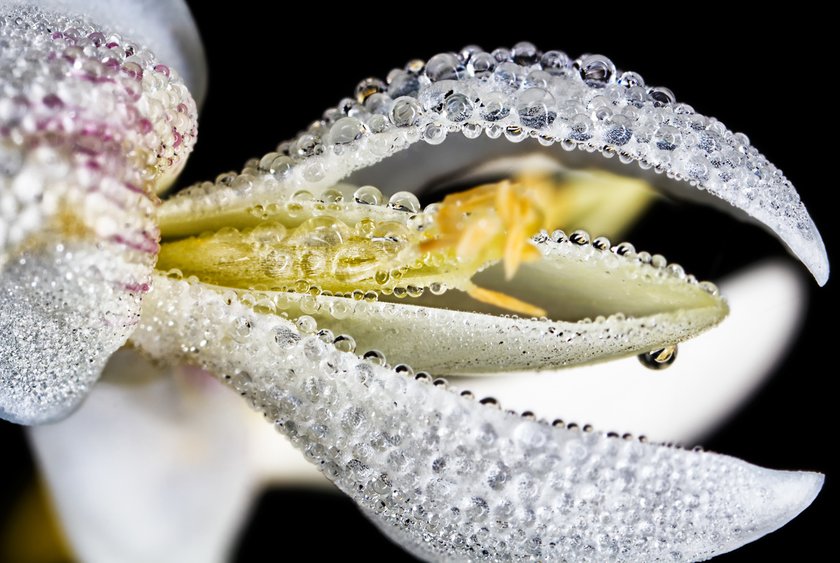
Experimenting with Colors and Reflections
Using artistic elements in your shots makes your photography portfolio more visually stimulating and intriguing. As much as most photographers opt for a plain black background, pushing yourself to test color and light can create a more pronounced style. Try these tips:
Attach colored gels to your flashes to cast vibrant tones across the scene
Use props like foil sheets or glass to create interesting reflections and refractions
Try different light directions—top-down, side-lighting, or even backlight for silhouette effects
These subtle adjustments change the mood of your photography water drop sessions. Over time, you’ll discover combinations that give your work a unique look and feel. If you want quick results, choosing the Best Software for Picture Editing can make a huge difference.
Post-Processing Your Water Drop Photos
 Even the most perfect photography water drop shot benefits from editing. This is where Luminar Neo becomes your best friend. It’s designed to enhance fine details and fix minor flaws without complicating the workflow.
Exclusive Tools of Endless Possibilities in One AI Editor
Explore Now!Useful Luminar Neo tools for water drop editing:
Structure AI. Enhances the texture of drops and ripples
Details Enhancer. Sharpen splash edges without halos
Erase Tool. Remove background dust or water stains
Color Harmony. Fine-tune hues and contrasts
Noiseless AI. Great for high ISO shots taken in low light
For those just starting, this is also a solid Photo Editing Software for Beginners that balances ease of use with professional features.
Water Drop Photography Tips & Tricks for Beginners
 Don’t expect a perfect shot in your first session. Timing, lighting, and setup all take some trial and error. Practice and repetition will teach you more than any manual ever could. But to help you get ahead faster, here are some practical tips and common mistakes to avoid.
Common Mistakes and How to Avoid Them
Using autofocus. It usually fails with such small and fast-moving subjects. Switch to manual focus and pre-focus on where the drop will fall.
Overexposing the splash. High-speed lighting needs careful control. Use low flash power to freeze the motion without blowing out details.
Messy background. Avoid anything distracting. A solid-colored sheet or card behind your setup works best and keeps the viewer’s attention on the subject.
Skipping cleanup. Drops tend to leave residue, especially when using different liquids. Dry off surfaces between shots to avoid smudges or unwanted reflections.
Reviewing your images after each set will also help you improve. And if you notice dust marks, color issues, or other small problems, you can simply fix them with a Free Mac Photo Editor. Particularly if you’re not ready to spend on high-end software yet.
How to Capture Unique and Creative Water Droplet Photos
When you’ve nailed the basics, it’s time to start experimenting. Mixing things up with different materials is a great way to make your photos stand out. Don’t limit yourself to plain water—adding color, texture, or something a bit thicker can really change the vibe. The following are some simple but effective ideas.
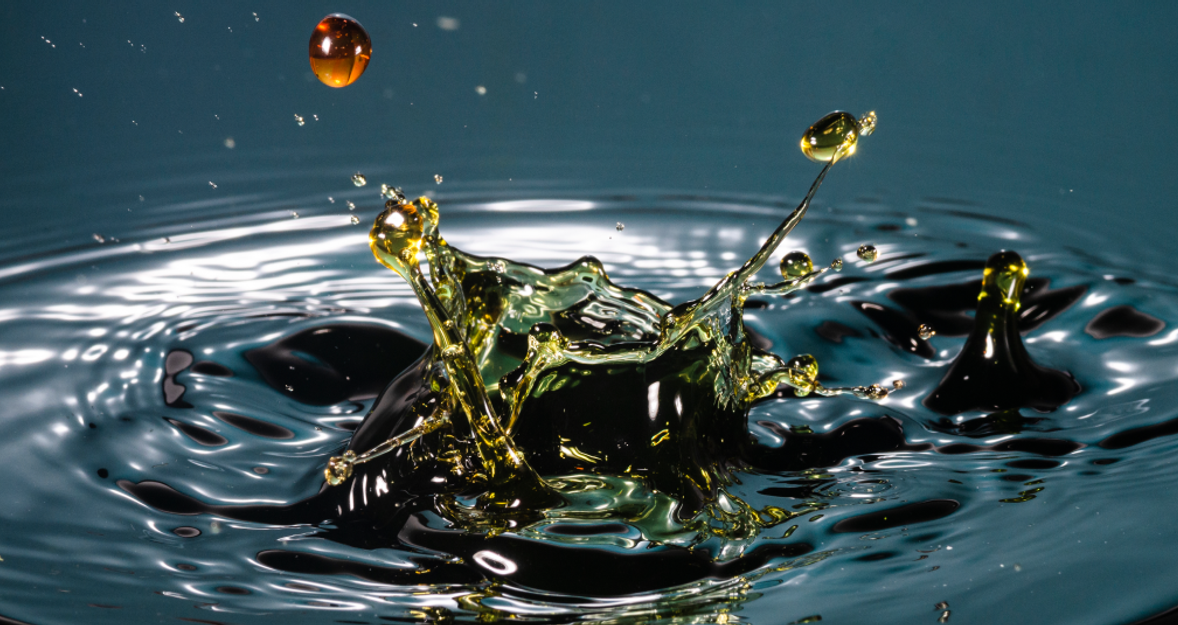
Use milk, coffee, or colored oil for totally different effects
Drop one colored liquid into another to create splash collisions with cool contrasts
Use a pipette or eyedropper to control the timing and angle more precisely
Place reflective surfaces under your setup to capture interesting mirrored splash shapes
Set up colored cards or lights behind your scene to naturally tint the background
You don’t need an upscale studio or a ton of props to get creative. Kitchen bowls, plastic bins, or colored plastic sheets can become something magical when lit correctly. These little tweaks can turn a run-of-the-mill setup into one that’s unique and show-stopping. Studying Lens Flare techniques can turn a simple photograph into a scene of emotion and fantasy.
Experimenting with Different Liquids and Colors
You are not limited to clear liquids. Alternative materials often produce the most dramatic and artistic results.
Milk. Great for creating a soft, matte texture that photographs well under diffused light
Honey mixed with water. Slows the drop speed and creates more defined shapes
Food coloring. Adds vibrant tones to your photos, but use sparingly to avoid over-saturation
Juice, soda, or syrup. Adds bubbles or unique textures (but clean up immediately to avoid stickiness)
Oil and water layers. Interesting for abstract patterns, especially when shot from above
Exploring Aperture Photo Editing tools can help blend multiple exposures if you’re layering shots or trying complex compositions. This gives you more room to create those dreamy, artistic effects seen in professional portfolios.
Mastering the Art of Water Droplets Photography
Once you know the basics of photography using water droplets, you can then develop your own style and consistency. This is done by trying out things, refining your techniques, and being aware of what makes your photographs stand out. Most importantly, enjoy yourself. Each shoot will be a learning process—and there’s always something new you can try experimenting with when it comes to water drop photography.


