How to fix blurry wildlife photos using Supersharp AI?
May 23, 2023
One problematic issue wildlife photographers face is a lack of sharpness in their images caused by fast-moving animals, or camera shakes – triggered by hand movements when the shutter release is pressed.
This article will illustrate how Luminar Neo can help wildlife photographers salvage blurry images by fixing those sharpness issues.
The specific tool I'll use to demonstrate this is Luminar Neo's AI-powered extension – Supersharp AI. This tool can help recover sharpness from blurry images while infusing detail into the main subject.
While we're at it, I'll also explore how Luminar Neo can further improve wildlife images using the collection of purpose-built tools for wildlife photographers. I'll also share some invaluable tips for wildlife photography in general.
Most Common Mistakes in Wildlife Photography
Every wildlife photographer is guilty of making mistakes at one point or the other. Here are the common issues that can plague your wildlife photos.
#1 - Not using the right focal length/lens
A majority of times, photographers choose a telephoto lens to shoot wildlife photography. This is a good thing because it helps you to capture a tight composition of a wild animal from a safe distance.
However, there could be moments when you need a wider focal length, for example, when you have a herd of wildebeest crossing a river or a herd of elephants spread across the vastness of an open pasture.
Not having the flexibility to swap to a different lens at a moment's notice means missing out on what could be an iconic image. I recommend having a second camera body with you with a different focal length lens mounted on it.
# 2 - Not switching on the right image stabilization mode
Many premium lenses come with more than one image stabilization mode. One is designed for standard situations. Then you have a dedicated panning mode that allows you to pan with an animal. Some lenses also have a third mode that's triggered at the precise moment when the shutter release is pressed.
Switching to the right stabilization mode ensures that your lens is able to adapt to the requirement of the scene and produce a sharp image.
# 3 – Using incorrect shutter speed
Always tune your shutter speed to the movement of the subject. Let's say that you're photographing a herd of elephants that are pretty much stationary. You could get away with a shutter speed of 1/250 sec in such a situation, depending on the ambient light.
Let's now say that you're photographing a cheetah chasing a gazelle at full steam. In this scenario, you need to have a minimum shutter speed of 1/2000 sec to ensure that you have a reasonable chance of getting a sharp image. The 1/250 sec shutter speed will only result in blurred images.
# 4 – Using incorrect exposure settings
Overexposure? Underexposure? We have done it all. Every photographer goes through those moments where they bite their lips after the fact. To avoid those embarrassing moments, start with the right wildlife photography settings, beginning with the correct shutter speed.
I wouldn't recommend using the manual mode because there are too many variables to calculate on the fly, and there may never be enough time for that.
I would put my camera on shutter priority mode and use Auto ISO with a maximum number set which the camera will not transgress. With the shutter speed set, I am confident I will not have image blur.
The only downside is if my maximum ISO is set high and the widest aperture that the lens can open up to is small, like f/6.3 at the tele-end, the camera will dial the highest ISO, which can induce noise.
# 5 – Noise in your photos
Noise is your worst enemy if you do photography of animals. Some amount of noise can be good and looks artistic in certain genres of photography. But for wildlife photography, avoiding noise is the best approach.
Every camera has a threshold for the highest usable ISO number. Larger sensor cameras with lower resolution tend to have a higher threshold number than smaller sensor cameras, especially those packed with a lot of pixels.
Figure out the highest ISO number that gets you the best pictures. Set that as the maximum ISO when setting your Auto ISO values.
# 6 – Learn how to Enhance images with AI
Also, I recommend you learn how to post-process your images using Luminar Neo. Suppose you're looking for information on how to get into wildlife photography and what are the first steps in that regard. In that case, apart from mastering photography skills, I strongly recommend that you learn post-processing as a part of the learning process, especially how to use photo sharpening software.
Luminar Neo has many tools, including Denoise and Noiseless RAW, to help you eliminate image noise.
How to Make a Picture Less Blurry by Luminar Neo?
The million-dollar question on every wildlife photographer's mind is, "How to sharpen blurry photos?" Let's take an example to explain this.
This is an image I shot of a lioness at a safari park. She suddenly moved out of the dense foliage, which surprised me. Before I could react, she had disappeared again in the foliage on the other side of the jeep track. I could only manage a few shots in the intervening seconds.
Only a few came any good, and this one was among them. 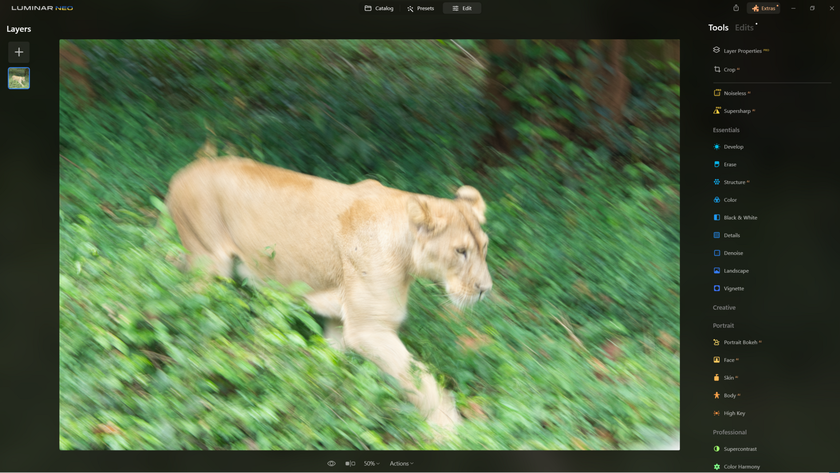
But clearly, the image was blurry, as you can see.
I planned on adding some details to it using Luminar Neo's Supersharp AI.
Step 1 – Basic Edits
Before I start the main process of recovering the sharpness and details of this image, a few basic edits are necessary. 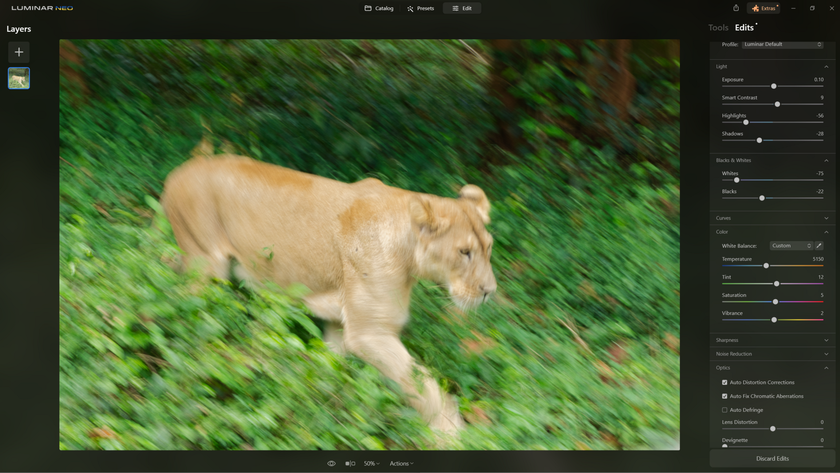
I adjusted the Exposure, Highlights, Shadows, Blacks & Whites, and Color. I wanted a slightly warm tone to the image. Very little tweaking was done with the rest of the Color sliders.
But before anything else, I checked the Auto Distortion Correction and Auto Fix Chromatic Aberrations options.
Step 2 – Choose Supersharp AI

The next step was to choose Supersharp AI in the Tools tab. There are two options under the Supersharp AI tool. Adjustments and Masking.
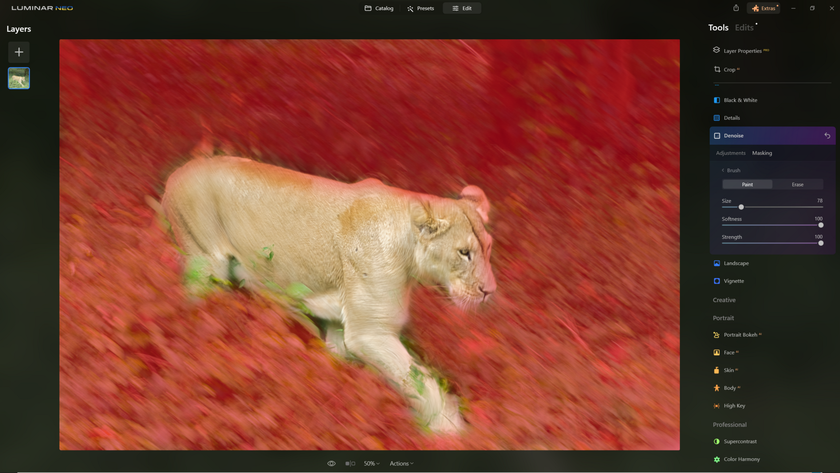
I needed the Masking tool for this image because it allowed me to specify the area that needed to be adjusted for blur.
Step 3 – Options under Masking

There are a bunch of tools under Masking – Brush, Linear Gradient, Radial Gradient, and Mask AI. What I need is the Brush tool. The other three would be unsuitable for this image.
Step 4 – Adjustments with the Brush tool
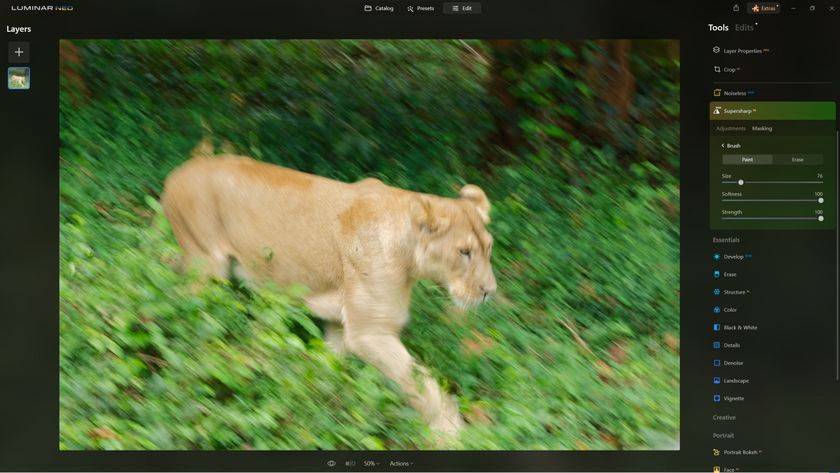
Choose a Brush size, Softness, and Strength. I need to mask only the animal in the frame and ensure that when I apply the Supersharp AI tool, only the bit she occupies in the frame gets impacted, and the rest of the image is left as it is.
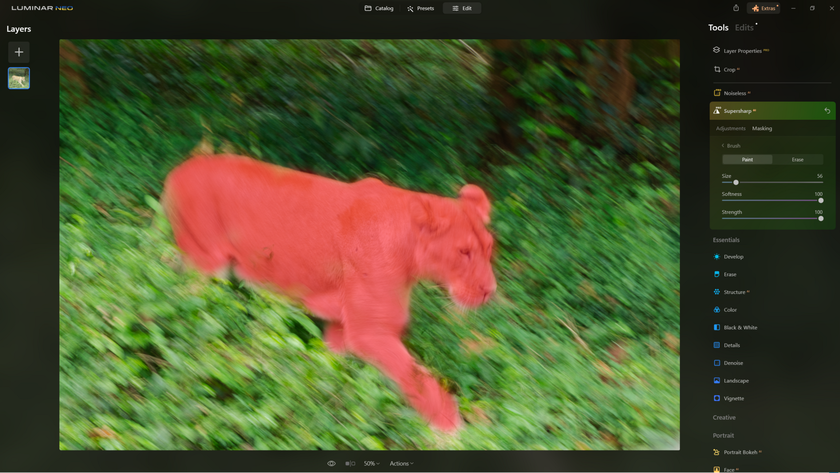
Step 5 – Universal or Motion Blur?
For this step, I choose Motion Blur as my tool of choice. This is because the lioness was moving briskly, resulting in a lot of blur in the final image.
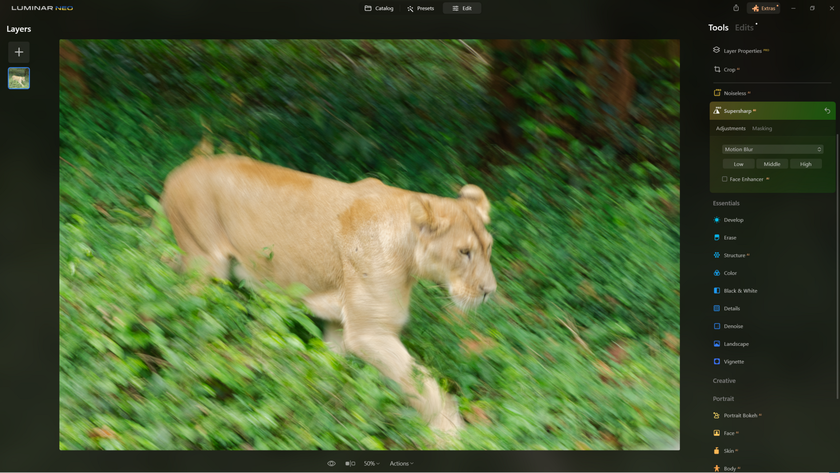
Finally, I hit the Low option and started recovering detail from the image and eliminating blur.
I love this part every time the animation happens.
Finally, the process of recovery is done.

This is Motion Blur with the Low setting. As you can see, the animal is already looking a lot sharper.
But even then, I decided to try the other two options to see if they could recover more details or produce a better result.
So, next up is the Motion Blur with the Middle option.

This one looks a little sharper than the previous one. But I can also see a few artefacts.
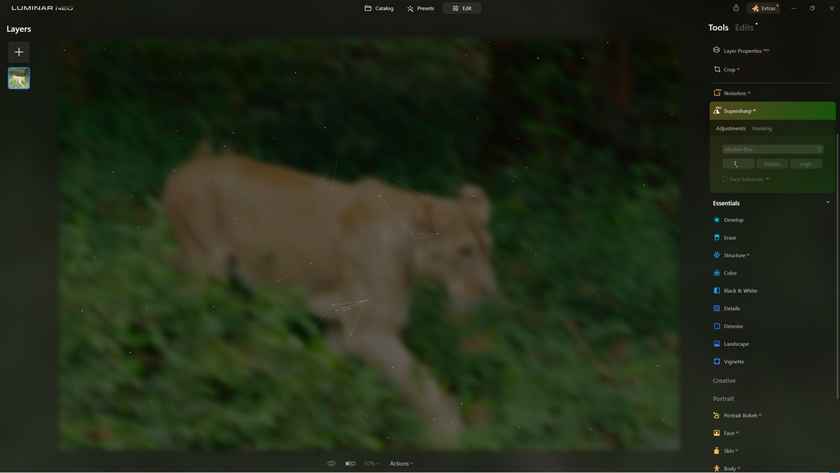
Finally, I tried the Motion Blur High option.

This one is not to my liking. The details on the face area look weird and unrealistic.
I also tried the Universal option and tried all three – Low, Middle, and High. But clearly, the Motion Blur option with the Low setting is what I like the most for enhancing my wildlife pictures.
Step 6 – Further edits and adjustments
Though, technically, you can leave your post-processing bit right here, I decided to do some further edits to fine-tune the image.
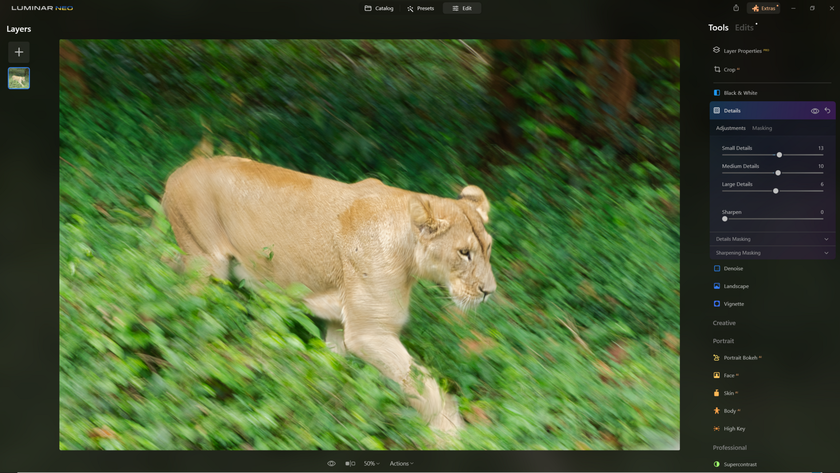
The Details option under Tools gives you the option to recover some details. However, it's easy to go overboard with this. I made some fine adjustments here.
First, I used the Masking tool to select the area I needed to tweak.
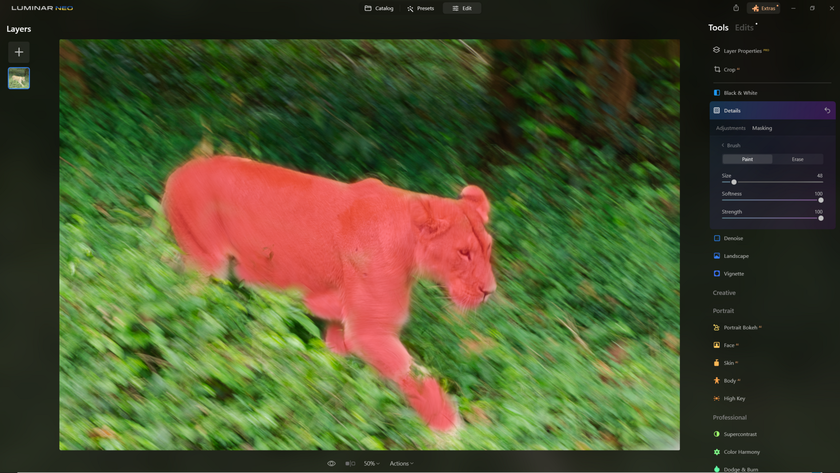
Next, I slightly adjusted the sliders to ensure the final results were realistic.
The rest of the frame had some luminosity noise which was pretty obvious when I enlarged the image on my computer screen. I needed to do something about it.
I chose to use Luminar Neo's Denoise option for this.
First, I had to select the area in the frame that required the edits. This was easily done using the Masking option.
Most of the noise was in the shadow areas, though some of the mid-tones also reflected a lot of noise after I pushed the exposure. I selected the entire image sans the lioness for this treatment.
Then I dragged the Luminosity Denoise slider to ensure that much of the Luminosity Noise had been taken care of. As there was little to no color noise in the image, I left the Color Denoise slider at 0. 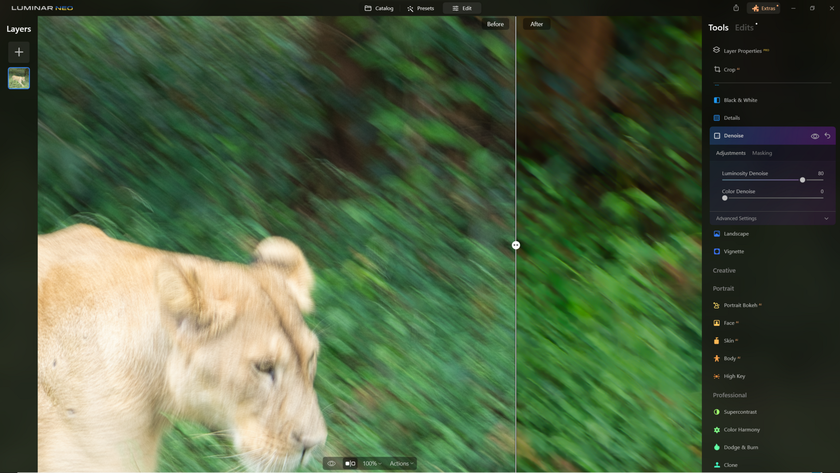
Here is a quick before and after side-by-side. As you see from this image, there is quite a bit of improvement in the areas affected by noise.
Here is a larger view of the same image before and after, side by side.
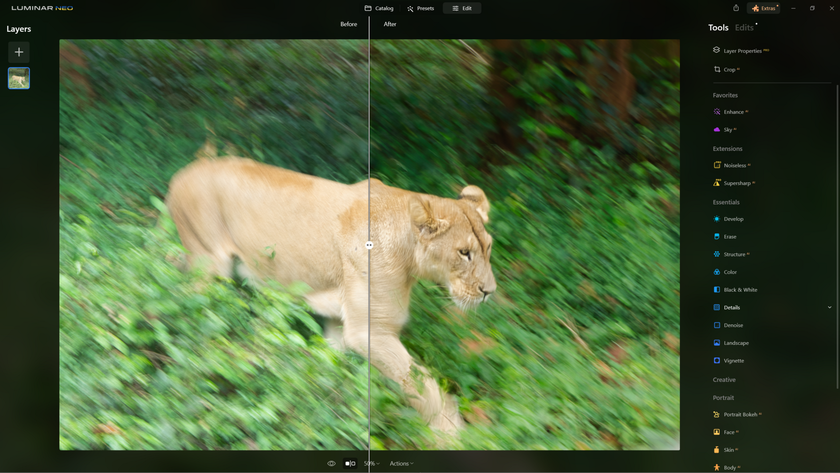
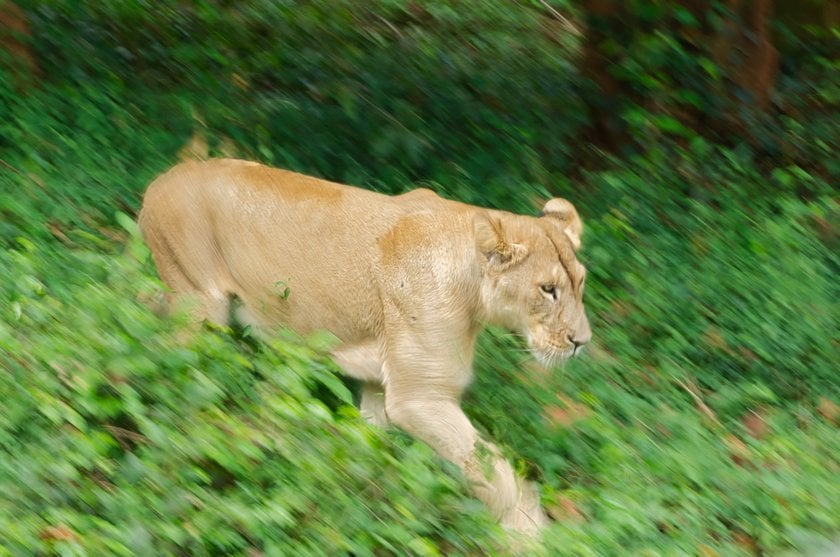
And here is the final image.
Concluding thoughts
The Supersharp AI tool does what it's meant to. It salvages images that you would normally throw away. Plus, it only takes a few minutes and a few mouse clicks (or pen taps, in my case) to achieve that. And the results can be surprising.
I hope you haven't deleted your blurry images. If you've just archived them, now is the time to dust off your hard drives and put those digital files through the process.
But I would imagine that the applications of this tool are far more encompassing than just wildlife photography. For example, if you're a sports photographer, this tool can help you salvage details from a sportsperson's face or body. The applications are endless, and you only have to figure out ways to use this tool.
FAQ
What causes Wildlife photos to be blurry?
Many factors contribute to blurry wildlife photos. But three are primary – unintentional movement of the hands, fast-moving subjects, and slow shutter speed.
How to sharpen nature photos, including wildlife photos using the right technique?
The major techniques to improve the sharpness of your wildlife photos are to –
- Use a shutter speed that freezes the action and does not induce noise.
- Use the lowest practical ISO number that allows a fast shutter speed.
- Make sure your lens is properly calibrated and not back or front focusing.
- Stop your lens down by at least one stop to improve sharpness.
- Manually select the focus point.
- Use the right image stabilization mode.
- Use a monopod when you can.
- Avoid using teleconverters, especially with cheaper lenses.
- Spend time learning post-processing techniques to fix a blurry photo.
How can I improve the focus of my photos without sacrificing the background?
The best way to improve focus on your photos without sacrificing a beautiful background blur is to use a masking tool to select the subject (that's blurry) and use the Supersharp AI Extension or image clearer online. This allows you to sharpen your subject and, at the same time, leave your background undisturbed.
How can I prevent blurry photos when taking wildlife pictures?
- Choosing a shutter speed that's ideal for the subject.
- Avoid shooting subjects across an open field (inducing heat distortion).
- Avoid using teleconverters with cheaper entry-level lenses.
- Avoid shooting from a vehicle that's still on (vehicle vibration).
- Always use image stabilization or at least a monopod.


