Using Framing in Photography
June 13, 2023
Framing in photography is often used to direct the viewer's eye towards the subject of an image. Here's what it is and how to best use it.
Many beginner photographers may not initially pay much attention to framing in photography. However, understanding and utilizing framing can significantly improve the composition and overall impact of your photos. Let's delve into what framing means in photography and its purpose.
Framing in photography typically refers to how you compose the picture in your viewfinder or LCD screen, but there's also another aspect of framing that takes place within the scene itself. This type of framing is a crucial composition technique, wherein elements within the scene are used to create a ‘frame’ around the subject. This guides the viewer’s focus, adds depth and context, and enhances the overall aesthetic of the photograph.
For example, you could shoot through an arch, a doorway, or between pulled back curtains to establish a frame effect. Similarly, branches or hedges could be used to enclose space around the subject, directing the viewer’s gaze precisely where you want it.
This is creative framing photography in the general sense. This technique allows you to create gorgeous shots and stand out among other photographers. Of course, we should also talk a little bit about the photography rule of framing in the usual sense of the word.
What is framing in photography?
Framing is a compositional technique used to direct attention to the main subject by using elements within the scene to create a "frame" around it. This can enhance the visual appeal and focus of the image by naturally guiding the viewer’s eye to the point of interest.
Technically, framing is the clarification of the frame boundaries. The ratio of the frame boundaries is called its format. The format can be very different, it depends on the creative idea of the author, on the specific subject, and on many other things.
The two main formats, established in photography are vertical and horizontal. Less common is the square format, and even rarer are the round or oval ones. Fitting the subject into a non-standard format is done in the processing, but thinking about the composition of such frame photography should already be done when shooting.
Borders of the frame, if the compositional solution is taken correctly, must limit the most important thing that is in the shooting. If possible, from that space must be excluded all the details that do not work for the plot, which would distract the viewer when looking at the picture from the main thing that is depicted on it. You have to consider not only the nature of the subject or object you are shooting but also its position in space and its proportions. The point of shooting is also important. Taking all this into account, the photographer has to distribute the material of the frame both on the plane and in-depth.
Often inexperienced photographers shoot everything without thinking, mechanically pressing the shutter button. It's important to choose your shot consciously. Never forget about the direction of the shot, the close-up, the photography composition technique, the lighting of the subject and the distance to it, and the color scheme. If you want to add more creativity, you have to be great at light and shadows. It's also very important to consider leading lines.
Don't forget the main thing: to make a good picture, which could be called a work of art, you have to know and correctly apply the main laws of composition and image building on the plane. But there are exceptions. Sometimes a spontaneous shot makes a lasting impression on the viewer. But that only happens when you take an extraordinary, shocking picture when the main role is played by the event itself. Of course, once in a while you can just take photos and get a masterpiece, but that's more of an exception. So we figured out what is framing in photography in the usual sense.
Types of Framing
In general, there are four different types of elements you can use to create a frame within your shot and draw the viewer's attention: architectural, natural, geometric shapes, and light/shadow. Doesn’t need to go completely through difficult techniques, start simple and progressively evolve. So, let's take a look right now at the original framing photography ideas.
1. Architectural: Using buildings or building elements.
The architecture provides some of the easiest elements for photo framing. This is a clear example of framing in photography. Doorways, arches, and windows create instantaneous openings through which we can focus. In the photo below, the photographer used a hole in the wall to bring focus to the cemetery beyond.
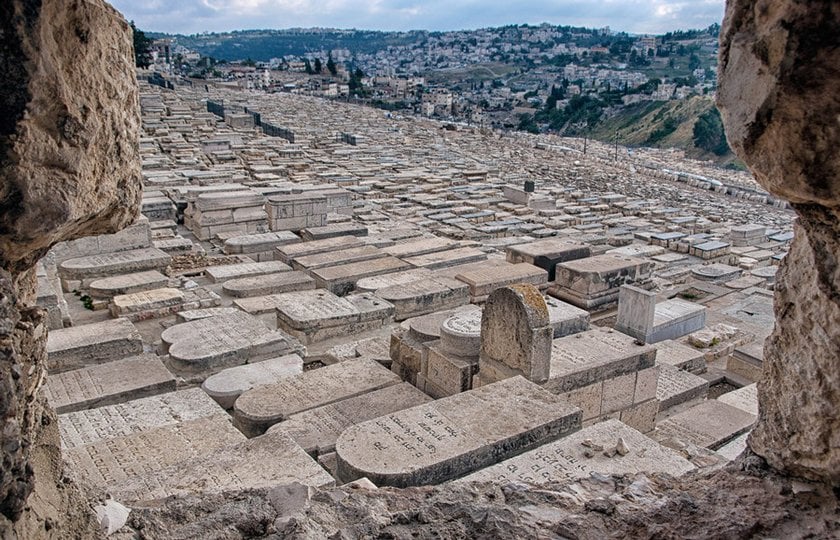 Photo Credit: Teryani Riggs
2. Natural: Using elements from the natural environment
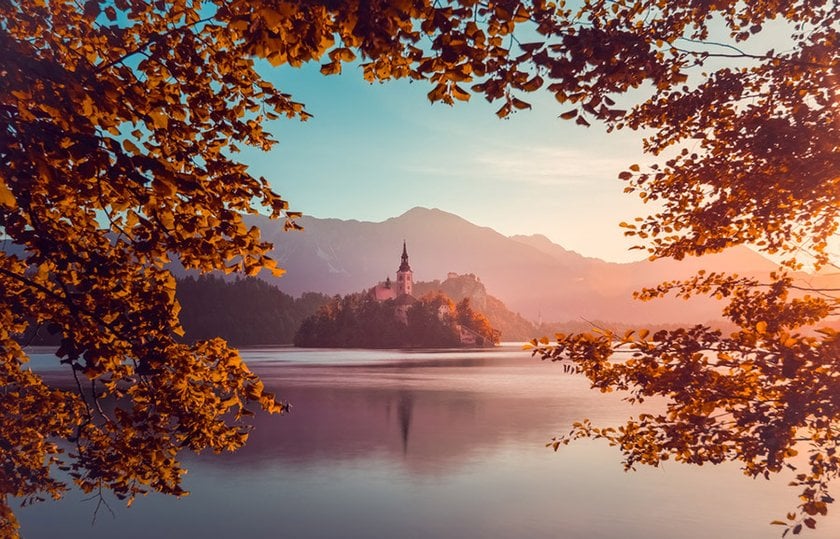
Nature provides many interesting possibilities for framing images: the branches of trees, flowers l, canyon walls, and sandstone formations. All of these natural elements can be used to direct the eye. You can even use nature weather elements like rain or fog. In the photo below, the trees and ground form a triangular frame around the subject, directing the eye towards the center and then off towards the mountains above. There are many ways you can use nature for the creative framing of pictures.
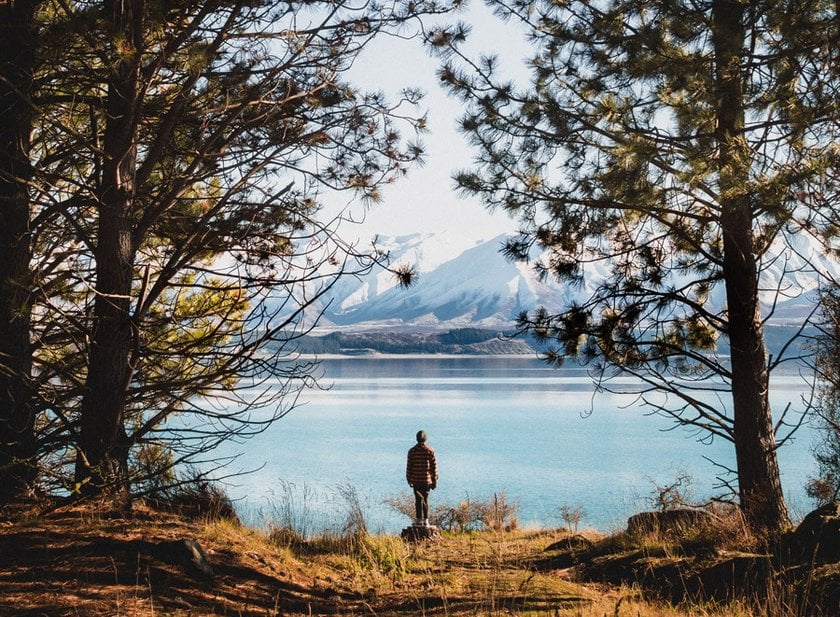 Photo Credit: Haziq Tumaran
3. Geometric Shapes
Shapes of any type can be used to create framing photos. Circles, squares, tunnels, and rectangles are the most obvious, but rarely the most interesting. You can see it in some perfect examples of framing in photography. In the photo below, photographer Claudel Rheault uses a spiral to bring attention to the subject up in the right hand corner.
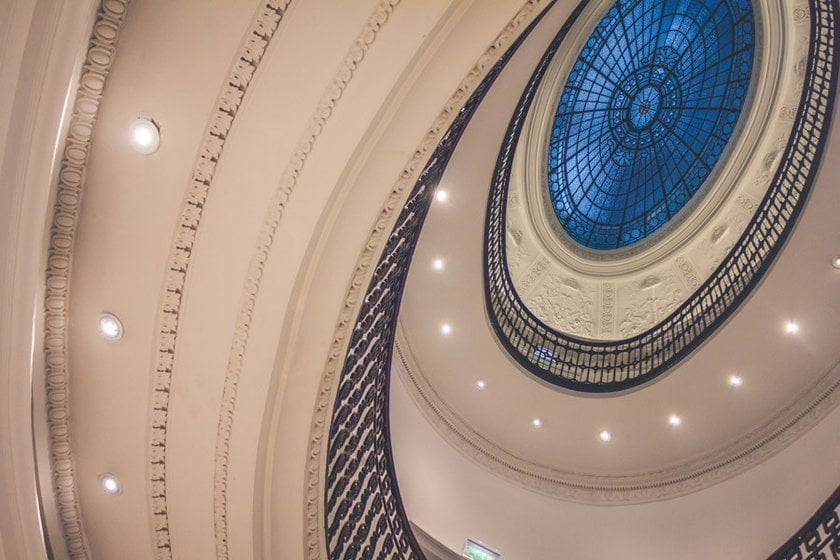 Photo Credit: Claudel Rheault
4. Light/Shadow Frames
Both light and shadow can be used to create forms for framing photo. Sometimes they’re as simple as an actual shape formed around the scene (like photographing a subject inside a window frame shadow). Other times they can function much like a vignette. Take the photo below, as one of the framing photography examples. Although it’s not a recognizable shape, the darkness and blur around the band make a frame around the lit area, making sure they’re the center of focus.
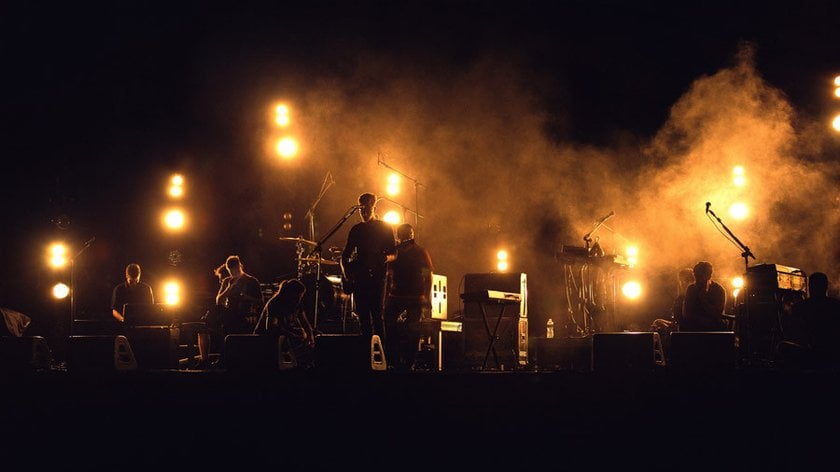 Photo Credit: Diego Sulivan
 When to Use Framing
Framing for pictures isn’t a technique that’s easy to do well. In fact, it’s so often poorly done, the standard wisdom is to use it sparingly. That being said, there are certainly times when framing can greatly enhance a photo. It is not comparable in complexity to compositional technique.
Some of the best times to use photography frames include:
- When you’d like to obscure boring subject matter that surrounds your main subject (like a sky without any clouds or color);
- When you’d like to add a sense of depth to the image;
- When a natural frame already exists and has an interesting shape to make your photos more creative;
- When you’d like to place context and blurred foreground around your subject;
- When it’s clear that the framing will enhance the photo, not merely clutter it up.
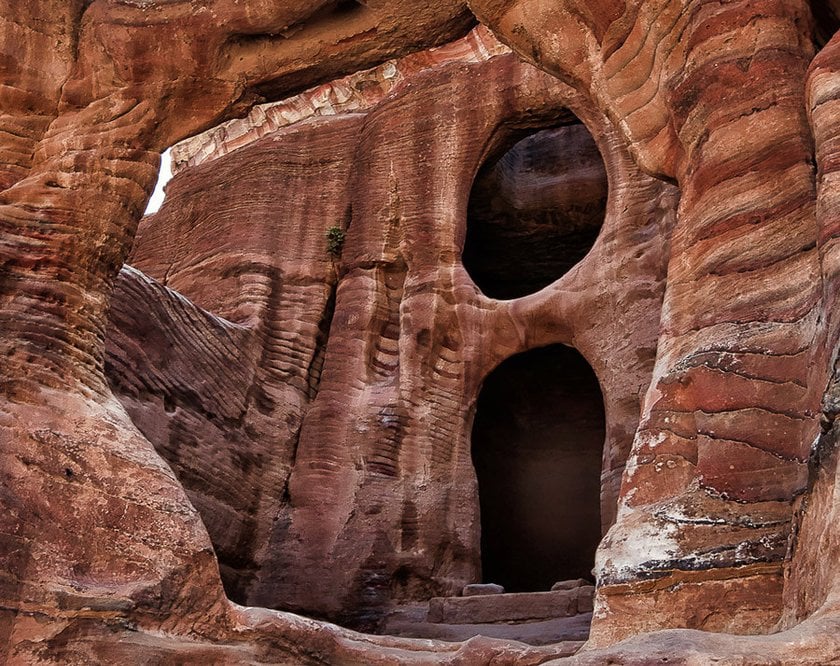 Photo Credit: Teryani Riggs
Any format should help, not hinder the viewer to understand the content of the frame, to feel the mood the photograph reflects. When you determine the format of the picture, working with the frame boundaries, don't forget one of the main rules. You should leave some space in the direction of movement, gesture, look, and head turn. This gives the composition of the picture a dynamic effect, making it more lively and natural. This emptiness, even if it is quite a big part of the image, will not disturb the balance of your composition, and will not make you feel that the space is empty. Quite the contrary, your picture will look complete and balanced.
If you are shooting a moving subject, never crop your shot so that the subject is too close to the frame boundary, which is the direction of the movement. This arrangement makes the viewer feel very uncomfortable. The dynamics disappear completely, there is an illusion of breaking, and the object seems to unnaturally freeze in place rather than move. Similarly, a photograph with a large negative space behind the moving object looks bad. It also messes up the balance of the frame.
Never forget about these rules when taking pictures of moving objects! But there's also no room for exceptions. Breaking the laws of composition, and not only in such cases (shooting moving objects), is always possible, but justified is very rare. Unless you are shooting some unusual subject that requires a special creative foreground from the author.
Advanced yet easy-to-use photo editor
Get Luminar Neo NowExamples of Framing in Photography
Let's look at an example of classic framing in photos for portraits. This is very necessary if you are a beginner and only learn about frame photography definition. Be careful in choosing the format and composition of the frame when shooting a portrait as well. Here you need to pay special attention to the choice of the optimal size of the space above the head of the portrayed person.
If the space is too small then the compositional and visual center of the portrait is not what we need - a face, but what we don't need at all: secondary details of clothes, for example, or disadvantageous features of the figure. On top of that, you get the impression that the person's head is resting against the ceiling, which in this case is embodied by the upper border of the frame.
But too much space above the head of the portrait is detrimental to the composition. The thing is that in this case, the frame is out of balance. The main thing in a portrait is the face of the person, the subject center of the whole composition, in such cases will be below the visual center of the picture. It creates the illusion of image instability and its downward tendency.
When the borders of the frame are getting closer, no matter whether they are vertical or horizontal, the viewer's attention is focused on the objects that are in the center, which emphasizes their importance and significance. If the borders widen, there is a feeling of space, freedom, and lightness. For instance, you can emphasize the height of the bell tower you are shooting by narrowing the width of the frame and lengthening it vertically.
How to frame a good photograph: Tips and Tricks
Photos with framing don’t need to go all the way around the subject. Some of the best, most natural-looking shots only have one or two sides framed.
Ask yourself, “Will this clutter or cramp my image?” or “What’s most important in my shoot?” Poorly used, framing just adds clutter to a shot, making it feel cramped and/or poorly cropped.
Experiment with having the framing elements in focus and out of focus. Each choice leads to a very different effect and can make the difference between the frame being merely annoying and really working for your shot.
In all reality, framing is a difficult technique to do well. Learning to do it in a way that truly enhances your images will take a fair amount of vision and creativity (unless the frame is already naturally occurring). So, in general, it’s best not overused. Still, if you can master the technique, you’ll likely create some rather extraordinary shots.
Nowadays, the possibilities of apps allow considerable expanding the creative possibilities of the author, giving huge scope for the flight of his imagination for pictures with framing. With their help, it is possible to change a photographic image in a very serious way. But the possibilities of this computer processing should not be overestimated. Do not forget that the foundation of the picture, which is interesting to the audience, is laid exactly when shooting. And all of its subsequent processing serves mainly to improve what has already been shot.