Infrared Photography: Guide to Capturing IR Photos
Last Updated on August 01, 2025
Want dreamlike landscapes and glowing wildlife? Infrared photography settings are key.
Imagine this: glowing white trees, black, dark skies, and surreal landscapes that seem more fitting for another galaxy. That’s the strange and fantastic world of infrared photography. It’s a unique form of photographic art that overlooks all the usual rules, showing us light we can’t see. A professional snapper, a beginner, or someone who just wants to try something different, this guide’s got you sorted. We’re going to walk you through the gear, the process, and the after-processing—everything it takes to start making IR pictures that shine.
What is Infrared Photography?
 Infrared photography lets you capture a world just beyond what our eyes can see—specifically, in the 700 to 1200 nanometer range of light. While regular photos rely on visible light (between 400 and 700 nm), shooting in IR reveals an entirely different reality. Grass and trees shine with a near-magical brightness, skies grow dark and broody, and skin becomes an uncannily smooth, ghostly sheen. It’s as if looking through an unseen lens that makes the mundane become magical.
This type of photographic technique existed as early as the 1900s, initially used for science and military purposes. But today, it’s become a creative tool for photographers who want to experiment with landscapes and wildlife or just add a surreal edge to their work. Part of its charm is how it blurs the line between the real and the unreal, offering a fresh perspective on the world we think we know.
Your AI-Powered Photo Editor for MacOS and Windows
Discover Now!How Infrared Light Works in Photography
 Infrared light is invisible, but certain cameras and films are sensitive to it and can capture this wavelength to the human eye. Most digital camera sensors are designed to block IR illumination with an internal filter (called a hot mirror), but with modifications or specific filters, you can let this light through. The result? Infrared pictures that reveal details invisible in standard photos, like heat signatures or unique textures in foliage.
When ultraviolet rays hit a camera sensor, they interact differently with objects. Plants, for example, reflect a lot of indirect radiation due to chlorophyll, making them appear bright white or pinkish in IR images. Skies and water, however, absorb invisible rays, often appearing dark or black.
The Difference Between Visible Light and Infrared Light
 We see visible rays every day—it’s the reds, blues, greens, and all the colors in between. IR light, on the other hand, sits just beyond red on the electromagnetic spectrum. In photography, visible exposure gives us the familiar colors we’re used to, while invisible exposure creates dreamy black-and-white or otherworldly false-color effects. For example, a green forest might appear snowy white in a photo, and a bright blue sky could turn almost black.
The real magic happens when different materials react to beyond-visible illumination. Unlike visible light, infrared can pass through haze, making far-off landscapes look sharper. This type of imaging also picks up textures and patterns that we don’t normally see, which is why IR photography is a favorite for creating dreamlike, artful snapshots.
Examples of Infrared Photos
Photographing in the IR spectrum offers way more than one look—it works across genres.
Landscape Photography
 The infrared spectrum is a game-changer for landscapes. Grass and trees glow with an unearthly light, while skies and water grow heavy with dramatic colors. Imagine a hillside carpeted with rolling green: in a normal photo, it’s green and blue, but in UV radiation, the grass can look as though it’s a blanket of snow against a black sky. This contrast makes landscapes pop, especially in bright sunlight when ultraviolet light is most abundant. For tips on capturing epic outdoor shots, check out night sky photos for inspiration on working with unique lighting conditions.
Fine Art and Surreal Photography
 IR photography is a favorite among fine art photographers because it creates dreamlike, surreal images. A portrait might show porcelain-smooth skin against a stark, dark background, giving it an ethereal vibe. Urban scenes, like cityscapes with reflective glass buildings, can look alien when shot in infrared. The false-color effects—where greens turn pink or red—add a layer of creativity that’s hard to achieve otherwise. To edit these artistic shots, try photo editing software for beginners to enhance your far-away creations.
Wildlife and Nature Infrared Photography
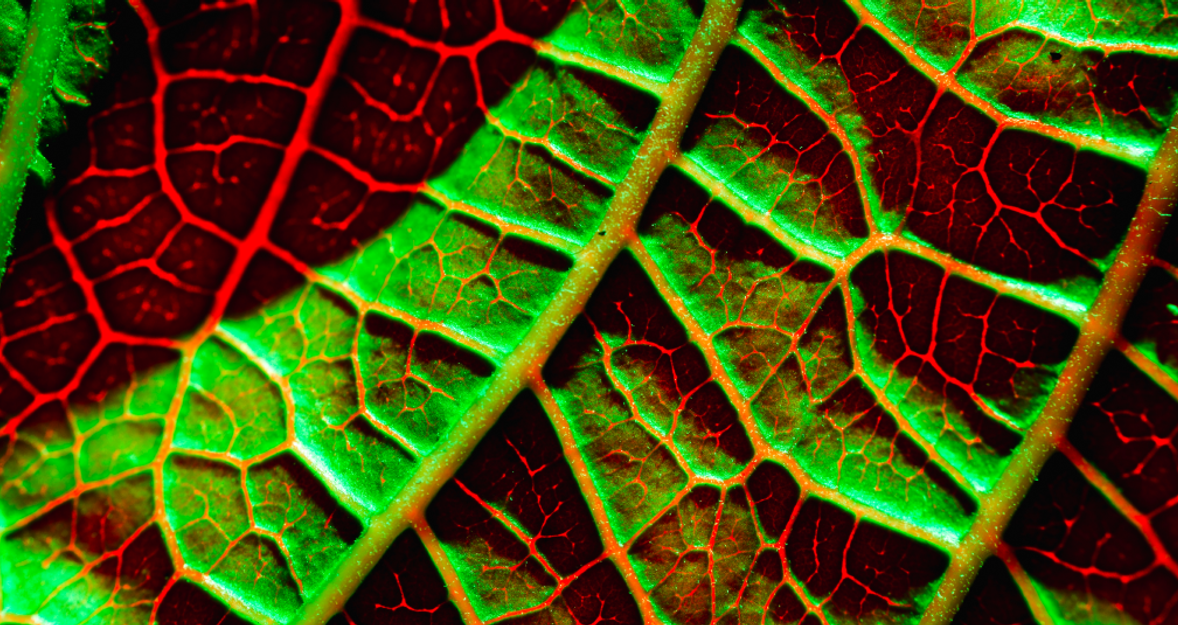
 Infrared photography gives wildlife a whole new look. Animals with fur or feathers often seem to glow softly, while their surroundings pop with contrast. Picture a deer standing in a forest—its body blending into a bright, white canopy—creating a scene that feels almost dreamlike. That wavelength is especially well-suited to recording fine detail, as with the texture of a bird’s feathers or the intricate patterns of plants.
Scientific and Forensic Applications
 Apart from its artistic uses, non-visible light photography is crucial to science and forensic use. Thermal imaging has the potential to reveal concealed information, such as obscured ink on ancient documents or bloodstains invisible to the naked eye. In space exploration, infrared photographs far-away stars through cosmic dust. These uses demonstrate the ways in which IR imagery can be double-edged, being both art and useful.
How to Do Infrared Photography?
 Getting started with infared photography requires some specialized gear and know-how. Here are the main ways to dive in.
1. Using Infrared Film Cameras
Long ago, the only means of capturing light outside the visible range was to shoot on special film. Ultraviolet-sensitive films like Kodak HIE produced the classic false-color appearance. You loaded film in the dark and employed special filters, like a deep red or IR-pass filter. Not as trendy today, film remains a hip, hands-on option for traditionalists. The downside? It’s expensive, and processing is a hassle.
2. Digital Cameras with Infrared Lens Filters
Most digital cameras have an IR-blocking filter, but you can screw on an infrared filter (like a 720nm filter) to block visible light and let indirect heat through. This method is affordable and doesn’t require modifying your camera. However, it requires long exposures since the filter blocks most rays, and not all lenses play nicely with IR filters. For post-processing these shots, a free Mac photo editor can help tweak your results.
3. Infrared-Converted Digital Cameras
For more serious IR photographers, camera conversion is the way to go. It involves opening the camera and substituting the internal IR-blocking filter with one that allows invisible light to pass. You can even order a wavelength (like 720nm) for consistent results. Converted cameras can take IR photo images without external filters, so they’re faster and more convenient. The drawback? It’s permanent, so you’ll need a camera that will be used for IR only.
4. Full-Spectrum Converted Cameras
A full-spectrum conversion removes the IR-blocking filter altogether, which allows your camera to capture UV, visible, and infrared light. You can then use filters outside the camera body to determine what radiation hits the sensor. This is super flexible but involves switching to different filters to obtain various effects. It’s fantastic if you want to experiment with both infared photo and UV photography.
Choosing the Right Infrared Filter for Your Camera
 If you’re not converting your camera, picking the right infrared filter is crucial. The wavelength of light that they allow, measured in nanometers (nm). Here’s a breakdown.
590nm Infrared Filter
The 590nm filter lets through visible light and ultraviolet rays, creating vibrant false-color images. You’ll see bright yellows and pinks in vegetation, with relatively breezy skies. It’s great for bold, colorful effects, but less dramatic than deeper filters.
665nm Infrared Filter
A 665nm filter strikes a nice balance, letting in less visible light while capturing more from the IR spectrum. The result is a deeper contrast, with foliage appearing whiter and skies appearing darker. It’s a very well-balanced choice for use in both black-and-white and false-color infrared photos.
720nm Infrared Filter
The 720nm filter is the standard for IR photography. It blocks most visible wavelengths, producing crazy contrast—radiant white trees against black backgrounds. It works best for classic infrared effects and is a favorite among landscapes.
850nm Infrared Filter
An 850nm filter is almost pure IR, creating high-contrast, nearly monochromatic images. Vegetation looks bright white, and skies are nearly black. It’s perfect for dramatic, black-and-white IR photos but lacks the false-color pop of lower-nm filters.
Full-Spectrum Filter
A full-spectrum filter (or no filter on a converted camera) captures everything—UV, visible, and infrared. You’ll need additional filters to isolate this light, but it’s the most flexible option for experimenting with different wavelengths.
How to Pick the Best Infrared Filter for Your Photography
Choosing a filter depends on your creative intent. For high-contrast, false-color infrared photographic prints, apply a 590nm or 665nm filter. For classic, black-and-white IR photos, apply a 720nm or 850nm filter. Consider your subject, too—landscapes love 720nm for drama, while portraits might benefit from 590nm for reduced contrast. Try different filters to create your style; don’t be shy. Some of the best software for picture editing can help improve your results.
Common Challenges in Infrared Photography
 Infrared photography isn’t without its quirks. Here are some common hurdles and how to tackle them.
Lens Hot Spots and How to Avoid Them
Hot spots are bright, fuzzy spots in the middle of infared pictures created by some lenses reflecting long-distance light. To prevent them, check out IR-compatible lenses (most companies include this information). Shoot a test shot with an IR filter before taking the picture, and avoid small apertures (such as f/16) that exacerbate hot spots.
Issues with UV and IR Light Interference
Full-spectrum cameras can pick up unwanted UV light, muddying your long-range photo. Use an IR-pass filter (like 720nm) to block UV and visible rays. Also, check for light leaks in your camera setup, as ultraviolet rays can sneak through tiny gaps.
Infrared Focus Shift and Lens Calibration
IR light focuses at a different point than the visible one, which can make your infared image blurry. Some lenses have an IR focus mark (a red dot or line) to adjust for this. With digital cameras, use live view to fine-tune focus or calibrate your lens for IR shooting.
How to Edit and Process Infrared Photos with Luminar Neo
 Editing such photos is where the magic happens. Tools like Luminar Neo make it easy to enhance the surreal qualities of your shots.
Infrared RAW File Processing
Infrared RAW images will have a red or magenta tint straight from the camera. In Luminar Neo, first correct the white balance to compensate for the red color cast. Apply the Develop RAW filter to correct exposure, contrast, and highlights. For creative processing, try HDR processing to expand the dynamic range of landscapes.
Fixing Red Tint in Infrared RAW Files
To fix that pesky red tint in those IR photo files, adjust the temperature slider toward cooler tones (around 3000-4000K). You can also use the color balance tool to reduce red saturation. Luminar Neo’s AI-driven tools can automate this, saving you time.
False Color vs. Black and White Infrared Images
False-color infrared images are colorful, pinks and yellows, or black-and-white highlight-contrast versions. In Luminar Neo, use the Color Harmony tool for false-coloring or go to black-and-white with the Monochrome tool for a retro look. For sharp compositions, remove the background from the image to isolate the subjects.
Exclusive Tools of Endless Possibilities in One AI Editor
Explore Now!Tips and Tricks for Capturing Stunning Infrared Pictures
 Here are some practical tips to elevate your long-range shooting skills.
Best Camera Settings for Infrared Photography
Getting the right camera settings can make a huge difference in your IR shots. Here are a few key settings to keep in mind:
ISO. Keep it low (100–200) to reduce noise, especially with long exposures.
Aperture. Use f/8 to f/11 for sharp landscapes, but avoid smaller apertures to prevent hot spots.
Shutter speed. Expect longer exposures with IR filters, so use a tripod.
White balance. Set a custom white balance (try shooting grass) for accurate colors.
These settings are a great starting point, but don’t be afraid to experiment—infrared photography often rewards a bit of creative trial and error.
Optimal Shooting Conditions for Infrared Photos
Bright sun is your ally in IR shots since this type of light is strongest at noon. Avoid cloudy days, which scatter IR wavelengths and sap contrast. Summer is ideal, since green leaves reflect more ultraviolet radiation. Keep an eye on weather reports and plan your shootings accordingly.
Composition Techniques for Unique Infrared Images
If you want to make the most of your long-range shots, a few thoughtful composition tricks can really elevate your results. Here are some simple techniques that work especially well with IR photography:
Contrast is key. Frame bright foliage against dark skies or water for a dramatic effect.
Leading lines. Use paths or rivers to guide the viewer’s eye through the image.
Simplify. IR scenes can feel visually intense, so keep compositions clean and focused.
These small adjustments can help your infrared photos feel more intentional—and a lot more striking.
Experimenting with Different Infrared Techniques
 What is really special about infrared photography is just how amazingly adaptable it is. Try shooting during different times of day to see how the changing light affects your photos. Feel free to experiment with filters to switch easily between vibrant false-color effects and classic black-and-white styles. It’s a fun way to see your images in new lighting styles. You can even combine indirect light with other techniques—like long exposure or close-up macro photos—to really push your imagination.