How to edit RAW photos – an easy guide to RAW photo editing in 2026
Last Updated on January 16, 2025
In this article, you will learn what RAW format is and why it is so popular among professional photographers. Also, we'll discuss several software options that can help you edit this type of file more effectively
Even if you’re a new photographer, chances are you’ve already heard of the RAW file format that your fancy camera supports. Many photographers prefer this format over compressed formats like JPEG and TIFF for various reasons. And the main reason is that they know how to edit RAW photos to get a masterpiece without spending half their lives.
If you’re in need of a RAW photo editor, Luminar Neo can help you out. Luminar lets you store, organize, and edit your photos easily and quickly. It’s a powerful tool that’s equally great for those just getting into photography and for advanced photographers looking to minimize their editing time.
What is a RAW Photo?
If you’ve ever had the chance to take photos with a film camera, you’re familiar with the process of sending negatives to a lab and waiting days to get your prints back. A negative contain a lot of information about the scene that was captured, and it takes a long time to develop prints by extracting all that embedded information. A RAW file can be thought of as the digital version of a negative. A RAW file contains all the information recorded by the camera sensor for any given shot, which means it can be processed to pull out details in your photos that may be lost with other formats.
RAW Photography Editing Basics
In order to be viewed on any device, a RAW file needs to be processed and compressed into a more traditional image format. That’s why you need to be familiar with RAW image editors. Yes, you read that right: a RAW file cannot be edited or processed in just any image editor.
RAW editors allow you to adjust almost anything you can imagine: exposure, sharpness, color, noise, and more. So unlike with a compressed format (JPEG, for example), if you happen to take an underexposed photo in RAW, you may very well be able to save it by pulling out more detail from the shadows. And the best part of a RAW editor is that the edits you make don’t hurt the quality of your photo!
 With that understanding of how RAW photography works, let’s take a look at some of the best RAW photo editing software.
Popular RAW Photo Editors
Luminar Neo by Skylum: your RAW image editor
Luminar Neo has a unique way of handling post-processing. Available both on Mac and Windows, Luminar Neo has an interface unlike other major editors and is more intuitive and smarter than many others, too. Additionally, it’s affordable, and you can choose the subscription suitable for your needs or buy a lifetime lisence. The best part? It comes with a free trial.
What’s inside?
Luminar Neo puts a variety of filters and sliders at your fingertips. Both beginner and professional photographers recommend Luminar Neo and are satisfied with the results. With Luminar Neo, you can adjust brightness and contrast, pull highlights and shadows, adjust the white balance, remove noise, and do so much more before converting RAW files to JPEG.
Another great feature that’s available with the Luminar Neo is the ability to organize your JPEG and RAW photography in your library. If your camera captures RAW and JPEG files at the same time, now you can easily organize these seemingly identical photos in a more convenient way. In Luminar Neo, you can view them as a single image but switch between versions easily.
Luminar Neo has excellent tools and presets that you can use if you’re running short on time and wish to achieve a certain look.
The best part of using Luminar Neo over rivals like Photoshop and Capture One is that this RAW image editor is easy to use. There’s no need to spend days or weeks getting used to the interface like with other programs. Even if you’re already invested in a program like Lightroom, you can use Luminar Neo as a plugin. And if you don’t want to download the whole program as a standalone app, you can just add the Photos for Mac Luminar Neo extension!
Lightroom and Photoshop by Adobe
How to edit RAW images in Photoshop? It seems like almost everyone who has even the weakest of connections with photography or design has heard of Photoshop. That’s because Photoshop has ruled the world of photo editing for a very long time. It’s the go-to editing tool for most people thanks to the amazing amount of control it provides. However, Photoshop isn’t really designed to be a standalone RAW photo editor, which is why it’s best used in combination with Lightroom, the other giant in the Adobe family. And how to edit RAW photos in Photoshop, you'll read below.
Before Lightroom, it was used with the Adobe Camera RAW plugin, which allowed you to download and enhance RAW images. The histogram in Camera RAW shows the current color parameters and updates as you adjust the settings. You can also sharpen it by increasing the radius. The higher the radius value, the wider the outline effect.
But almost everything has an alternative. The Camera RAW plug-in has Olympus Workspace. It's an almost identical free alternative to the plugin. It has a bit of a problem with the graphic processor, but if you don't deal with highlight and shadow corrections a lot, it will do for you. Also since it's free you can check it out thoroughly.
Lightroom has been around for a long time too and is usually the first choice when it comes to processing RAW images. You can find out more about how to edit RAW in Lightroom by going to the app's website. It isn’t quite as easy to use as Luminar Neo, but the features are more or less the same. Both Lightroom and Luminar Neo are known for their presets, which are capable of performing color correction, and adding brightness, highlights, and shadows using sliders. But there is a critical tool in Lightroom that Luminar Neo doesn't have: the Tone Curve. Controlling the curve is a great way to tweak the above options.
The best part about the Lightroom and Photoshop combo is that they can be used together; you can make basic adjustments to your RAW files in Lightroom and then bring them over to Photoshop if you want to go pixel-deep with your editing.
Capture One Pro by Phase One
If Luminar Neo is too simple for you and Photoshop is too feature-packed, then Capture One Pro is probably the one RAW image editor that you’ll like. It has a robust processing engine that’s usually deemed even better than Lightroom’s, plus a slew of features that pro users around the world are satisfied with. Capture One has become a direct rival to Lightroom and Photoshop when it comes to RAW processing thanks to its straightforward interface, depth of control, and amazing image quality.
Capture One has a very capable cataloging system so that all your files are stored in a systematic way and can be accessed with ease. The software also comes with built-in presets and styles that can give your photos a new look with just one click.
Photopea
Photopea is similar in functionality to Photoshop, but not as advanced and without AI technology. The app includes a RAW photo editor. However, the Photopea RAW has only exposure, temp tint, and contrast. It's missing the ability to independently adjust the blacks, whites, highlights, and shadows, as well as sliders for clarity and texture. It lacks masks and sliders for clarity correction. Those who are familiar with the Photoshop interface will quickly get used to it here as well. The interface and functions of Photopea are almost identical to Photoshop. That is, the app is almost perfect for standard photo processing, but for RAW editing there are much better alternatives.
Affinity Photo 2
Affinity decided to stand out from all the editors. They've updated their program with a new feature called double RAW processing. What is it? It's two versions processed with different settings, then combined and mixed with masks. It means that by mixing them together you get a perfect result, which you would probably not get with just one photo. You can find detailed instructions for double processing on the developer's website.
Photo by Evgeny Tchebotarev
Free RAW Photo Editors
There are a few options if you want to save money and use a free RAW photo editor.
GIMP
The main advantage of GIMP is that it’s an absolutely free RAW photo editor, without ads or paid upgrades. GIMP is open-source and offers a sufficient yet minimal set of features. The mobile and online versions often lag; however, this is the program you need if you don’t want to spend money but do want to edit RAW files for the first time. Unfortunately, only the iPhone version and desktop are available. XGimp is an iPhone edit RAW photo app. And for Android, there are only alternatives to the app.
Fotor
Fotor is a photo editor that’s available for desktop, mobile, and web app. It’s not the best RAW photo editor available, especially since it has ads. However, the desktop version lets you edit RAW files for free. Bear in mind that only the desktop version supports RAW conversion. Even though the possibilities for image retouching are also limited, this free RAW photo editor is a good start for finding out if RAW editing is for you. You can find out more about how to edit RAW photos on iPhones and Android from its website.
Darktable
Another free app. Darktable reads RAW files using the open-source library RAWSpeed. This app lets you take advantage of an extensive set of tools and masks to enhance your future photography. A detailed tutorial on how to edit a RAW photo is waiting for you on the official website. We should also mention that Darktable is one of the best free alternatives to Lightroom.
RAWTherapee
A wonderful free RAW editing application that allows you to process RAW images in a non-destructive way. That is, to retouch, color-correct and enhance your images. Its interface is not as easy as the previous application, but why not give it a try?
Krita
Although Krita supports this file format, its developers have limited the set of tools for processing. You cannot use a non-destructive way of editing. It contains only 3 basic tools: color correction, highlight, and exposition. But nevertheless, since it is free you can try it. There is also a bonus in the form of RAW photo editing Android version.
But if you’re serious about photography, you should probably invest in software that will let you achieve the best results instead of using free RAW photo editors.
Editing a RAW Photo in Luminar Neo: Bonus Guide
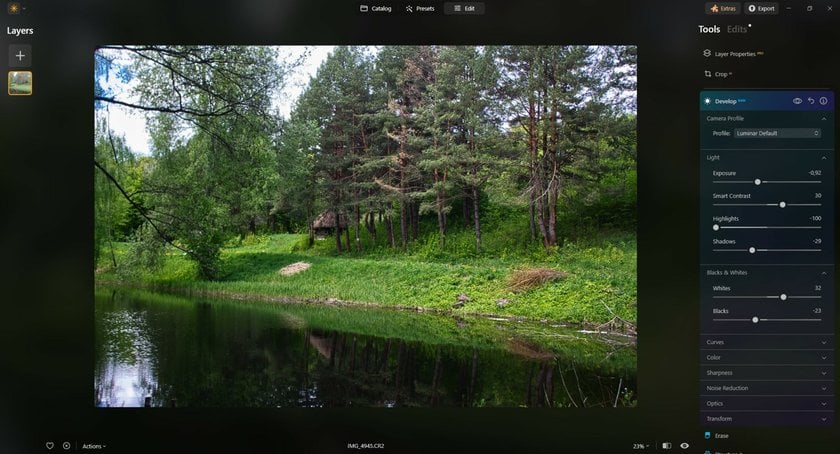
Let’s delve into the art of editing RAW images using Luminar Neo, a powerful tool for enhancing your photography. To begin, navigate to the Essentials tab, where you'll find the indispensable Develop tool. Here, a plethora of options awaits to elevate your images to new heights.

Light: Adjust exposure, contrast, and shadows effortlessly, refining the nuances of light in your composition.
Blacks & Whites: Enhance dark areas or lighten your image, imbuing it with rich tones and depth.
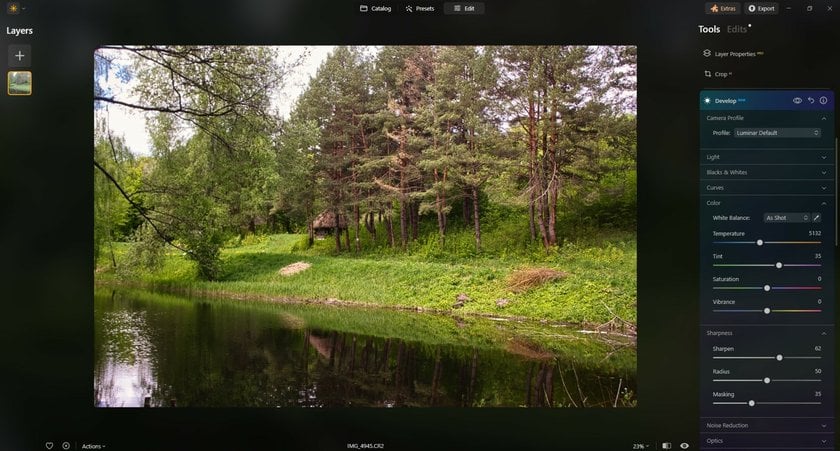
Curves: Craft your color palette with classic curves, adding a timeless dimension to your photographs.

- Color: Fine-tune the hues and saturation, breathing life and vibrancy into your RAW captures.
Sharpness: Banish motion blur and ensure every detail pops, giving your photos a crisp, professional finish.
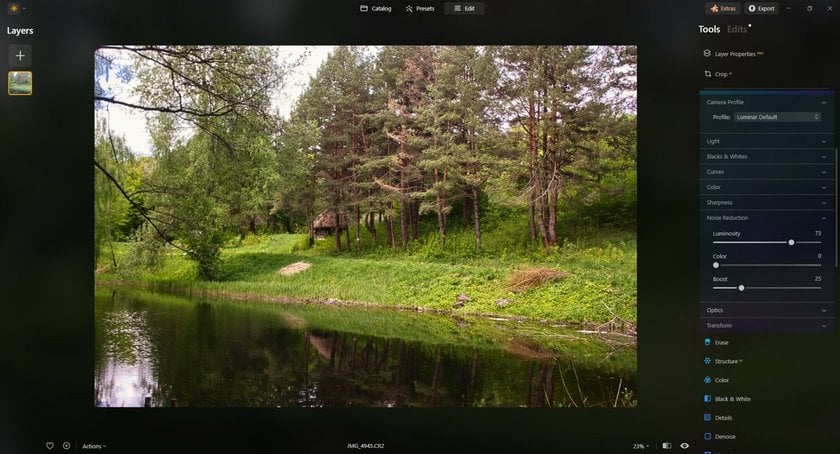
Noise Reduction: Bid farewell to unwanted graining, achieving a clean, polished look.
Optics: Correct flaws caused by your lens, including distortion, chromatic aberration, and vignetting, for pristine results.
Transform: Rectify perspective issues stemming from your lens's positioning during capture. Adjust vertical and horizontal alignments, rotation, and aspect ratios to perfect your RAW images with precision.
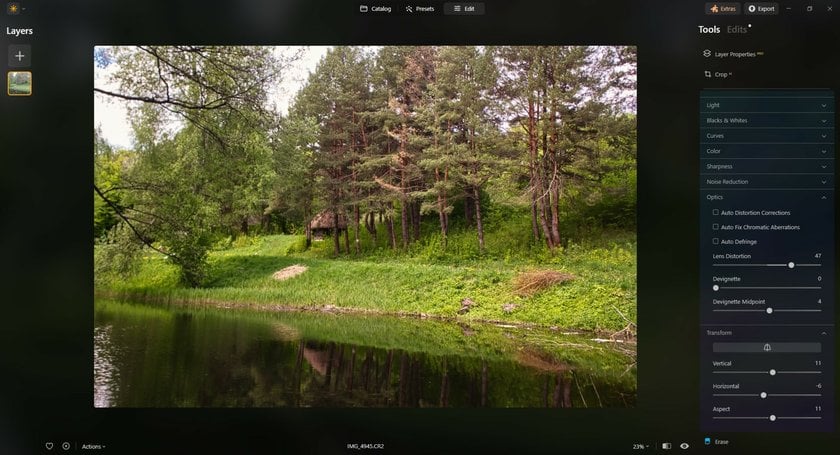


With these essential tools at your fingertips, Luminar Neo empowers you to transform RAW captures into stunning works of art, unveiling the full potential of your photography.
These three neatly organized sets of tools are all you need from a RAW photo editor. They form a powerful triad for correcting many of the problems encountered with unprocessed RAW photos.
In a world where RAW editors for serious users are often intimidating and difficult to use, Luminar Neo is truly a breath of fresh air. It’s an almost perfect blend of simple and complex tools that beginners and experts alike can take advantage of. We highly recommend giving Luminar Neo a try.
In Conclusion
If you’re a photographer who shoots in RAW or if you’re new to photography and want to know how to work with RAW photos, this article should help you decide which RAW image editor you’d like to work with. We’ve also given you a basic understanding of how to edit RAW images. Of course, the editor you choose will depend on what kinds of photos you take and how you plan on using the software, to check the best ways to edit RAW photos.
That’s why we suggest that before making any decision you give various programs a try and see which works best for you. Maybe you prefer a simpler interface over crazy amounts of control, or maybe you don’t mind spending time learning the software if it gives you all the control you can imagine. But no matter which software you choose, make sure it’s also a dedicated RAW converter. Otherwise, you might not be able to work with the RAW photos your camera captures.
For your RAW photography, we recommend Luminar Neo. It is currently considered the best way to edit RAW photos. It’s easy to use, provides all the features you need, and gives excellent results. You can buy Luminar Neo and own this RAW editor forever. Not ready to invest yet? Give it a try by clicking the button below.
Advanced yet easy-to-use photo editor
Get Luminar Neo NowFAQ
What adjustments can I make when editing RAW photos?
Any processing includes the following editing options: crop photo, add luminance, saturation, or shadows, set the white balance, and noise reduction. RAW editors usually have the same functions as photo editors. This processing is more demanding for post-production.
Do I need special equipment to edit RAW photos?
No. All you have to do is decide on the device you want to work on and choose an image-processing application.
What is the advantage of editing RAW photos over JPEGs?
Working with RAW format files means more control over editing, unlike a JPEG image. RAW editing turns an ordinary image into a polished perfect photo. That's why shooting in RAW is better to get high-quality photos.
Can I edit RAW photos on my phone or tablet?
Of course. There are RAW processing programs for Android and iPhone, but not as many as there are for the desktop.