How To Crop A Screenshot On Mac In 2026
Last Updated on January 16, 2025

Learn to quickly crop screenshots on your Mac using simple keyboard shortcuts, built-in apps, and advanced software.
Capturing the perfect screenshot on your Mac might sometimes include unwanted extras. You might wonder, "How do I crop a screenshot on my Mac?" Look no further!
This guide walks you through several methods to fine-tune your images right on your Mac. We'll cover everything from simple keyboard shortcuts to the built-in tools and even explore some online solutions.
Get ready to learn how to make your screen captures clean and focused with ease!
Your Go-To for Perfecting Crop and Perspective
Explore In Luminar Neo!Taking and Cropping Screenshots on Mac
Learning how to manage screenshots on your Mac can streamline your workflow and keep your files organized. Here's your guide to taking and cropping directly on your device!
Taking a screenshot on your Mac is straightforward, with a few key shortcuts. Whether you need to capture the whole screen or just a part of it, here's what to do:
Capture the Entire Screen

Press Command (⌘) + Shift + 3.
Your Mac will make a shutter sound, indicating the screen capture has been taken and saved to your desktop.
Capture a Selected Part of the Screen

Press Command (⌘) + Shift + 4. Your cursor will change to a crosshair.
Click and drag to select the desired area.
Release the mouse or trackpad button to capture the screenshot.
Capture a Specific Window
Press Command (⌘) + Shift + 4, then hit the Spacebar. Your cursor will switch to a camera icon.
Click on the window you wish to capture.
Capture the Touch Bar (if applicable)
Press Command (⌘) + Shift + 6.
Capture menu bar and system items (macOS Mojave and later):
Press Command (⌘) + Shift + 5 to bring up the screenshot toolbar at the bottom of your screen, offering various options for screen capture.
Now, you know how to take a cropped screenshot on Mac, and you can bypass additional steps, making it a swift solution to obtain only the part of the screen you need!
Whether you’re preparing a presentation, documenting software bugs, or saving important information, mastering these shortcuts can enhance your efficiency and accuracy in capturing screen content on your Mac!
If you accidentally took a screenshot of your whole screen and didn't select a specific area like we discussed earlier, but you intended to, don't worry! You can easily fix it by cropping it later. Let's look at four ways to do this!
Exclusive Tools of Endless Possibilities in One AI Editor
EXPLORE NOW!Method 1: Cropping in the Photos App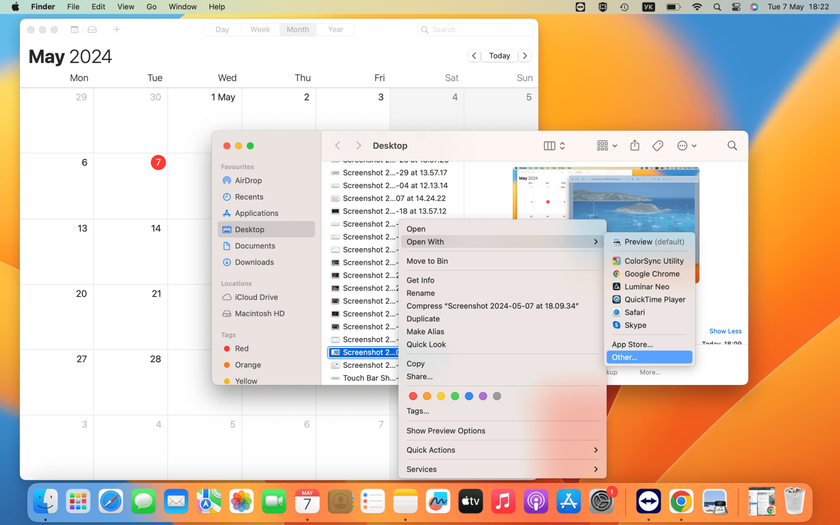

Can you crop a screenshot on your Mac using built-in tools? Absolutely, and the Photos app is one of the easiest ways to help you do it! To adjust your screen captures, follow these steps!
Step 1: Importing Screenshots
Two-finger click (or right-click) on the screenshot file you want to edit and select Open With > Photos.
If Photos isn't listed, click Open With > Other, navigate to your Applications folder, and choose Photos.
Step 2: Cropping the Screenshot
Once the screenshot is open in Photos, click Edit in the top right corner.
Switch to the Crop tab. Here, you can manually drag the edges of the crop box or select one of the preset aspect ratios to crop your image.
After adjusting the crop as needed, click Done to save your changes.
Method 2: Cropping in the Preview App
 Another excellent tool for cropping screenshots on your Mac is the Preview app!
Step 1: Opening Screenshots in Preview
Simply double-click the screenshot file. It will usually open in Preview by default.
If it doesn’t, right-click the file, choose Open With, and select Preview.
Step 2: Cropping the Screenshot
In Preview, click the pencil tip icon in the toolbar to enter the editing mode.
Click the selection tool in the markup toolbar to draw around the area you want to keep.
Once you have your area selected, click the crop icon (it looks like a square with lines around it) in the toolbar.
Confirm your crop by clicking the crop button again.
The Photos and Preview apps on your Mac feature user-friendly interfaces that allow you to crop screen captures effortlessly. Want to learn more about fine-tuning your images? Don’t miss our detailed guide on how to crop an image on Mac for additional techniques and insights!
Do You Know All the Functions of Your Mac Photo Editor?
Learn moreMethod 3: Online Tools for Cropping Screenshots
 If you need to crop a screenshot but don't have the right software installed, there is an Online Photo Editor that can help you do it right from your browser! It offers a simple yet powerful solution for photo editing right from your Google Chrome browser. Get started by either signing in or just uploading a photo directly to the editor.
How to Crop a Screenshot
Ready to perfect your screenshot? Here’s how to use the Online Photo Editor to crop your image:
Upload your photo to the editor.
Choose the Crop tool to fine-tune the composition of your image.
Apply your changes and admire your neatly cropped screenshot.
Beyond Basic Cropping
The Online Photo Editor isn’t just for cropping. Check out these handy tools!
Enhance AI: Quickly improve your photo with a slide of a button.
Light Adjustment: Tweak the lighting to get just the right mood.
Black and White: Give your photo a timeless black and white style.
If you’re planning to keep or share your edited masterpiece, make sure to sign in so you can download it in popular formats like JPEG and PNG. This editor makes it a breeze to enhance and share your images with the world or just your friends!
Method 4: Advanced Image Editing on Mac
 Another option for cropping your screenshot is to use Luminar Neo, an AI image editor for Mac. It includes a photo size reducer feature, allowing you to adjust the image dimensions without compromising quality.
Simply open your image in Luminar Neo, use the Crop AI tool to select your desired aspect ratio, and then apply the resize option during export to specify exact pixel dimensions. This process ensures your screenshots are perfectly sized for any use while maintaining sharpness and detail!
Conclusion
That wraps up our guide on how to crop a screenshot on your Mac in 2026. With all these tools available, you're well-equipped to handle any screenshot-cropping task! Whether you’re refining images for a presentation or simply organizing your screen captures, these tools will ensure your screen captures are both polished and functional. Explore these options to find the best fit for your needs and make your cropping process seamless and efficient.