How to Use a Green Screen for Photos: Pro Tips and Tricks
September 05, 2023

Discover our comprehensive guide to a green screen photo shoot and learn expert tips and tricks for achieving the best possible results. Let’s dive in!
reativity has no bounds. Nowadays, with the rise of technological advancements, photographers create scenes and imagery that were once only possible in our imaginations.
One such thing is chroma keying. Knowing how to use a green screen for photography unlocks a world of limitless creativity. Just by working on your PC for a while, you can create captivating imagery that tells a story, conveys an emotion, or simply dazzles the viewer with its beauty.
In this guide, we will discuss everything from setting up the green screen to taking the final shots. We'll also delve into post-processing techniques using AI-powered tools from Luminar Neo.
So… how to work with a green screen properly? Do you not know yet? Let's get to the bottom of this quickly!
Role of Green Screen in Photography
What does a green screen do? A popular question. Green screen technology is a vital tool in the film industry, allowing filmmakers to create scenes that would otherwise be too expensive or impossible. You’ll find green screen examples everywhere.
For instance, a weather forecaster appears before a computer-generated map, showing sunny or rainy conditions. Similarly, Dune characters are placed in vast desert landscapes or aboard futuristic spaceships. Different situations, one technique. But how does a green screen work in photography?
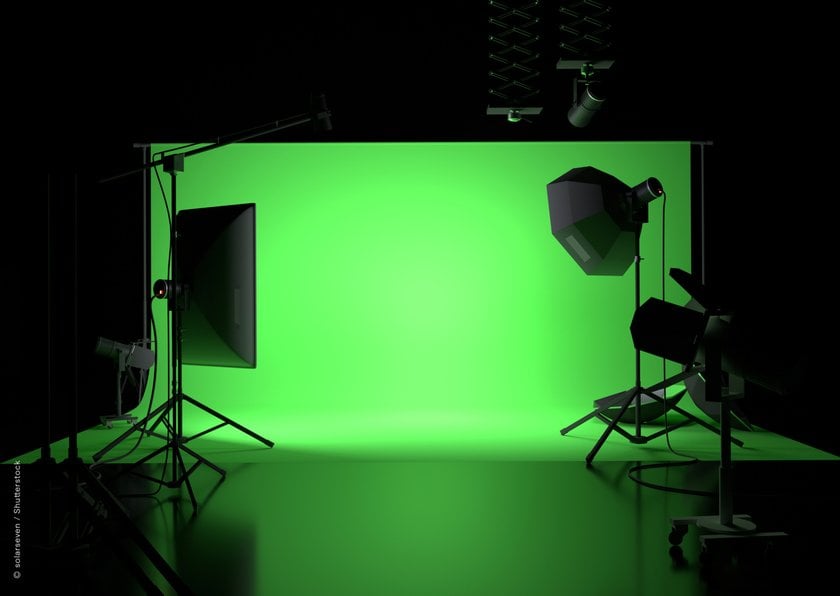
A green screen, or chroma keying, is a technique that involves photographing a subject against a solid-colored background, typically green or blue. Then, this background is replaced with a different image or scene during post-processing. Green is most commonly used because it is distinctly different from natural skin tones and is less common in clothing or props, making it easier to isolate and remove the background without affecting the subject.
The green screen technique is an invaluable tool for portrait photographers, commercial photographers, and anyone looking to add a creative touch to their photos.
Also read: How To Put A Black Background On A Picture In 5 Minutes
Getting Ready to Take Shots
Using a green screen in photography requires careful preparation and the right equipment to achieve the best results. Here are some key considerations when working with chroma keying:
Green Screen Selection
Let’s start by selecting non-reflective chroma keying material. The color should be a bright, uniform shade to ensure consistency across the background. Avoid any materials that produce glare or shiny spots, as these make keying out the background difficult during post-processing. Also, make sure it is large enough to fill the frame behind your subject completely.
Studio Setting Up
Proper lighting is crucial in any type of photography, and the green screen technique is no exception. Yes, it can be difficult, but we are here to give you some tips. First, ensure that the screen is evenly lit to make the keying process easier. Position lights correctly to avoid casting shadows on the background. Also, remember the distance between your subject and the green screen to prevent shadows and green color spills.
Next, as for camera position, set a tripod at a distance that allows you to capture your subject and chroma keying. Ensure that the screen fills the entire background of the frame.
Camera Settings and Equipment
Setting up your camera is the last step in preparing to take pictures, but it usually causes the most difficulties. Let's figure it out. First, we recommend using a camera with manual settings. Yes, it can be tricky, but that allows you to control the exposure, aperture, and ISO settings, which is crucial for a professional green screen photoshoot:
Use the lowest possible ISO setting, ideally 100 or 200, to minimize noise.
As for exposure, a good starting point is between f/5.6 and f/8 to ensure a sharp subject while maintaining good depth of field.
Depending on the lighting and aperture, set the shutter speed around 1/125 to 1/250 of a second to avoid motion blur while ensuring proper exposure.
We also remind you that shooting in RAW format is preferable for more flexibility in post-processing.
Process of Photography: Pro Tips for Great Pics
Using chroma keying revolutionizes photography, but it presents unique challenges in posing composition, lighting, etc. Here are tips for overcoming these challenges in green screen photography:
1. Since you'll replace the background in post-processing, be mindful of how your subject interacts with it. Avoid poses where the subject touches or leans against the background, as this can complicate keying out the chroma keying.
2. When composing your shot, consider the final background’s perspective. The angle and height you shoot your subject should match the background’s perspective. This is also important when directing your subject's pose.
3. Even lighting across the green screen is crucial for easier keying. Use softbox lights or diffusers to create soft, even light. Match the lighting of your subject to the lighting in the final background for a more realistic, cohesive result.
Remember: “How do you use a green screen?” is intertwined with “How often do you interact with it.” Practice and experimentation are essential in green screen photography, so we encourage you to shoot more and improve through experience
How To Edit Green Screen Photos


Once you have captured images, the next step is to process them to achieve the desired final result. Here are some essential steps and advanced techniques to follow for professional results:
Step 1: Key Out the Green Screen
 Use photo editing software to remove the green background from images. There are several options available, one of which is Luminar Neo, a powerful tool with advanced AI capabilities that can help in keying out the green screen and replacing it with a new background.
In the “Layer Properties” panel, navigate to the “Masking” tab and select one of the available methods for background removal. For images with a green background, we recommend using the “Color” tool, which allows you to effectively remove the desired color.
Step 2: Set New Background
 After removing the background, you can add a new one. It is important to select a background that matches your image's lighting, perspective, and overall mood.
Navigate to the Layers section and click on the “Add New Layer” button. From there, you can either select one of the pre-made assets or upload a custom image.
Step 3: Add Color Correction and Grading
 Adjust colors in your image to ensure they are accurate and pleasing to the eye. This involves fine-tuning your image's white balance, saturation, and hue. You can utilize the basic tools, such as the “Develop” and “Color” tools, to address your needs. Additionally, explore other options available in the Creative tab for more advanced adjustments.
Also read: Best Tablets For Photo Editing: Left Desktops Behind
Step 4: Retouch and Add Final Touches
 Retouch your subject to remove any blemishes, stray hairs, or other imperfections. Also, make any final adjustments to your image's exposure, contrast, and sharpness. At any time, you can select the “Brush” tool to remove or restore the elements you need. Additionally, remember to retouch your base layer photo for optimal results.
Step 5: Use Advanced Techniques
 For more advanced editing, you may want to consider using layer masks, blending modes, and other advanced techniques to achieve professional results.
Wrap-Up
Green screen background photography is a great way to get creative and professional results, not only in the film industry but also in photography! We hope our article was useful for you and maybe inspired you to create beautiful fairy images yourself.
FAQ
Why is green used more often than blue for chroma keying?
Green is typically chosen because it contrasts better with most skin tones and is less commonly found in clothing or props. However, blue screens are used when the subject includes a lot of green, such as in nature shots or with green clothing.
Can I use any green background, or does it have to be a professional green screen?
While any solid green background can work, professional chroma keying is designed to minimize reflections and provide consistent color. Non-reflective, high-quality materials are recommended to make the keying process easier and cleaner.
How do I ensure that my green screen background looks realistic when replaced?
To make your replaced background look realistic, match the lighting and perspective of the background to your subject. Pay attention to the direction, intensity, and color of the light in the new background to ensure it aligns with the lighting on your subject.
How do I avoid the green color spill on my subject?
To avoid a green spill (where the green screen color reflects onto your subject), ensure there's enough distance between your subject and the screen. Proper lighting can also help by reducing shadows and reflections.
What is the best software for green screen photography?
Adobe Photoshop is one of the best options due to its advanced masking and chroma key tools, allowing for precise background removal and post-processing. Luminar Neo is another excellent choice. It offers AI-driven tools that simplify the process, making it great for those seeking a streamlined workflow.