Best Lighting For Indoor Photography Beyond Natural Light
December 16, 2025

Even though natural light doesn't cost a thing yet effective, the "just use a window" approach doesn't always work. A photo session can be spoiled by weather conditions, like dense fog or harsh sun that throws odd shadows.
Also, shooting by the window limits usable space options and is obviously not suitable for night shoots. Due to these and many other reasons, we created this guide on how to get good lighting for pictures indoors, focusing on artificial options that always cooperate.
Common Indoor Light Problems and Professional Solutions
 Your eyes might read the room as bright and comfortable, while the camera picks up tangled color casts and odd shadow shapes. Overheads throw light straight down, resulting in dark eye sockets and shiny hotspots on the skin. Regular lamps create warm orange or sometimes greenish tints, while daylight leaking in from a window has a completely different color temperature. As if that wasn't enough, colored walls bounce their tint onto the subject, causing skin and clothing to pick up unwanted color casts.
No way to fix everything all at once. Tackle this in stages: turn off those ugly overheads, choose one main light source, and add or subtract others with intention. A soft key light, paired with a reflector or a negative fill, looks a million times better than five random bulbs fighting each other. Color issues should be handled at the source with gels or consistent bulbs, not just in post-production.
You can't rearrange the room every time you shoot, so you should master the logic of light to take control of any situation. That makes the properties of light in photography—direction, quality, intensity, and color—the foundation you build on.
Creating a Controlled Indoor Photography Setup
Since the "why" is covered, time for the "how" to assemble a lighting setup. Sure, relying on a couple of random lamps and panels is a definite flop, but the setup you choose shouldn't be complicated or expensive. What matters is functionality and that it aligns with your workflow.
Gear Basics for Beginners
When it comes to indoor photography lighting for beginners, details shouldn't tie you in knots. Start with kits that are ready to work right out of the box and affordably priced. Your first light rig might include:
Gear item | Function | Description |
Continuous LED panel or strobe | Provides adjustable, reliable illumination. | The key light is needed to properly expose the subject and control brightness. |
Umbrella or softbox | A light modifier diffuses the light source, making it larger and softer. | Minimizes harsh shadows, creating the soft, flattering look for studio results. |
Reflector (e.g., DIY foam board) | Bounces light back into the shadowed areas of the subject. | Fill light lifts shadows to reduce contrast, saving the need for a second light. |
Light stand and mounting bracket | Provides a secure, adjustable fixture to hold the light source and modifier off-camera. | Allows control of the direction and height of the light, which shapes different lighting patterns. |


First, learn what a single light does. Next, add the reflector to open up shadows. As you progress, add a second light for background or rim accents and gradually build your collection.
Advanced Gear That Guarantees Great Lighting Inside
To get the best lighting for photography inside, you need a kit that delivers accurate color, stable power, and surgical shaping control. This reliability is the difference maker if you're working for clients or matching images across a series.
If you rely heavily on natural light, getting flashes will smooth out your routine to the point where you'll ask yourself, "Why didn't I get these sooner?" Two powerful speedlights are usually enough to fill an ordinary-sized room with light. Portable flashes can sit on the camera or off to the side, so you’re no longer glued to the window. Using them, you can go for a lower ISO and still get sharp images.
Those who work in studio settings prefer larger and more dedicated flashes, which are strobes. They are used to light up large rooms as well as overpower strong sunlight, but not all of them are suitable for on-location indoor shootings. A big advantage of strobes is the professional and repeatable results, which are highly appreciated for commercial work.
High-CRI LED panels are another piece of gear pros are going for to gain control over color and brightness. They are constantly lit, they don't flash, and provide adjustable color temperatures along with brightness levels. One of the nicest things about LED panels is how they can imitate daylight, so your scene doesn’t feel “fake lit.”
Maximizing Your Setup Efficiency
Flags and scrims are tools for controlling light on set. A flag is an opaque black panel used to block light. Want deep shadows or a pure black background? Use a flag to kill the light spill. A scrim is a mesh or net material placed in front of the light source to reduce its power. A scrim dims the light without requiring adjustment to the light's actual output settings.
To level up and speed up your indoor photography lighting setup, you can get a light meter. Thanks to this device, the photos end up being perfectly exposed every time, even in multiple light settings. It's possible since light meters calculate camera settings, namely aperture, shutter speed, and ISO. 
One more tool to mention is the trigger. Once you add one to your routine, you’re free to walk the set and watch the light while changing flash power on the fly, no more back-and-forth trips to the stand.
Studio Lighting Techniques
 Pro-level studio lighting effects are all about knowing how your lights behave so you can always combine them the right way. Your goal is to see the purpose of every light source and exactly where it lands on your subject. Some dependable techniques to explore are:
Key and reflector combo. Place one soft key light at an angle to shape the face, and use a white wall or reflector on the opposite side to lift shadows.
Classic three-point setup. Build a key, a softer fill, and a subtle rim or background light so the subject feels separated from the room.
Feathered light. Aim the softbox slightly past the subject so they sit in the edge of the beam, which gives smoother transitions and avoids shiny hotspots.
Controlled spill. Use flags, grids, or barn doors to stop light from washing over the background when you want more contrast and depth.
Early on, adjusting a lamp's power or angle is like fumbling blindly, hoping to stumble onto the correct light. But after a few sessions, you’ll know where you want your key light just by glancing at the room.
Practical Indoor Lighting Scenarios
Your setup may vary from one shoot to the next. For tangible examples, let's dissect different photo shoot scenarios.
Portraits and Lifestyle Sessions
 One soft key light and a reflector are basically all you need for a relaxed portrait at home. To get this shot, fire light above and to the side of the person, then bounce a bit back in from the shadow side. As for tighter headshots, a second light or background kick may be needed, along with flags or black foam board to prevent light washing over the walls.
Product and Still-Life Shots
 To capture small objects, use a softbox or strip light along with a reflector. The result is that the item is wrapped in even light, and it's you who gets to decide where shadows should fall. If repeatable shots are what you are aiming for, get a mini soft tent or DIY light box to keep things consistent. As for annoying, harsh reflections on shiny surfaces, you can tame them by angling the light and camera until they disappear or get a pleasing glow.
Real Estate and Interior Shoots
 When shooting homes, the light needs to represent the space, yet be inviting enough to draw people in. The main problem is that warm indoor lamps tend to fight with the cool window light, which can be challenging to balance later in real estate photo editing. To prevent this, unplug the lights or match the color temperature by placing colored gels over your flashes.
Creative Low-Key Photography
 Low-key lighting sculpts drama and intrigue through shadow. To summon this setting, darken the room, isolate the subject with a directional light source, and control light spill with flags. Set the subject in the light beam, with low-key photography settings doing the rest. Use a low ISO, moderate aperture, and a shutter speed to make the background dark.
Finishing Indoor Images in Post
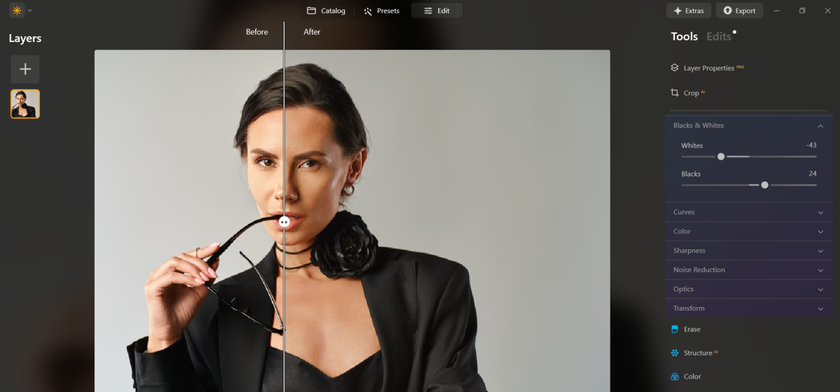
Inside, the light can feel like a pile-up: yellow bulbs, blue daylight, bright monitors, and dark corners. That’s why editing ends up being the place where you finish the lighting choices you started on set. Lightroom, Photoshop, Luminar Neo—whichever you use, preserve subject detail, guide the contrast, and tidy up color. One effective sequence is:
Set exposure and contrast. Place overall brightness, adjust highlights and shadows so faces and main objects read clearly.

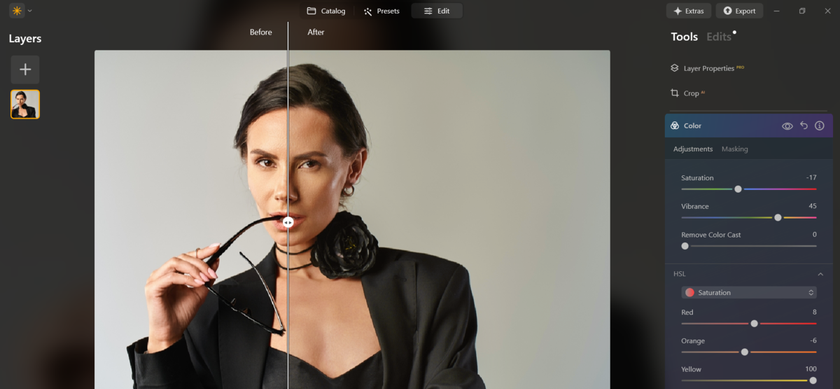
Correct white balance. Choose the dominant light source and neutralize unwanted casts from other lamps or windows.
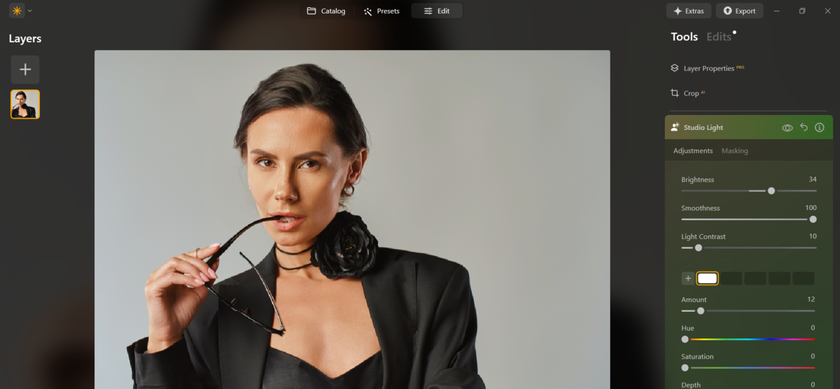
Shape light locally. Use targeted edits to highlight the areas that matter most and ease back anything that distracts, so the subject becomes the obvious place to look.
Refine color and clarity. Balance saturation, control grain, and highlight texture where it matters, so the end result echoes the lighting feel you created on location.


The aim isn’t to rescue a lost cause, but to back up the choices you already made when you set those lights in place.
Embracing the Process
As the placement of a modifier becomes instinct, and you understand how a lamp or a panel will shape the scene, indoor lighting photography transitions from a struggle to a statement. Don’t worry if at first setups flop. Your toolkit will change, and eventually you'll discover the gear that is best and most comfortable to work with. You can even bring in some advanced and not-so-necessary tools that speed up the process. Over time, you graduate from "hoping the light looks okay" to masterfully shaping it, no matter where you’re shooting.


