How To Transfer Photos From iPhone To Computer: Simple Ways
February 20, 2026

Having trouble transferring iPhone photos to your computer? Follow our simple step-by-step guide to move your images quickly and hassle-free!
Sometimes, things don’t go as planned. Why can't I transfer photos from my iPhone to my computer? It’s a common issue that can come down to incompatible settings, outdated software, or even something as simple as a faulty cable.
Luckily, this guide is here to help. Below, you’ll find a handful of easy, step-by-step methods to transfer your photos smoothly—no stress, no confusion. So grab your iPhone, plug it in (or go wireless), and let’s get started!
Wireless Transfer Methods
How to download photos from an iPhone to a computer? Good news—you don’t need any cables. As a photographer, I often transfer images on the go, and wireless methods have made the process quicker and more flexible than ever. Whether you're working on a Mac or a PC, there are easy ways to send your photos straight from your iPhone without plugging in a single wire.
Here are two reliable methods I use regularly to move my photos wirelessly. Let’s dive in!
1. iCloud Photos: Seamless Sync Across Devices
 iCloud Photos automatically syncs your images and videos across all your Apple devices, including your computer. This ensures that your photo library is consistently updated and accessible wherever you are.
How to Enable iCloud Photos:
(On your iPhone)
1. Go to Settings > [your name] > iCloud > Photos.
2. Toggle on Sync this iPhone.
(On your Windows PC)
1. Download and install iCloud for Windows from the Apple website.
2. Sign in with your Apple ID.
3. Select Options next to Photos and check iCloud Photos.
4. Click Done, then Apply.
Downloading Photos:
(On your Windows PC)
1. Open File Explorer and click on iCloud Photos in the Navigation pane.
2. Double-click a thumbnail to download and view it.
Alternatively:
1. Visit iCloud.com and sign in with your Apple ID.
2. Navigate to Photos, select the images you want, and click the download button.
Tips for iCloud Photos Use
Managing Your Storage: You start with 5GB of free iCloud storage. If you need more space for your photos and videos, consider upgrading your storage plan.
Editing and Deleting: Edits or deletions you make will reflect across all devices. Deleted images can be recovered from the Recently Deleted folder within 30 days.
Downloading High-Resolution Copies: For the highest resolution, use iCloud.com. Click the picture or video, then the download button in the top right corner or the More Download Options for more choices.
Read also: How to Combine Photos on iPhone: Shortcut & App Guide
2. AirDrop: Quick Transfers Between Apple Devices
 AirDrop allows you to quickly and securely transfer images directly between Apple devices without needing the internet—just Wi-Fi and Bluetooth. It's especially handy for transferring a few photos on the go.
1. Check Compatibility: Ensure both your iPhone and Mac support AirDrop and have the latest OS versions.
2. Enable Necessary Settings:
Turn on both Wi-Fi and Bluetooth on both devices.
Ensure neither device is set to 'Personal Hotspot'.
3. Adjust AirDrop Settings:
(On your iPhone)
Go to Settings > General > AirDrop.
Select Everyone or Contacts Only.
(On your Mac)
Open Finder.
In the menu bar, select Go > AirDrop.
Set Allow me to be discovered by to Everyone or Contacts Only.
4. Transfer Photos:
Open the Photos app on your iPhone.
Select the photos you want to transfer.
Tap the Share icon and choose your Mac from the AirDrop section.
Accept the transfer on your Mac, and the pictures will be saved directly.
Both iCloud Photos and AirDrop offer efficient ways to transfer your photos wirelessly. Choose the method that best fits your workflow and enjoy seamless integration across your devices.
Wired Transfer Methods
While wireless transfers are great for convenience, sometimes you just want speed and reliability—especially when moving large batches of high-resolution photos or videos. As a photographer, I often rely on a good old cable when transferring RAW files or entire shoots. A wired connection gives you a direct line from your iPhone to your computer—no dropped signals, no waiting on Wi-Fi.
Here’s how to transfer your images using a USB cable, whether you’re on a Mac, Windows 10/11, or even Windows 7.
1. For Mac Users: Using the Photos App

Connect your iPhone to your Mac using a USB cable.
Unlock your iPhone and tap "Trust" if prompted.
Open the Photos app on your Mac.
If the Import screen doesn’t open automatically, select your iPhone from the sidebar.
Choose where to import your photos—either select an album or create a new one.
Select specific images to import, or click "Import All New Photos" to transfer everything not yet on your Mac.
Pro tip: Keep both macOS and iOS updated to avoid glitches with device recognition.
2. For Windows 10/11 Users: Using File Explorer
Connect your iPhone to your PC with a USB cable.
Unlock your iPhone and confirm the “Trust this computer” prompt.
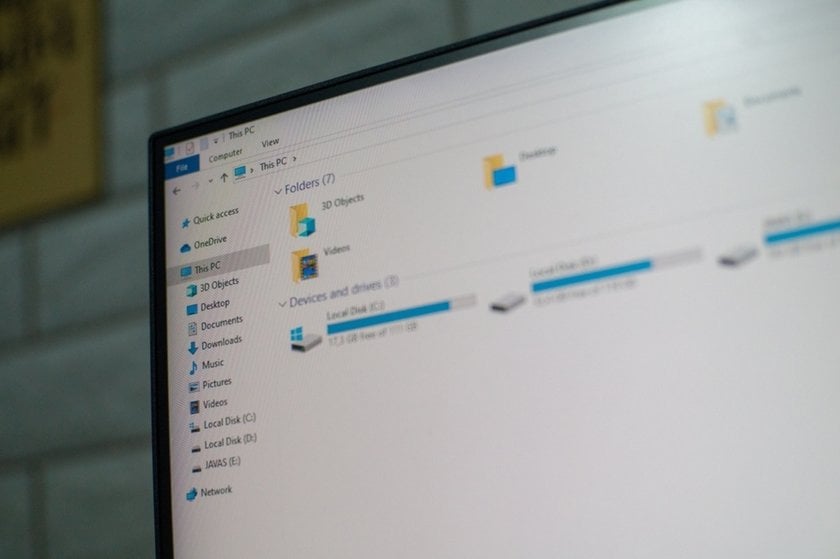
Open File Explorer. You’ll see your iPhone listed under This PC or Devices and Drives.
Navigate to the DCIM folder, where your photos and videos are stored.
Manually drag and drop or copy the images you want into a folder on your PC.
Note: If iCloud Photos is turned on, only optimized (lower-resolution) versions may appear. To fix this, ensure original files are downloaded to your iPhone before transferring.
3. For Windows 7 Users: Using AutoPlay
Connect your iPhone to the PC with a USB cable.
Allow the trust prompt on your iPhone.
The AutoPlay dialog box should appear. Select "Import pictures and videos".
Follow the prompts to choose the destination folder and import options.
Photos are typically organized into folders by import date.
Tip: If AutoPlay doesn’t appear, check if your USB port or driver needs updating.
Organizing and Editing Your Images Post-Transfer
Now that you know how to transfer your photos from your iPhone onto your Mac (or PC), it’s time to take things a step further. Moving your images is just the beginning—organizing and editing them will help you get the most out of every shot you’ve captured.
Organizing Your Photo Library
 A clean, structured photo library makes editing easier and keeps your best work within easy reach. Here’s a simple workflow I recommend:
Create dedicated folders or albums for different shoots, trips, or projects.
Use clear and consistent file names like “2026_Paris_StreetPhotography” instead of relying on random numbers.
Add tags, keywords, or star ratings to quickly sort through large collections.
Back up your images to an external hard drive or cloud service—you’ll thank yourself later.
Spending a little extra time organizing now saves hours of frustration later when you're searching for that one perfect shot.
Read also: How to Hide Photos on iPhone? Simple Guide 2025
Enhancing Your Photos
 Once everything is sorted, it’s time to bring your images to life through editing.
Use your computer’s built-in editing apps (Photos on Mac or Windows Photos) for basic adjustments like cropping, straightening, or tweaking brightness.
For more advanced work, an AI-powered iPhone pic editor makes retouching faster and more intuitive, helping you fine-tune details while keeping the creative process smooth.
One trick I love: Start by selecting your absolute favorite shots before editing. Focusing on the best ones first keeps the creative energy flowing and helps you build a stronger final collection.
Conclusion
This guide has walked you through the best ways to transfer photos from your iPhone to a PC, from using iCloud for easy wireless syncing to relying on a direct USB connection for fast, reliable transfers. No matter which method you choose, moving your images to your computer is now simple and efficient.
After transferring your photos, the next step is polishing your work. For editing photos on Mac, tools like Luminar Neo offer powerful options to enhance colors, adjust details, and bring out the best in every shot—all without overwhelming your workflow.
With the right methods in place for transferring and editing, you’re ready to take full control of your digital photo collection. Organize your images, refine your best moments, and keep your creative process smooth and rewarding.