To save changes applied to your image, you need to export it. To do that, click on ‘Export’ button in the bottom right-hand corner of Photolemur window.
To save changes applied to your image, you need to export it. To do that, click on ‘Export’ button in the bottom right-hand corner of Photolemur window.

In Photolemur, you can export your image to Disk, Facebook, or Twitter.

Exporting to social medial is pretty easy, as it opens chosen platform as soon as you select it in Photolemur.
In this section, we’ll describe export setting, which can be chosen when you save your image (or images) to disk.
Once you click on Export > Disk, you can see the window, where you can select a folder where you want to save your image, file format and image quality.

There’s also ‘Advanced Settings’ button, which will open Photolemur window with the advanced export options.
Photolemur export: Advanced Settings
Photolemur advanced settings allow you to choose the location where you want to save your photos, rename, resize your images, choose format, quality, and color profile.
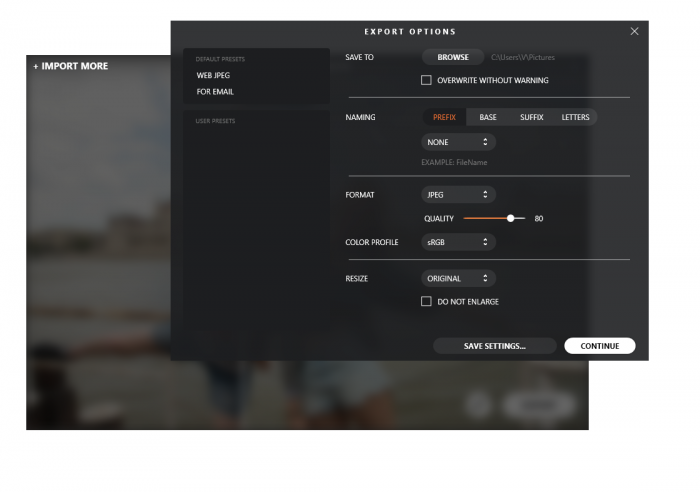
All these setting can be saved as settings presets, the list of which is located on the left side of export window.
There are 2 default presets in Photolemur: ‘WEB JPEG’ and ‘FOR EMAIL’.
If you want to save your settings as a preset, click on ‘Save settings’ button on the bottom of the window. After that your modified settings will be saved as a user preset.
Save to
Under ‘Save to’ section, you can select a folder where you want to save your files. If you want to overwrite your original photo without a warning, checkmark ‘Overwrite without warning’ box.
Note:Your original photo will be overwritten only if the exported image and original image names match.
Naming
Your image’s filename can be modified in different ways. You can add prefix, suffix to your original filename, change the base and choose your letters to be upper-case or lower-case.
Prefixes, suffixes and base can be modified in the following ways:
NONE
If you select this option under Prefix and Suffix, there will be no prefix or suffix added to your filename. This option can’t be selected under base and is replaced by ‘Filename’ option. If you select ‘Filename’ under base and ‘None’ under Prefix and Suffix, your filename won’t be modified.
FILE NAME
- If you select FILENAME under Prefix, the prefix identical to your file name will be added.
- If you select FILENAME under Suffix, the suffix identical to your file name will be added.
e.g. I modify an image named ‘London.jpeg’ and select Prefix > Filename. The exported image name will be ‘London_London.jpeg’. If I also select Suffix > Filename, the image will be saved as ‘London_London_London.jpeg’.
CUSTOM TEXT
Custom text allows you to type the name manually. If you want to modify your image name without adding any prefixes/suffixes, you should select ‘Custom Text’ under Base and type there a new name.
COUNTER
In counter field you need to type a number, which will be added to your image. If you’re exporting more than one photo and type ‘4’ in the counter field under Suffix, your images will be saved as ‘Filename_4.jpeg’, ‘Filename_5.jpeg’, ‘Filename_6.jpeg’ etc. If you select ‘Counter’ under Base, your filename will be replaced by that number.
TIMESTAMP
If you select ‘Timestamp’ under Prefix or Suffix, current date will be added before or after your filename. If you select it under Base, it will replace your original filename.
‘Letters’ has the following options for you to choose:
- Leave as it is
- Upper-case
- Lower-case
Format, Color Profile
In Photolemur, you can save image in the following formats:
- JPEG
- PNG
- TIFF
- JPEG-2000
- Photoshop
Color profile options are the following:
- sRGB
- Adobe RGD
- ProPhoto RGB
Resize
You can resize your image by Long Edge, Short Edge or Dimensions. Or you can leave your original image size.
Resize by Long Edge means that you can type the desired length of the longer side of your image. The shorter side will be resized accordingly.
Resize by Short Edge means that you can type the desired length of the shorter side of your image. The longer side will be resized accordingly.
Dimensions setting allows you to type the dimensions you need in pixels.